Are you having trouble when you try to update or publish things on your WordPress website? Sometimes, you might have seen an error message saying Updating Failed or Publishing Failed, and it can be really confusing, especially if you’re new to this, even experienced users sometimes get confused by these messages.
So don’t worry if you have encountered this error too. A lot of WordPress users have encountered this error and they have reached out to us, as if we can provide some solutions.
So here in this guide, I will walk you through the step by step process on how to easily fix WordPress updating failed issue and I will also explain why these kinds of errors happen when you’re trying to update or publish. So let’s get started.
Why Updating or Publishing Failed Error in WordPress?
The WordPress Update Failed or Publishing Failed error is a common issue that users may encounter while working on their websites. These errors typically mean that WordPress is unable to save or publish your content and the common causes of this issue are:
- Due to internet connection problems.
- REST API being blocked.
- Incorrect URL settings:
- Conflicts between plugins.
- Website Firewall Service issue.
Now to fix this issue, follow the below steps one by one with close attention to easy understand the solutions and implement the fix.
Also Read: How to Update WordPress Manually and Automatically
Step: 1 Check Your Internet Connection
Making sure that your internet connection is working well is the first step to fixing the Updating Failed or Publishing Failed error on your WordPress website.
If your connection is unstable or if it’s too slow, WordPress may not be able to save your changes and it may show you the error message. So before looking into any other solution, first check your Internet connection and make sure it’s working fine.
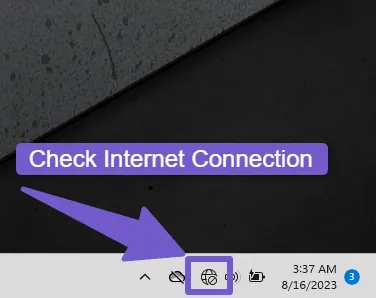
So to check your connection, try to load any other website, if it is loading too slow its mean your internet is too slow and in WordPress, when you click the update button, there is a time limit for the updating process, as your internet connection is slow, the updating process exceeds this time limit and you will get an error message
So what you can do is to connect to another fast internet network or wait if the current internet connection restores. You can also try restarting you modem, so go ahead and give this solution a try.
Step: 2 Clear Your Browser Cache and Cookies
Sometimes, the Updating Failed or Publishing Failed error in WordPress can be caused by outdated or corrupted files in your browser cache. Clearing your browser cache and cookies can often resolve this issue.
But first, you need to know if the the error is occurring due to browser cache and to find this a very simple way is to open your WordPress Dashboard in another browser, there try to publish or update your page/post, if it updates successfully, then the error can be due to browser cache and cookies so to clear it follow these steps.
But first, you need to know if the the error is happening due to the browser cache and cookies and an easy way to confirm this is to access your WordPress Dashboard via a different browser and attempt to publish or update your page/post there. If the update goes through smoothly, it means that the error could be related to browser cache and cookies.
So to clear browser cache and cookies follow these steps:
- Click on the three dot menu icon in the top right corner of the browser.
- Go to More Tools > Clear Browsing Data or Settings > Privacy and Security.
- Select Cached images and files and Cookies and other site data, then click Clear data.
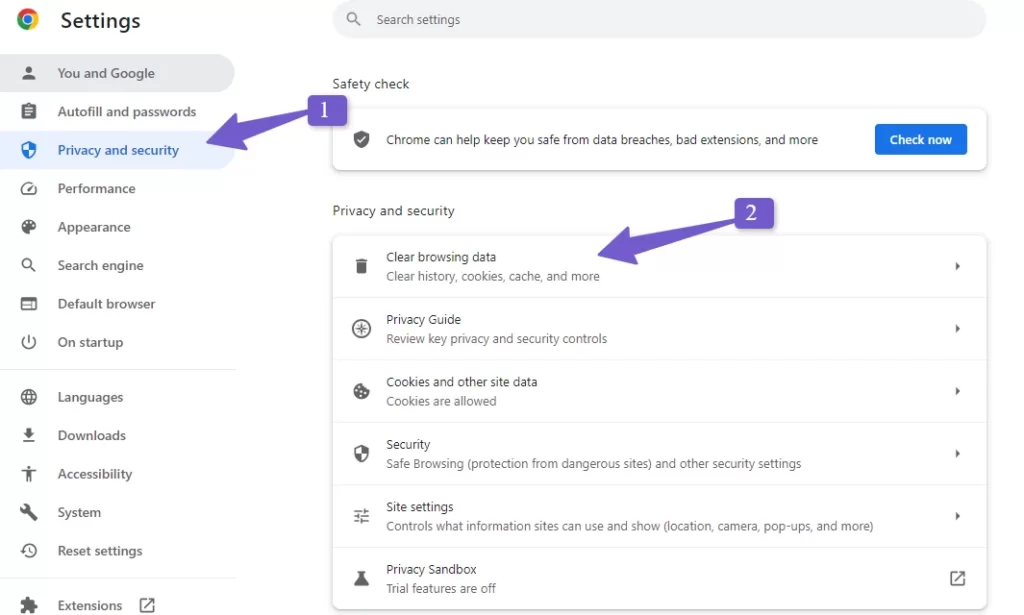
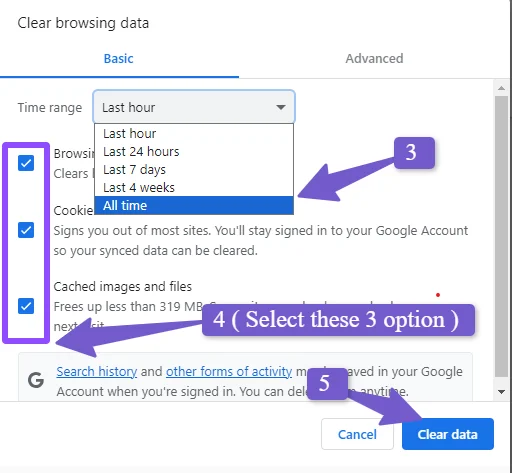
Now navigate to your website and try to update your content. However, if the issue is not with cache and cookies, proceed to next solution steps.
Step: 3 Checking if the REST API is being blocked
Assuming your internet connection is working well and browser cache is also cleared, let’s move to the next important step, which is to check whether your WordPress REST API is being blocked. You might be wondering what is REST API in WordPress, Well don’t worry, I explain every complex terms used in my guides, so you can have clear understanding of everything.
Think of the REST API as a set of instructions that developers follow when they are creating their API. It lets outside applications or servers talk to and work with your WordPress site. In simple terms, it’s like a bridge between your WordPress website and the server.
So if the REST API is blocked, your WordPress site can’t talk to the server to save or publish your content which can cause errors like Updating Failed or Publishing Failed.
Now in order to check if the REST API is being blocked on your WordPress website, follow these steps:
- Log into your WordPress dashboard.
- Navigate to Tools > Site Health.
- Click on the Status tab at the top of the page.
- Scroll down to the REST API section.
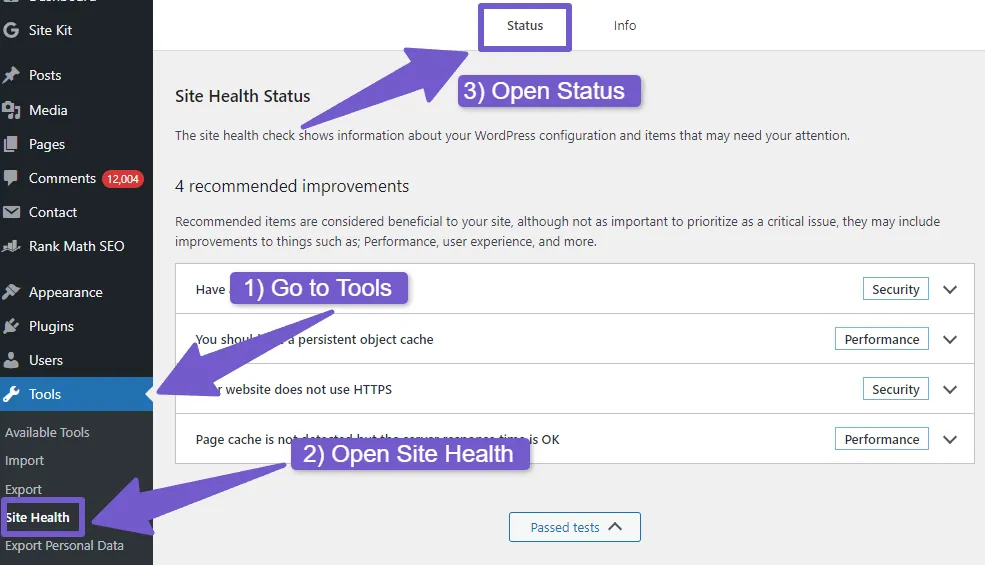
If there is an issue with the REST API section, you will see “The REST API encountered an unexpected result” under the recommended improvements tab, where some debugging information will be also shown.

You will need to investigate what’s causing the block. It could be a plugin, a security measure implemented by your host, or your hosting provider’s rules and to find the cause, you might need to contact your hosting provider or disable plugins one by one ( I will be showing this in step 4).
However, if the REST API is not blocked, you wont see it under recommended improvements tab, below there you will see passed tests, click on it and there scroll down to REST API section, and there you will see the status of API which is will be saying The REST API is Available.
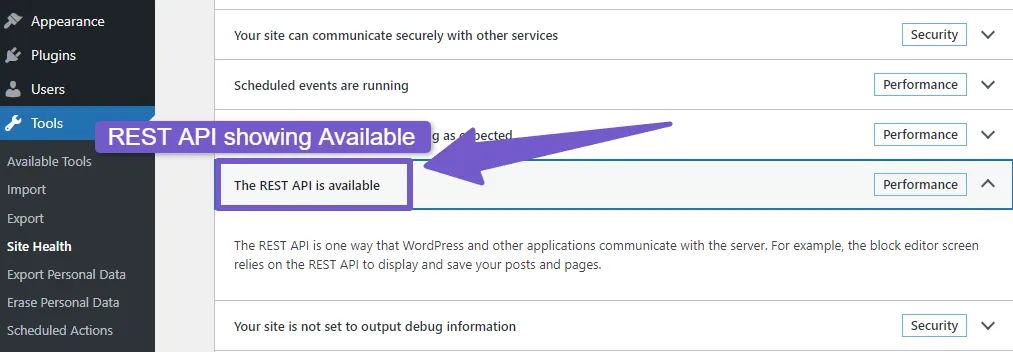
Now, if the REST API isn’t blocked, you won’t see it under the recommended improvements tab. Instead, you will see a button for tests that are passed. Click on this, then scroll down to the REST API section. Here, you’ll see a status update saying The REST API is Available, which means the problem is not with the REST API. So let’s move on the next step.
Also Read: How to Fix ‘Failed To Load Resource’ Error in WordPress
Step: 4 Checking Your URL Settings
The next thing to do is to double-check your URL settings. Sometimes, the Updating Failed or Publishing Failed error can occur due to incorrect URL settings. If your website URL is not set correctly in the WordPress settings, it can cause this issue.
So to check your WordPress URL settings follow these steps:
- In WordPress Dashboard > Go to Settings, then click on General.
- Look for two fields – WordPress Address (URL) and Site Address (URL). Make sure both of these have the same URL.
- If the URLs are different, change them so they match and check if WordPress updating or publishing error is gone.
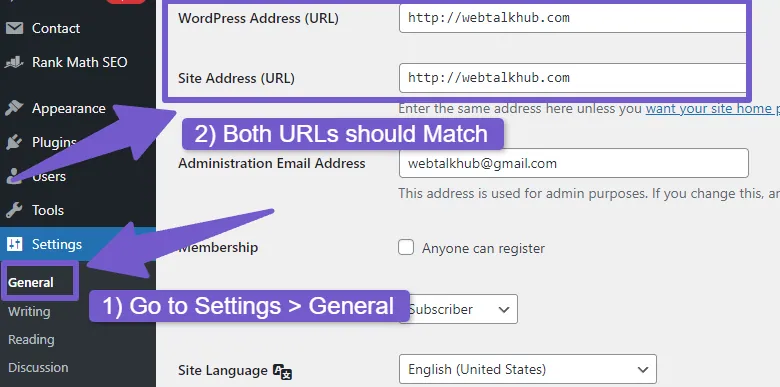
However, if the URL settings are already same and the issue is not with the URL settings then move on to next solution step.
Step: 5 Checking for Plugin Conflicts
Plugins are a great way to add functionality to your WordPress site. However, not every plugin is compatible with each other and they can sometimes conflict with each other or your maybe with your theme, leading to various issues, including Updating Failed or Publishing Failed errors.
So as I discussed earlier too in step 2 that if “The REST API encountered an unexpected result” error happened and while looking at the debugging information, you found that the issue maybe due to plugin conflicts, then follow this step to look for the conflicting plugin.
However, if the The REST API is Available, still you need to check for plugin conflicts if the issue is still there.
- In your WordPress dashboard, go to Plugins.
- There temporarily deactivate all your plugins, this won’t delete them, it just temporarily disables them.
- Try to update or publish your post again. If it works without any errors, it means that a plugin conflict was causing the issue.
- So to find the problematic plugin, you will need to reactivate your plugins one by one. After each reactivation, try to update or publish your post.
- If you encounter the error again after reactivating a specific plugin, this indicates that this plugin is likely causing the conflict.
- Now once you have identified the conflicting plugin, first check if there is update available for that plugin, maybe it’s not updated that why causing the issue.
- If it is already updated, contact this plugin support team, and elaborate your issue, they will look into and will fix it for you, otherwise find an alternative plugin that offers similar functionality.
Note: Always remember to keep your plugins updated to the latest version as outdated plugins are more likely to cause conflicts and can expose your site to security threats.
Checking for Theme Conflict:
Just like plugins, themes can also cause conflicts which could lead to the Updating Failed or Publishing Failed error. The theme you are using might not be compatible with a plugin or maybe with the WordPress version you are running.
So to check if your theme is causing the issue, follow these steps:
- In your WordPress dashboard, go to Appearance > Themes.
- Activate a default WordPress theme like Twenty Twenty-two temporarily( if you don’t have it installed on your website, add it).
- Now try to update or publish your post again. If it works without any errors, it indicates that your theme was causing the conflict.
- If you find that your theme is causing the problem, first check if an update is available for your theme. Often, theme developers release updates to fix compatibility issues with the latest version of WordPress or popular plugins.
- If your theme is already up-to-date, get in touch with the theme’s support team and explain your issue. They should be able to help you resolve the conflict.
- If the support team is unable to help, or if the theme is no longer being updated, you may need to consider switching to a different theme.
Step:6 Checking Website Firewall Service if Blocked
Sometimes, your website firewall service can also cause the Updating Failed or Publishing Failed error. If your firewall is blocking requests from WordPress, it can prevent content from being saved or published.
To check this follow these steps:
- Log into your firewall service provider’s dashboard. This will be different depending on the provider you use ( I am using Cloudflare ).
- Look for any logs or reports of blocked requests from your WordPress site by clicking on your domain > Security > WAF, there click on Tools tab.
- If you see any blocked requests, you’ll need to adjust your firewall settings to allow these requests. How you do this will depend on your firewall provider but the general steps should be same.
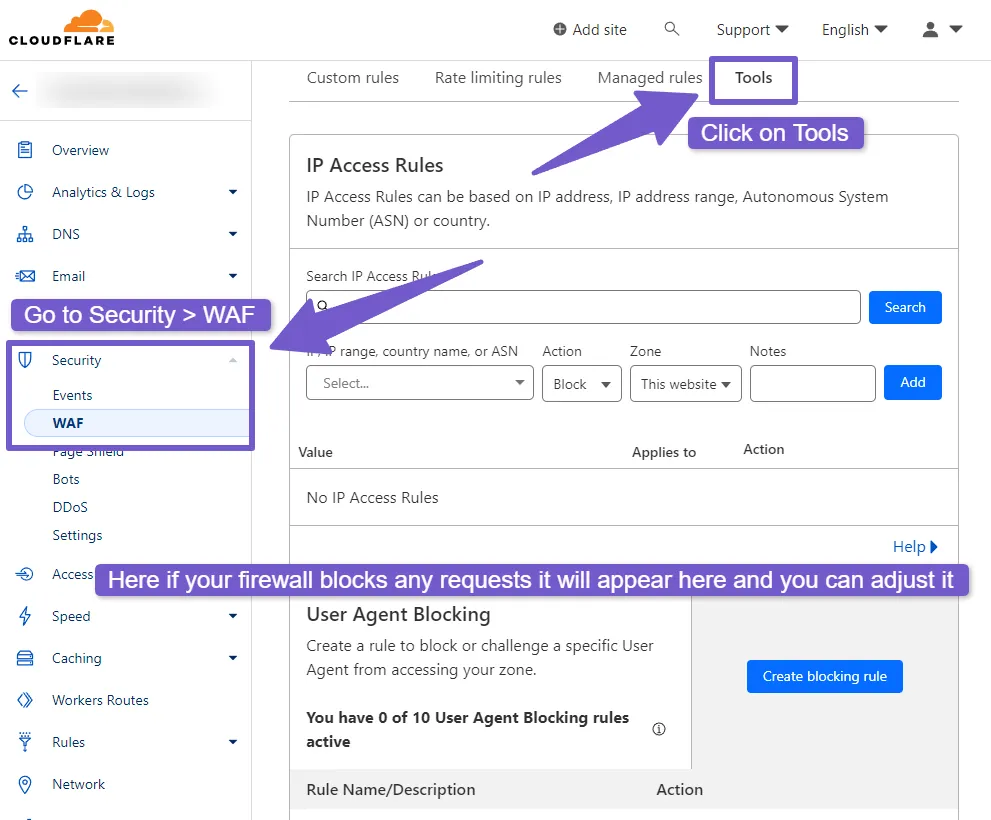
However, if you are unsure how to do this, reach out to your firewall provider’s support team for assistance elaborate your issue and they will help you out with it, you can also reach out to us through our contact page, we have expert WordPress developer who will help you out with this issue.
Step 7: Turn On and Examine WordPress Debug Log
The WordPress Debug Log is an essential tool for diagnosing issues within your WordPress site. It records any errors or issues that arise, providing valuable insights to help troubleshoot problems. So if you are facing the updating or publishing error, it will record it and will help you identify the source of this issue.
So here is how you can enable the WordPress Debug Log:
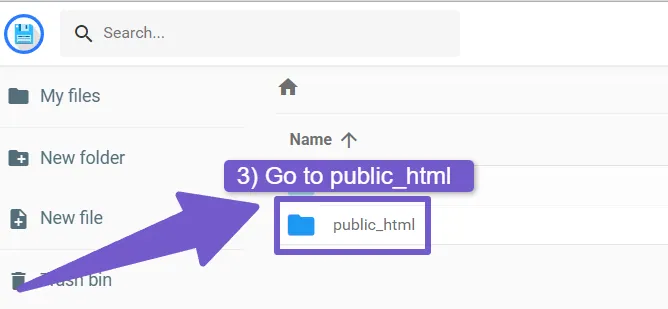
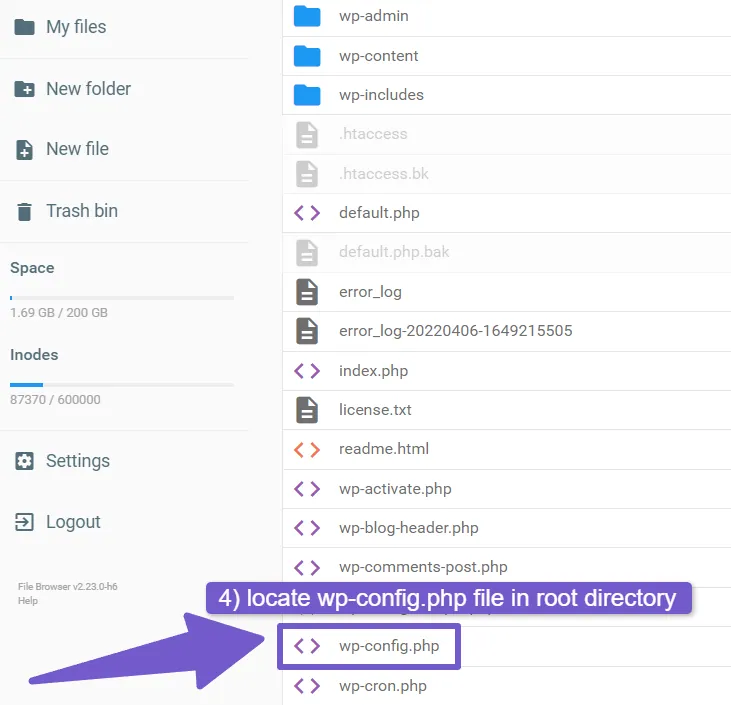
- Use an FTP client or your web hosting control panel to access your WordPress root directory. Or I can say simply log into your hosting account, go to cPanel > file manager.
- There locate and open the wp-config.php file.
- In the bottom of file, add the following code:
define( 'WP_DEBUG', true );
define( 'WP_DEBUG_LOG', true );
define( 'WP_DEBUG_DISPLAY', true );

If you want to know, what this code do, I will tell you:
- First of all it activates WordPress debugging (
WP_DEBUG). - Then it ensures that debug output is recorded in a log file (
WP_DEBUG_LOG). - And lastly, it prevents errors from being shown on your website (
WP_DEBUG_DISPLAY).
Save your changes and close the file.
Now, when the WordPress update issue occurred, it will be logged in a debug.log file, which will be now located in the wp-content directory. You can check this log to find detailed information about the errors that are happening on your site.
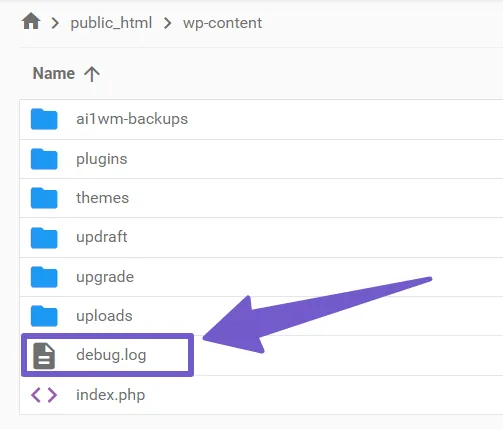
If you see in log that the error is due to some plugin code conflict, then follow our Step 5, else contact your hosting provider and discuss this issue with them. Since you already have the log details it will be easier for hosting team support to help you fix the issue for you.
Remember, once you have resolved the issue, it is good practice to turn off debugging by setting WP_DEBUG to false in code or else just simply remove the whole code from wp-config.php file. This is because leaving debugging on can potentially expose sensitive information of the site.
Step:8 Switch to Classic WordPress Editor
If you have tried all the above solutions and still find yourself dealing with the Updating Failed or Publishing Failed error, you can consider switching to the Classic Editor temporarily (or permanently if you prefer its straightforward and easy to edit).
The Gutenberg editor, which is now the default editor for WordPress, uses the REST API to communicate with your website’s server. This means that when you’re writing a post in Gutenberg and click the Update or Publish button, a request is sent to the server via the REST API to save or publish your post.
However, if there is any issue with the REST API, such as a conflict with a theme or plugin, or even a firewall blocking the request, it could result in the Updating Failed or Publishing Failed error.
On the other hand, the Classic Editor does not rely on the REST API to save or publish posts. Instead, it uses a more traditional form submission method, which is less likely to run into the issues.
So to change to WordPress classic Editor, follow these steps
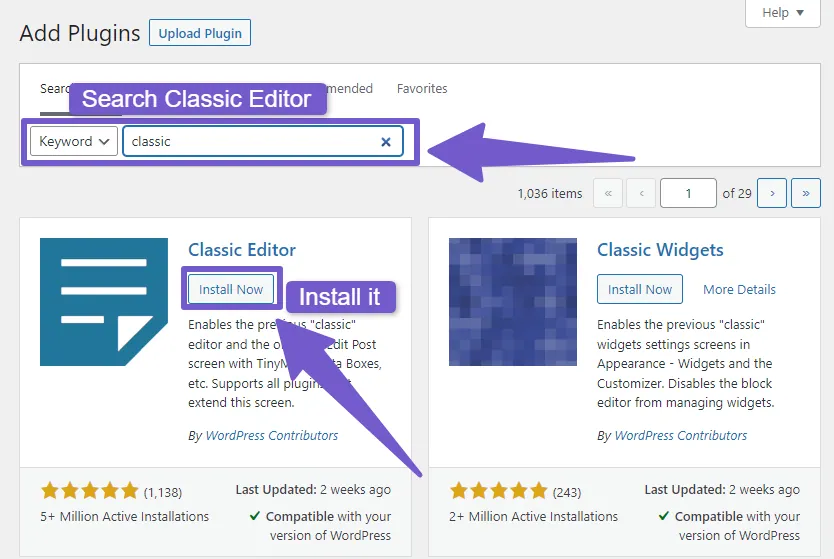
- In your WordPress dashboard, go to Plugins > Add New.
- Search for Classic Editor.
- Install and activate the plugin.
Once you have it installed, now open your page/post and try updating or publishing it again. If it works without any issue, then stick with the classic editor, it’s also very easy to use.
FAQ( How to Fix WordPress Updating Failed )
What does WordPress updating failed mean?
This error typically means that your WordPress site is unable to establish a connection with the database or you can say server. It can occur when you try to update your post or page content.
Why am I seeing the WordPress updating failed error?
The WordPress updating failed or publishing failed error usually occurs when WordPress cannot connect to the server, some common reasons include issues with your internet connection, outdated browser cache or cookies, REST API being blocked, URL settings being miss-matched, firewall service blocking server requests, conflicts with plugins or themes and outdated WordPress version.
How can I fix the WordPress updating failed issue?
You can try several solutions to fix the WordPress updating failed issue, like checking your internet connection, disabling all plugins to find conflicting one or switching to a default theme, checking website URL settings to match WordPress Address (URL) and Site Address (URL), checking firewall settings to unblock the server requests coming form WordPress, or may switch to WordPress Classic Editor.
What if none of these solutions work?
If none of these solutions work for some reason, then consider reaching out to your hosting provider’s support team. They may be able to provide further assistance, and will help you smoothly fix your issue.
My final verdict on How to Fix WordPress Updating Failed
In my guide, I have provided the solution in steps, starting from easy to more technical fixes, so by following these steps, you should be able to identify and fix the cause of the Updating Failed or Publishing Failed error on your WordPress site.
Remember, if you are still experiencing this issue after trying these solutions, it’s always a good idea to reach out to your hosting provider’s support team for further assistance. They have access to more detailed server logs and may be able to identify and resolve the issue more quickly.
I hope with my solutions you would have solved you issue( this issue is not so hard that you can’t fix, maybe it’s just a glitch in WordPress and by refreshing you page it might be solved ). So thanks for reading this guide, if you have solved your issue please comment down below with a thumbs up. It will boost our confidence that our solutions are helpful.
If you have any other WordPress related issues, also mention them in your comment, so we can write guide on that too.
