If you’re like most people, you probably don’t think too much about the fonts you use on your website. But the truth is, the fonts you use can actually have a big impact on how your website is perceived by visitors. The right font can make your website look more professional, more trustworthy, and more credible, and if you’re running a business, that’s exactly what you want.
Squarespace is a powerful and popular web design platform and one of the great things about Squarespace is that it is highly customizable, you can change almost everything about your website, from the layout to the colors to the fonts.
As a Squarespace user, you may want to add a custom font to your site to make it stand out from the rest. However, Squarespace offers a wide range of fonts to choose from, but sometimes you just can’t find the perfect one for your brand. Luckily, it’s easy to add custom fonts to Squarespace.
In this article, I will show you how to add custom font to Squarespace in just a few easy steps, furthermore, I will also show you how to apply these fonts to different sections of your Squarespace site.
4 Steps to Add Custom Font to Squarespace
I will now demonstrate four steps that will help you add custom font to your Squarespace website. So let’s begin by following the steps outlined below.
Step: 1 ( Uploading Your Custom Font File to Squarespace )
To upload your font file to the site, follow the below process:
- Log in to your Squarespace account.
- Open your website from the Dashboard.
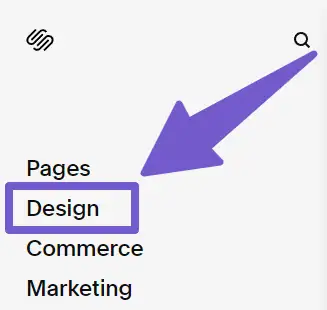
- Click on the Design section.
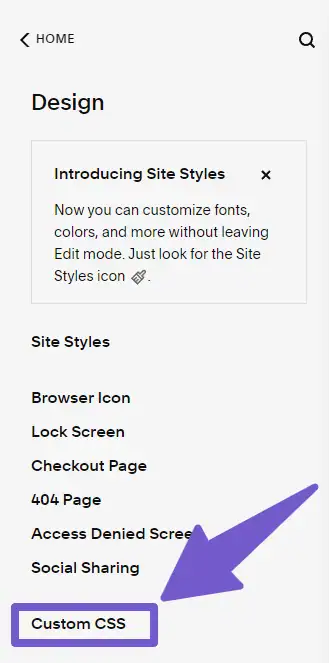
- At the bottom, you will see the Custom CSS tab. Open it.
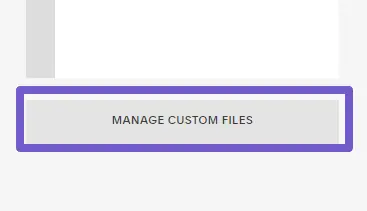
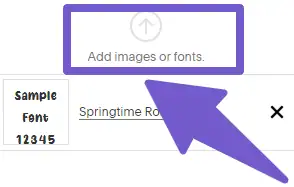
- There you will see the code area for CSS code and below it, there is a Manage Custom File Button.
- Upload your Font file from there.
Also Read: How to Add a PDF to Squarespace ( 4 Easy Ways )
Alternate Method ( Using CDN instead of Uploading Font to Site ):
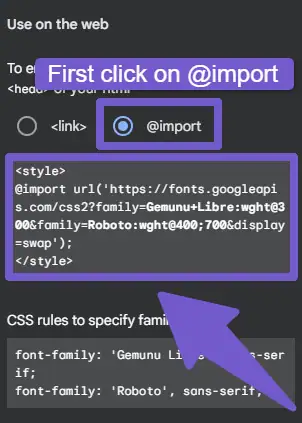
If you don’t want to upload your custom font to your Squarespace website, but want to link it through a CDN link instead (for example, if you’re using a Google Font), then you can directly import your Google Font to Squarespace through a link.
In order to do so, first go to your google font and get the CDN import link. Then, go to your Squarespace site and paste the CDN link in the Custom CSS tab. Well, that was this easy! You can now use your custom font and skip our second step.
Note: The font file should be usually .otf, .woff or .ttf type file. For example: Myfont.ttf etc.
Step: 2 ( Integrating Your Uploaded Custom Font File With Site )
Now that the Custom font has been uploaded to Squarespace, you might think that all the work is complete and you can start utilizing your custom font. However, this is not the case because you now have to inform Squarespace that a new custom font has been added and that you want to use it.
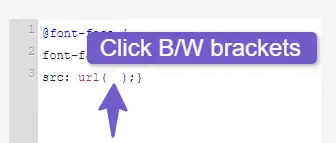
What this means is that you have to link your custom font file with the help of code in order to begin using it. So in order to start using the custom font, you have to add the below CSS code in the Custom CSS tab:
@font-face {
font-family: YOURFONTNAME !important;
src: url();}
Once you have added the code, you have now two things to do. First, change YOURFONTNAME to any other name you want, but the thing is, add a name of the font that you can remember later. After this, the second thing is to add the Link/URL of the font that you have uploaded between the brackets.
Note: When any custom file is added to Squarespace, it automatically generates its source link.
But the thing is you will be wondering where to find this font link and add it in the src brackets. Well, it’s easy, just go to your CSS code and there click between the two brackets, then click on the Manage Custom File button and there you will see your uploaded font so click on it.
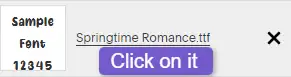
Once clicked, the URL of the font will automatically be added in the brackets. That completes the process of uploading and integrating custom font to your website. Now, let me show you how to apply it on your website.
Step: 3 ( Apply Your Custom Font Throughout the Site )
Now that the custom font has been linked, it is time to implement it throughout the website. However, before doing so, we must determine which version of Squarespace we are using, as both 7.0 and 7.1 have different HTML tags. For instance, the below table provides the different tags that are used:
| Squarespace 7.0 HTML tags | Squarespace 7.1 HTML tags |
| Heading One h1 | Heading One h1 |
| Heading Two h2 | Heading Two h2 |
| Heading Three h3 | Heading Three h3 |
| Paragraph p | Heading Four h4 |
| Paragraph One .sqsrte-large | |
| Paragraph Two p | |
| Paragraph Three .sqsrte-small |
Now to change the font for different headings and paragraphs add the below CSS code to your site:
h1 {
font-family: 'YOURFONTNAME' !important;}

h2 {
font-family: 'YOURFONTNAME' !important;}

h3 {
font-family: 'YOURFONTNAME' !important;}

h4 {
font-family: 'YOURFONTNAME' !important;}

.sqsrte-large {
font-family: 'YOURFONTNAME' !important;}

p {
font-family: 'YOURFONTNAME' !important;}

.sqsrte-small {
font-family: 'YOURFONTNAME' !important;}
If your font is linked through CDN, then instead of using your custom font name, use the specified font name, like given below in the image as an example:
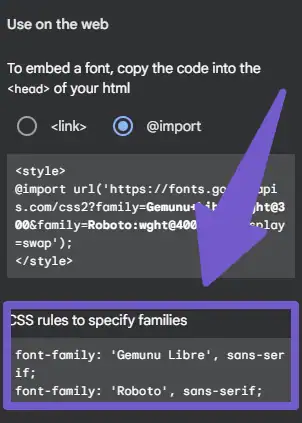
Note: Change the DEMOFONT to the name of the font you have given above.
That’s it, your default font is now successfully changed to the custom font you have added.
Step: 4 ( Further Customizing Your Custom Font )
If you want to further enhance the appearance of your custom font, such as by adding font-weight or letter-spacing, you can do so by adding the following CSS code in the Custom CSS tab of Squarespace:
.Any-CSS-rule {
  font-weight: 600;
  letter-spacing: 0.1em;
  line-height: 1em;
  text-transform: uppercase;
}
Bonus Information For Further Applying Custom Font on Site
As you are aware, a website has various elements and sections, such as the navigation section, footer section, newsletters, blog posts, buttons, etc. So the code that can add custom fonts to these areas will also be provided below.
You May like:
How To Change Favicon On Squarespace
How to Add Anchor Links in Squarespace
How to Embed Google Calendar in Squarespace
Add Custom Font to Buttons in Squarespace
To apply your custom font on buttons, add the below code in the Custom CSS tab of Squarespace:
// Squarespace Primary Button //
.sqs-block-button-element--medium, .sqs-button-element--primary {
  font-family: YOURFONTNAME !important;
}

// Squarespace Secondary Button //
.sqs-block-button-element--large, .sqs-button-element--secondary {
  font-family: YOURFONTNAME !important;
}

// Squarespace Tertiary Button //
.sqs-block-button-element--small,  .sqs-button-element--tertiary {
  font-family: YOURFONTNAME !important;
}
Add Custom Font to Header and Footer in Squarespace
To apply your custom font on the header and footer sections of your Squarespace site, add the below code in the Custom CSS tab of Squarespace:
// Your Site Title font //
.header-title-text a {
  font-family: YOURFONTNAME !important;}

// Your Site Navigation link font //
.header-nav-item a {
  font-family: YOURFONTNAME !important;}

// Your site Navigation Button font //
.header-actions-action .btn {
  font-family: YOURFONTNAME !important;}

// site Announcement Bar font //
.sqs-announcement-bar-url a {
  font-family: YOURFONTNAME !important;}

// Your site footer link font //
#footer-sections .sqs-block-html a{
  font-family: YOURFONTNAME !important;}

// Your site footer button font //
#footer-sections .sqs-block-html .btn{
  font-family: YOURFONTNAME !important;}
Add Custom Font to Blog Posts in Squarespace
To have a different font on your website blog posts than on other pages (like on homepages or any other), add the below code in the Custom CSS tab of Squarespace:
// Blog Page Post Title //
.blog-title {
  font-family: YOURFONTNAME !important;}

// Blog Page Post Descriptions //
.blog-excerpt p {
  font-family: YOURFONTNAME !important;}

// Blog Page Read More Link //
.blog-more-link {
  font-family: YOURFONTNAME !important;}

// Blog Post Entry Titles //
 .blog-item-title h1.entry-title {
  font-family: YOURFONTNAME !important;}

// Blog Post Heading 2 Titles //
 .blog-item-title h2 {
  font-family: YOURFONTNAME  !important;}

// Blog Post Heading 3 Titles //
 .blog-item-title h3 {
  font-family: YOURFONTNAME !important;}

// Blog Post Heading 4 Titles //
 .blog-item-title h4 {
  font-family: YOURFONTNAME !important;}
Add Custom Font to Newsletter in Squarespace
If you want to keep your font simple on the other pages of your Squarespace and use a fancy type font for your Newsletter or any other type font then you can change the Newsletter font from default to a custom font. To do so, add the following CSS code in the Custom CSS tab:
// Newsletter Form Title Font //
.newsletter-form-header-title  {
  font-family: YOURFONTNAME !important;
}

// Newsletter Form Description Font  //
.newsletter-form-header-description p {
  font-family: YOURFONTNAME !important;
}

// Newsletter Form Fields Font  //
.newsletter-form-field-element {
  font-family: YOURFONTNAME !important;
}

// Newsletter Form Button Font  //
.newsletter-form-button {
  font-family: YOURFONTNAME !important;
}

// Newsletter Form Footnote Font  //
.newsletter-form-footnote {
  font-family: YOURFONTNAME !important;
}
The Quote Block is also helpful in showcasing the important quotes or phrases from your website by enlarging and highlighting them. This is especially useful for highlighting client testimonials with eye-catching custom fonts. So to apply/change the custom font for Quote Block add the below code in the Custom CSS tab:
// Quote Text Font //
.sqs-block-quote blockquote {
  font-family: YOURFONTNAME !important;
}

// Quote Source Font //
.sqs-block-quote .source {
  font-family: YOURFONTNAME !important;
}
FAQ ( How to Add Custom Font to Squarespace )
Can I Upload Custom Font to Squarespace?
You can upload a custom font to your Squarespace website with ease. To do so, open your Squarespace account and go to your website. Then, click on the Design tab > Custom CSS tab. Once there, click on the Manage Custom Files button. From there, you can upload your custom font to Squarespace.
How do I import a font into Squarespace?
Squarespace offers a wide variety of built-in fonts that you can use for your website. But sometimes, you may want to use a font that’s not available in Squarespace. In that case, you can import a custom font into Squarespace.
Squarespace supports the following file formats for fonts: .ttf, .otf, and .woff. To import a font into Squarespace, follow these steps:
1. On your Squarespace website menu, click on Design, then click the Custom CSS tab.
2. In the Custom CSS tab, click on the Manage Custom files button, and from there you can import the custom font.
3. Now you have to link your custom font to the Squarespace site, to do so add the below CSS code in the Custom CSS tab:
@font-face {
font-family: YOUR-FONT- NAME !important;
src: url();}
// Add the source URL in the Manage Custom file tab, add it in between the brackets
That’s it you have successfully imported the custom font to your Squarespace site.
Tips on Choosing the Right Font for Your Squarespace Site
There are a few things to keep in mind when choosing a custom font for your Squarespace site. First, you’ll want to make sure the font is legible and easy to read. Second, you’ll want to make sure the font fits with the overall look and feel of your site. And last, you’ll want to make sure that the font is web-safe, which means it’s compatible.
My Final Thoughts on Adding Custom Font to Squarespace
There can be many ways to add custom fonts to your Squarespace website. However, the best way to do this is to use the Custom CSS option. But there are a few things to keep in mind when using the Custom CSS option.
First, you need to make sure that the font you want to use is available for web usage. Second, you need to upload the font file to your Squarespace Website. And finally, you need to add the CSS code to your website.
Adding custom fonts to your Squarespace website is a great way to personalize your website and make it stand out from the rest. If you have followed the steps above, you should have no problem adding custom fonts to your website.
Thank you for reading our guide, if you have any further queries regarding this topic, feel free to comment down below or contact us through our Contact page for further details on this topic.