One of the features that makes WordPress so versatile is the ability to install plugins to add different functionalities to your WordPress website.
If you are a beginner and just finished installing WordPress and now looking for a way to install WordPress plugins and how to choose the right plugins and manage them in your WordPress website, then you are at the right place.
In this guide, you will learn what a WordPress plugin is, why you need them, and how you can install them using different methods. So let’s get started.
What are WordPress Plugins and Why Do You Need Them?
Plugins are like apps for your website that let you customize your WordPress website however you want. Different plugins have different features and functionalities. For example, in WordPress, you can find a plugin for almost any feature you want.
If you want a contact form plugin, you can install WPForms. If you want e-commerce functionality, you can install WooCommerce. If you want a plugin for email marketing, you can install Mailchimp.
WordPress has 59,742 plugins in its free plugins library as of November 2023.
wordpress.org
WordPress is not limited to only free plugins. There are also paid plugins that have more features and functionalities than free plugins and have faster support from the developers.
Moreover, if you can’t find a plugin for your specific need in the free or paid plugins, you can create a custom plugin for your need by hiring a developer from platforms like Fiverr and Upwork.
Some examples of what Plugins can do on your WordPress website:
- Making your site faster, safer, and easier to use. For example, you can use the W3 Total Cache Plugin to improve your site’s speed and performance.
- Making your site more visible on search engines and social media. For example, you can use the Rank Math Plugin to optimize your site’s SEO and social media presence.
- Creating and showing different kinds of content, like pictures, videos, podcasts, and more. For example, you can use the Elementor Plugin to design and build beautiful pages and posts with drag and drop.
- Connecting your site with other services and platforms, like email marketing, e-commerce, analytics, and more. For example, you can use the WooCommerce Plugin to create and manage an online store, and the Mailchimp Plugin to grow your email list and send newsletters.
- Making your site more interactive and fun, by adding polls, quizzes, and more. For example, you can use the WP Quiz Plugin to create and display quizzes.
But plugins are not all good. They can also cause some problems and risks, such as:
- Make your site slower if they are badly written or doesn’t work well with your theme or other plugins.
- Make your site break or crash if they are old or not updated by its developers.
- Make your site unsafe if they are harmful or hacked.
- Make your site messy if they are not needed or used.
So, you have to be careful when you choose and install plugins.
5 Ways to Install WordPress Plugin
Now that we have learned what a WordPress plugin is and why we need them, let me show you five ways to install a WordPress plugin.
We will start with the easiest method, which is using the WordPress plugin search. Then we will move on to the manual method, which involves uploading the zip file of the plugin.
Finally, we will explore the advanced methods for installing a WordPress plugin using cPanel, FTP, and WP-CLI.
So, let’s get started!
1) Using WordPress Plugin Search to Install Plugins
The easiest and most common way to install WordPress plugins is to use the WordPress plugin search feature which searches for the plugin in the WordPress plugin library this method allows you to install plugins directly from the WordPress plugin directory, which contains thousands of free and tested plugins. To use this method, follow these steps:
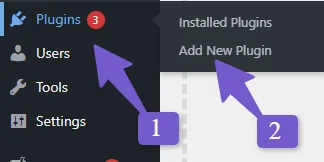
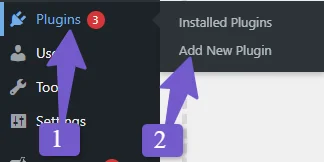
Log in to your WordPress dashboard and go to Plugins > Add New.
In the search box, type the name or the functionality of the plugin you are looking for. For example, if you want to install a contact form plugin, you can type “contact form” and see the results.
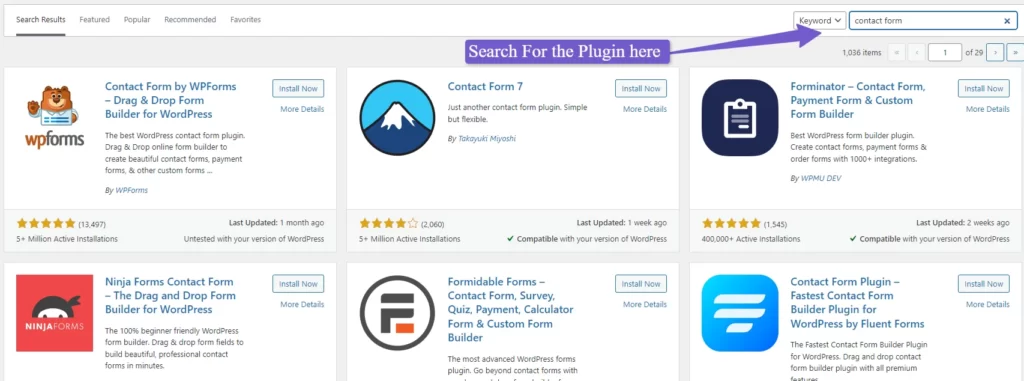
Browse the results and select the plugin that has positive reviews and tested with your version of WordPress.
Once you find the plugin you want, click on the Install Now button next to it and wait for WordPress to install the plugin for you.
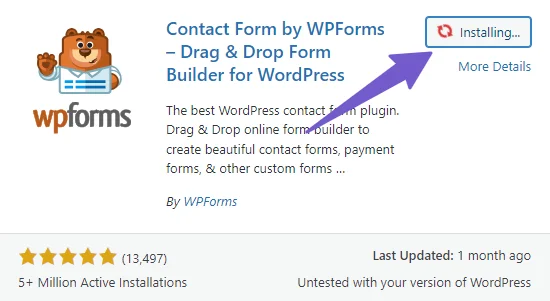
After the installation is complete, you will see the Activate button instead of the Install Now button. Click on it to activate the plugin and make it ready to use.
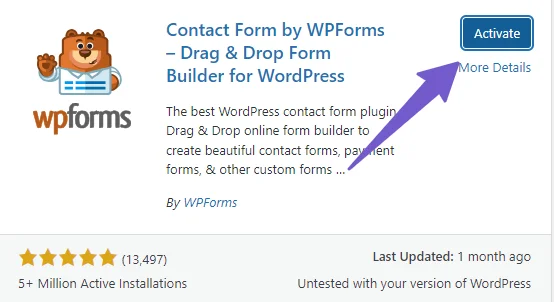
And that’s it you have successfully installed the WordPress plugin this is the most common and easy method for installing the plugin in WordPress.
Now if you want to install a plugin from the third-party website you can check the next method of manually installing a WordPress plugin.
2) Install WordPress Plugins Manually by Uploading Zip Files
To install a custom-made plugin or a premium plugin that is not available in the WordPress plugin directory, you can follow these steps:
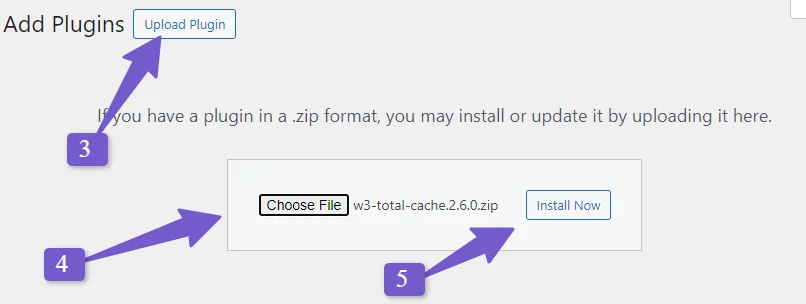
Go to Plugins > Add New and click on the Upload Plugin button. Click on the Choose File button and select the zip file of the plugin from your computer.
Click on the Install Now button and wait for the plugin to be uploaded and installed. Click on the Activate Plugin button to activate the plugin on your WordPress website.
This is how you can manually install paid and custom plugins on your WordPress website.
3) Installing WordPress Plugins From Cpanel
If, for some reason, you are unable to install the plugin from your WordPress dashboard, an alternative method is to manually upload the plugin files to your file manager from cPanel.
This approach is recommended if you encounter issues during the installation from the WordPress dashboard or if you need to install multiple plugins at once.
To do this, follow these steps:
Go to your Cpanel and access the File Manager. I am using Hostinger as my web host, so the interface for you may be different, but the process is the same.

Go to wp-content/plugins and click on the Upload icon at the top. Upload the plugin zip file from your computer.
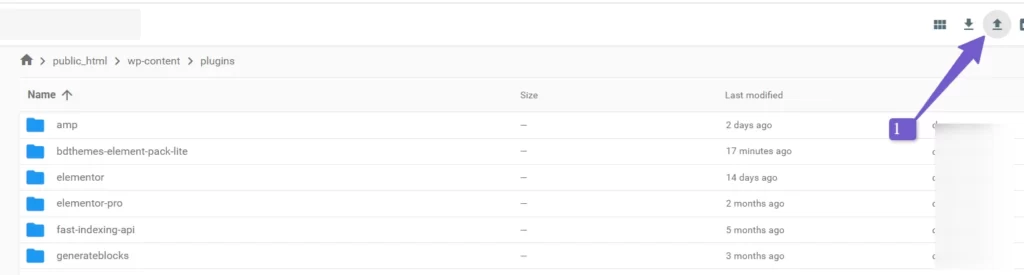
Once the upload is complete, click on the zip file and Extract it.
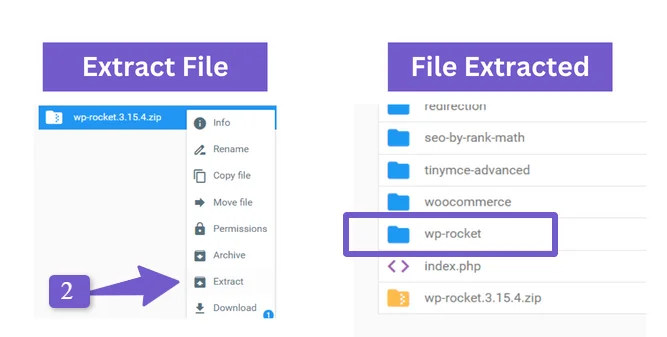
After extracting the plugin files, delete the zip file and go back to your WordPress dashboard and Plugins. You will see the newly installed plugin there. You just have to Activate it now.
That’s it! You have successfully installed the plugin on your WordPress website using Cpanel.
4) Using FTP to Install WordPress Plugin
If you are using FTP most of the time for managing files on your hosting, then this method is for you to install a plugin on your WordPress website.
FTP allows you to interact directly with individual files, and you can edit, replace, or delete specific plugin files if needed.
This method is also useful if you have trouble installing a plugin on WordPress from the dashboard or Cpanel.
Using FTP, you can transfer files directly to your server by using an FTP client such as FileZilla. You can also upload large file-size plugins.
To install a plugin using FTP, follow these steps:
Download the plugin from a third-party website and make sure the plugin file is in zip format. Extract the plugin zip file on your computer.
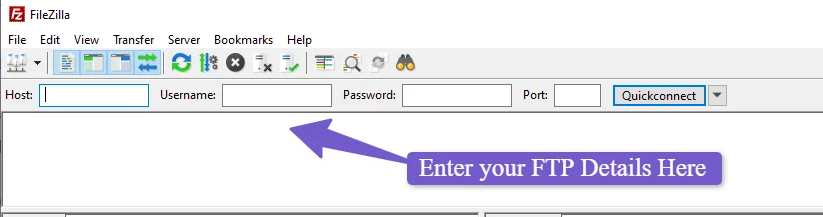
Launch the FTP client and connect with your web hosting by using the FTP credentials. You can find them on your hosting or ask your hosting support for help.
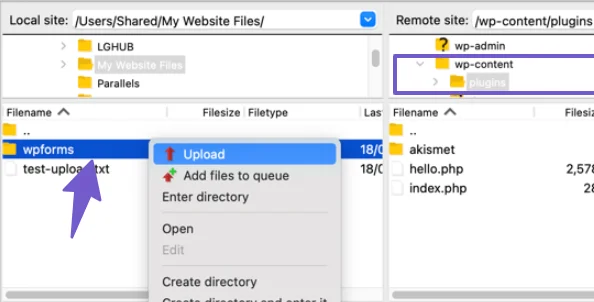
Once you are connected to your server, navigate to wp-content/plugins in your WordPress files and drag and drop the plugin folder you have extracted on your computer. Wait for the plugin to be uploaded to your server.
Log in to your WordPress and go to Plugins. You will find the plugin there. Activate it and make it ready for use.
5) Installing WordPress PLugins with WP-CLI Commands
The last way to install WordPress plugins is to use WP-CLI, which stands for WordPress Command Line Interface. This method is for advanced users familiar with coding, as you will be using a terminal or CMD to install the plugin on WordPress.
To install a plugin using WP-CLI, follow these steps:
Make sure you have WP-CLI installed on your computer and web server. I am using Hostinger, so mine is already installed on the hosting. Most popular hosting providers have WP-CLI installed in their hosting interface.
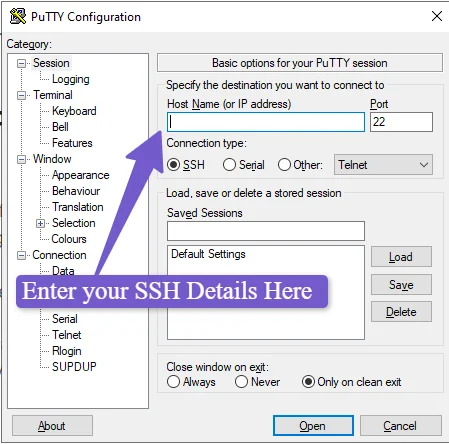
Install an SSH Client. I recommend installing Putty, as it has an easy interface. Enter your SSH details in it, like hostname (Host IP) and port number.
Once Putty is connected to your server via SSH, you will be asked for the username and password. When you enter a password it will not be shown as normally when we enter a password it shows as *****. Don’t worry, it is for security purposes. You can write your password and press enter.
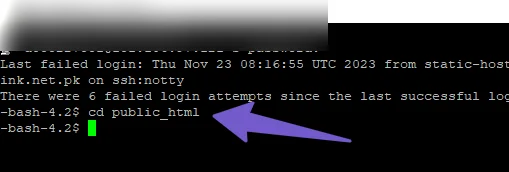
Once connected, go to the root folder of your WordPress site. For example, if your WordPress installation is located in public_html, you have to type cd public_html.
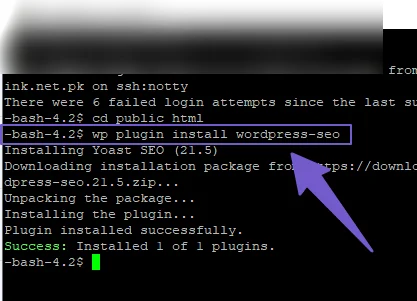
To install a plugin from the WordPress plugin directory, use the wp plugin install command followed by the plugin slug. For example, if you want to install the Yoast SEO plugin, you can type wp plugin install wordpress-seo and press enter. This will download and install the plugin for you.
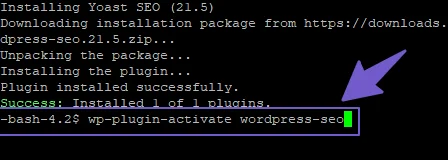
To activate the plugin, use the wp plugin activate command followed by the plugin slug. For example, if you want to activate the Yoast SEO plugin, you can type wp plugin activate wordpress-seo and press enter. This will activate the plugin and make it ready to use.
To install a plugin from a .zip file, use the wp plugin install command followed by the URL of the .zip file. For example, if you want to install a premium plugin from a developer’s website, you can type wp plugin install https://example.com/plugin.zip and press enter. This will download and install the plugin for you.
That’s it! You have successfully installed the plugin on your WordPress website using WP-CLI. You can use WP-CLI to do many things on your WordPress website, like bulk installing and deleting plugins and themes, updating WordPress, and much more.
Selecting WordPress Plugins: Key Considerations
Choosing a WordPress plugin that has a good rating and clean code can be hard, but there are some things to look for. Here are some tips to help you pick the right plugin for your website:
Update Frequency | Check if the plugin is updated often. This means it is safe, fast, and works well with WordPress. You can see when it was last updated, how many people use it, and what ratings it has. |
| Plugin Functionality | Check if the plugin does what you need. Read the plugin description, documentation, and reviews. You can also look for blog posts that compare different plugins for the same function. |
| Plugin Testing | Test one plugin at a time. This way, you can see if it works well and does not cause any problems. If you don’t need a plugin, delete it. Too many plugins can slow down your website. |
| Plugin Compatibility | Use only one plugin for each function. This means you don’t have two plugins that do the same thing. This can avoid conflicts and errors. For example, you only need one plugin for SEO, not two. so if you are using the Yoast SEO plugin and Rankmath SEO plugin on the same website you have to delete one. |
FAQs (Installing WordPress Plugins)
Below are some most common FAQs related to Installing plugins in WordPress.
How to Update WordPress Plugins?
You can update WordPress plugins in two ways: automatically or manually. For Automatic updates go to Plugins > Installed Plugins and click Update Available. Select the plugins you want to update and click Update Plugins and for manual updates Download the latest plugin version from the developer’s website or WordPress plugin directory. Rename the old plugin version this will deactivate the old version of the plugin now upload the new plugin from your computer and activate it from your WordPress dashboard.
What Permissions Are Required to Install a WordPress Plugin?
To install a plugin in WordPress, you need one of these:
- Administrator role to install from the dashboard
- Access to /wp-content/plugins/ directory to install manually
How to Troubleshoot WordPress Plugins?
To fix errors or conflicts from plugins, follow these steps:
- Read the plugin documentation and support forum.
- Deactivate and Activate the plugin and see if the problem is still there
- Use a default WordPress theme and check the issue caused by the plugin
- Deactivate all plugins. Activate one plugin at a time to find the plugin that causes issues.
- Turn on the WordPress debug mode and locate the plugin file that caused the issue
- Ask the plugin developer or support team for help.
Conclusion
I hope this guide helps you learn how to add a plugin to your WordPress website. But make sure to install the plugin either from wordpress.org or the developer website directly. Do not install it from any random website on the web, as they might have malware and your site can be hacked if you install plugins from untrusted sources.
If you have any questions in mind regarding the installation of a plugin in WordPress, you can ask me via comment and I will be happy to assist you.