You want to embed content from other web pages on your website, and you might have heard that you can do this with iFrames. Since you are using Elementor Page builder for your WordPress site, you might be wondering how to add iframes to your Elementor site. Well, don’t worry, I’m here to help.
In this article, I will show you how to easily add Elementor iFrame on your website using two methods and you don’t need any coding skills to implement them, just follow the simple steps I will be giving and you will be able to embed any content you want using iFrames, and I will also show you how to customize them according to your design preference.
But first, let me give you a proper explanation of what an iFrame is, so you have a complete idea of what you can do with iFrames.
What is an iFrame?
An iFrame is a HTML element that creates a window on your webpage which will displays content from another website like showing videos, maps, social media feeds, or even entire webpages within your website without affecting its performance or design.
This way, you can enrich your website with useful and relevant content without making your visitor leave your website to see that content. For example, if you have a travel blog, you can use iFrames to show a Google map of the destination you are writing about, or a YouTube video so visitors can see the location and the sights of the place you are describing.
Or, if you have an online store, you can use iFrames to show a product review from another site, or a social media feed of your customers testimonials. This way, your visitor can see the feedback and the opinions of other people who have bought your products.
2 Ways to Add iFrame in Elementor
Now that you know what an iFrame is, let me show you how to add Elementor iFrame in any WordPress theme. There are two ways to do this: using the HTML widget( without plugin method ) and using the iFrame plugins. Both methods are easy and quick, and you can easily customize the appearance and behavior of your iFrames according to your needs.
If you are adding iframe in WordPress without using elementor, you can follow the methods mention in separate guide on embedding iFrame code in WordPress
Method 1: Using Default Elementor HTML Widget
This is the simplest and most straightforward way to add iFrame in Elementor. The HTML widget is the native Elementor widget that allows you to insert any custom HTML code into your Elementor page.
You can use this widget to add an iFrame by simply pasting the iFrame code into the widget. This method is suitable for beginners and for embedding simple content like videos or maps. Follow the below steps to use this method:
Step: 1
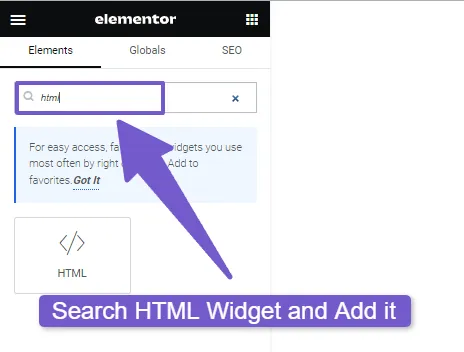
Once you open the Elementor editor for the page you want to add an iFrame to, there search for the HTML widget in the Elementor widget panel and drag and drop it to the desired location on your page.
For some reasons if your Elementor editor is not loading, don’t worry we have a fix for it in this guide on Elementor editor not Loading: How to fix it.
Step: 2
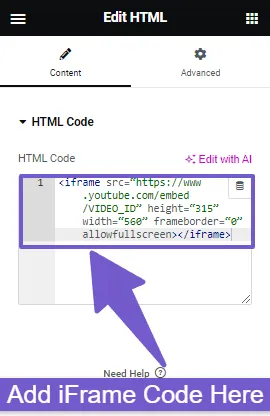
Now click on the widget to edit it and paste the iFrame code into the HTML Code box. You can get the iFrame code from the source website of the content you want to embed.
For example, if you want to embed a YouTube video, you can click on the Share button under the video, select the Embed option, and copy the code from there.
Step: 3
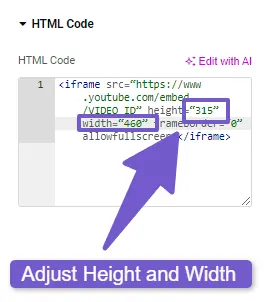
You can also adjust the iFrame code to change the size, alignment, border, and other attributes of the iFrame. For example, you can change the width and height values to fit your layout.
An example iFrame code for YouTube video embedding can look like this:
<iframe src=“https://www.youtube.com/embed/VIDEO_ID” height=“315” width=“560” frameborder=“0” allowfullscreen></iframe>
The basic terms/attributes used in this iFrame code are:
- Src: The source URL of the embedded content, in this case, it is a YouTube video URL with some parameters.
- Width/Height: The width and height of the iframe in pixels.
- Frameborder: The border around the iframe, you can set it to 0 to remove it.
- Allowfullscreen: A boolean attribute that allows the user to view the map in full screen mode.
There are various iFrame attributes, If you want to know more on them, you can visit here.
Ok so that’s it, you have now successfully added Elementor iFrame using the HTML widget. Easy, right? Now let’s look at the second method.
Method 2: Using Plugins to Add iFrame in Elementor
Using plugins gives you more flexibility to customize iFrame without the need to manually add attributes in code. There are two plugins that I recommend for this purpose: Elementor Pack and EmbedPress.
Elementor Pack iFrame Widget:

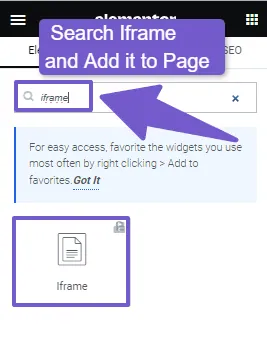
The iFrame widget is an extra Elementor widget that comes with the Element Pack plugin. You won’t find it in the default Elementor Widgets area, but it will appear after you install the Element Pack Addon.
This plugin/ Addon for Elementor provides more than 200 widgets and extensions for Elementor, including the iFrame widget. This widget also lets you adjust your iFrames with more options, such as lazy loading, scrolling, fullscreen, and more.
If you wish to see how elementor pack will display iFrame code on your website, you can visit their site to preview them.
Here are the steps to follow on how to use this plugin:
- First you need to purchase and download the Element Pack plugin from the Element Pack website.
- Go to Plugins > Add New > Upload Plugin and select the plugin file you downloaded and install and activate it.
- Now, open the Elementor editor for the page you want to add iFrame to, there search for the iFrame widget and add it to the specific location.
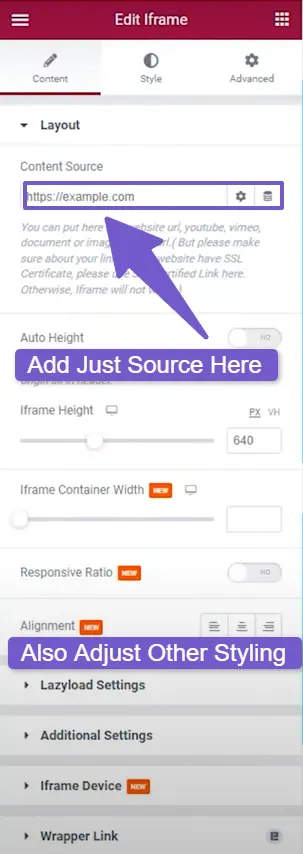
- Click on the widget to edit it and enter the URL of the content you want to embed in the Content Source field.
- There you can customize the iFrame appearance and behavior using the options in the Content, Style, and Advanced tabs. For example, you can change the iFrame height, enable or disable lazy loading, allow or deny fullscreen, show or hide scroll bars, and more. Just play around it to make it to your specific design.
- Finally, Update or publish your page and preview the result. You should see the iFrame content displayed on your page.
This is an Elementor addon plugin, but the iFrame widget is not free and requires a purchase. However, I can suggest another option to embed iFrames in Elementor using the EmbedPress plugin. It works very well with Elementor and the best part is that you don’t need to pay for using the iFrame feature.
EmbedPress plugin:

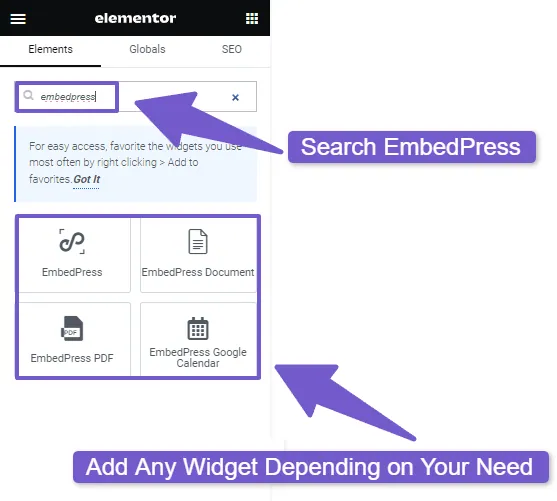
The EmbedPress plugin is another option to add iFrame in Elementor. This plugin allows you to embed any type of content from over 75 sources, such as YouTube, Google Maps, Twitter, Facebook, and more. You can also use it to embed any custom URL using iFrame. Here are the steps to use this plugin:
- Once you installed this plugin, go to EmbedPress > Settings and enable the Elementor option.
- Now, open the Elementor editor and search for the EmbedPress widget and add it to the page.
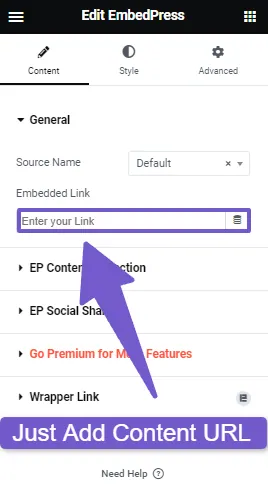
- Click on the widget to edit it and enter the URL of the content you want to embed in the Embed URL field.
- There you can also customize the iFrame appearance changing the iFrame width, height, aspect ratio, alignment, border, and many more.
- That’s it save you changes and your iframe will be succesfully added in Elementor site.
These are the two plugins that I recommend for adding iFrame in Elementor. They both have their pros and cons such as one is paid and another is free, so you can choose the one that suits your needs and preferences.
You can also use Advance Iframe, another plugin that allows you to add iFrames in Elementor. It works in a similar way as the ones I have shown you above. If you are interested, you can give it a try.
Also Read: Adding a Vertical Divider in Elementor: A Step-by-Step Guide
Best Practices for Elementor iFrame Integration
Adding iFrame in Elementor can be a useful way to display external content on your website, but you should also be aware of some best practices to ensure a good user experience and performance of your site. So here are some of the tips to follow when using iFrame in Elementor:
- Use a responsive iFrame that can adapt to different screen sizes and devices. Iframes may not display well on mobile devices, especially if they have fixed width and height. Therefore, optimize your iframes for mobile devices by using responsive or adaptive design and use % instead of pixels.
- Avoid adding too many iFrames on your page, as this can slow down your page loading speed and affect your SEO ranking. You can use the lazy loading option in the plugins to defer the loading of iFrame content until the user scrolls to it.
- Test your iframes on different browsers and devices. Iframes may not work or look the same on different browsers and devices. Therefore, test your iframes on different browsers and devices to ensure that they work properly and provide a good user experience.
FAQ( How to Add iFrame in WordPress Elementor )
While I was researching on this topic, I found out some of the most common questions that people were asking. So here are the answers to those queries.
How do I add an iFrame using Elementor?
To add an iFrame using Elementor, follow these steps:
- Open the page or post with Elementor where you want to embed the iFrame.
- Drag and drop the HTML widget from the Elementor widget panel to the desired section.
- In the HTML widget, paste the iFrame code that you got from the external source of the content.
- Save or publish your page or post and you will now see the iFrame content on your website.
How do I customize the appearance of the iFrame in Elementor?
You can adjust the appearance of the iFrame using the HTML widget’s styling options or by modifying the iFrame code itself. For example, you can change the width, height, and alignment of the iFrame using the HTML widget’s settings. Alternatively, you can edit the iFrame code and add or change the attributes such as width, height, and frameborder etc to suit your preferences.
Where do I get the iFrame code for the content I want to embed?
The iFrame code is usually provided by the external website or platform that hosts the content you want to embed. For example, if you want to embed a YouTube video, a Google Map, or a third-party form, you can find the iFrame code by clicking on the Embed, Share, or Embed Code option on these respective platforms.
Can I preview the iFrame content within the Elementor editor?
The Elementor editor may not show the actual iFrame content while you are editing the page or post. To preview the iFrame content, you need to save your changes and view the published page or post on your website.
Can I add more than one iFrame to a single page in Elementor?
Yes, you can add as many iFrames as you want to a single page in Elementor. Just repeat the process of adding the HTML widget and pasting the iFrame code for each iFrame you want to embed. However, be careful not to add too many iFrames as they can affect your website’s performance and loading time.
What should I do if the iFrame content is not displaying correctly?
If the iFrame content is not showing up properly on your website, you should try the following solutions:
- Check the iFrame code for any errors or typos, such as incorrect dimension values or missing quotation marks.
- Make sure that the external source of the iFrame allows embedding on other websites as some websites may block or restrict iFrame embedding for security or privacy reasons.
- Look for any conflicts or compatibility issues with other plugins or themes that may interfere with the iFrame functionality.
Final Verdict
Adding iFrame in Elementor can be a great way to enhance your website with external content, but you should also follow some best practices to ensure that your iFrames are responsive, fast, and compatible.
I hope that this article has helped you learn how to add and customize iFrames in Elementor using two methods: the default HTML widget and the iFrame plugins.
The HTML widget method is simple and straightforward, but it may not offer much flexibility and control over the iFrame appearance and behavior. However, the iFrame plugins method is more advanced and powerful, but it may require some additional steps and settings to configure the iFrame properly.
So choose the method that suits your needs and preferences, and experiment with different iFrame content and options to create a unique and engaging website. If you have any questions or feedback, please let me know in the comments below. Thank you for reading! 😊