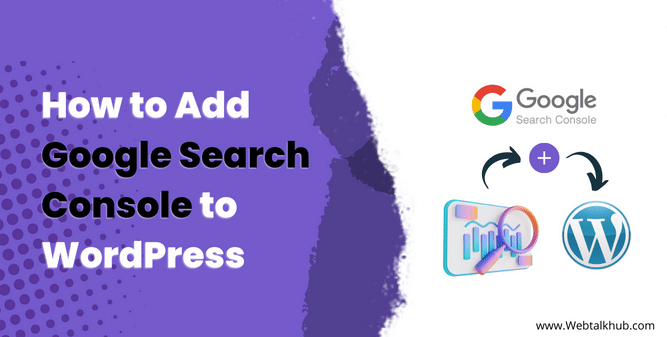
Want your website to show up higher in Google searches than optimization for SEO is important, and this can be achieved by Google search console formerly Google Webmaster Tools).
The Google search console provides different webmaster tools allowing website owners to monitor and optimize the website’s online presence and ranking.
In this guide, I will show you a simple way of adding and verifying a Google search console in WordPress, giving you valuable insights into your website performance, indexing, errors, and much more.
I will show you six different ways to add Google search console to WordPress website, starting with the most user-friendly method, and then show you the other alternative methods which will enhance your website visibility and search engine performance.
But before proceeding with the methods of integrating the search console, first, understand what is Google search console and its benefits.
What is Google Search Console and its Benefits?
Google Search Console, previously known as google webmaster tool, is a free service provided by Google to website owners, webmasters, and SEO professionals to monitor and optimize the performance of the websites in Google search results.
By using the Google search console, you can monitor your website’s performance on Google search results, and by using that information, you can further optimize your website to increase its search ranking.
Some benefits of the Google search console are listed below:
- Performance Monitoring: Tracks website performance in Google search results, including impressions, clicks, ranking positions, and click-through rates.
- Indexing Status: This shows which pages from your website have been indexed by Google.
- Sitemap Submission: This allows you to submit a website’s sitemap.
- Fixing Errors: Alerts to technical issues, crawl errors, and broken links hindering proper indexing.
- Mobile Usability: Checks mobile-friendliness of the site.
- Search Appearance: Provides data on how the site appears in search results and allows optimization of titles and meta descriptions to improve click-through rates.
- Backlink Analysis: Identifies which websites link to yours.
- Security Issues: Alerts to security issues such as malware or hacking attempts.
So by using the Google search console, you can improve your website ranking on Google search results as you will be able to fix the error and issues that are making your website de-rank and gain important information regarding what type of content on your website is performing well.
So let’s start with integrating the Google search console on the website.
1) Add Google Search Console to WordPress Using Google Site Kit
If you’re comfortable with the technicality of WordPress or just starting out, the easiest and most effective way to add your WordPress website to Google Search Console is by using the Google Site Kit plugin.
It’s the official Google plugin for WordPress, and it also allows integration with other Google services like Google Analytics, Google AdSense, Google Tag Manager, and PageSpeed Insights.
This plugin provides an all-in-one solution for integrating various Google services into your website.
To get started, follow these simple steps:
Go to your WordPress dashboard, navigate to Plugins > Add New, and search for “Google Site Kit.”
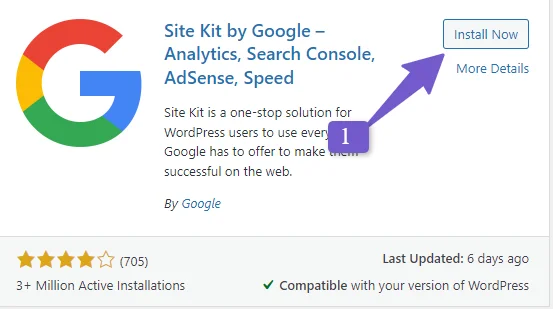
Once you find the plugin, install and activate it. A congratulatory banner appears with a button to start the setup.
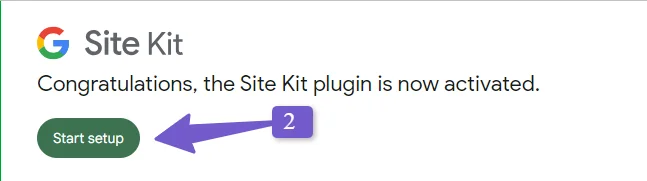
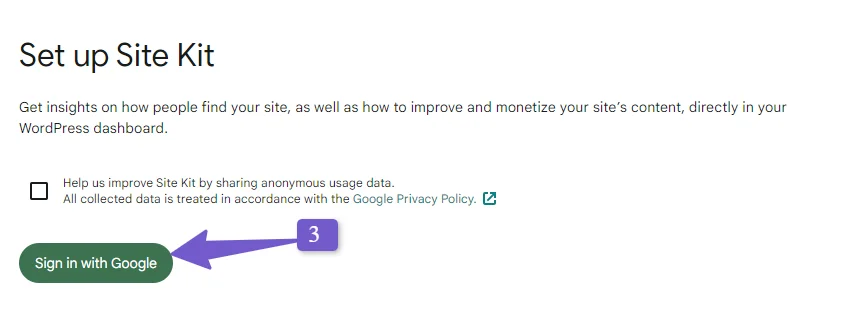
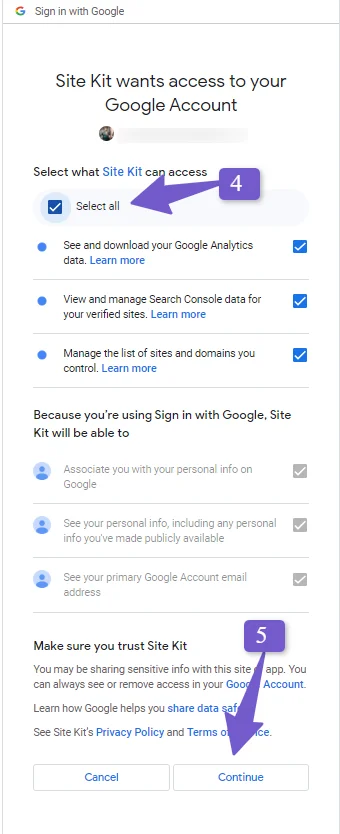
Click on the “Sign in with Google” button, and you’ll be redirected to your Google account. Select the account you want to use for the plugin, grant the necessary permissions, and then click continue.
You’ll be taken through a setup wizard. Click on Verify > Allow > Setup > Next.
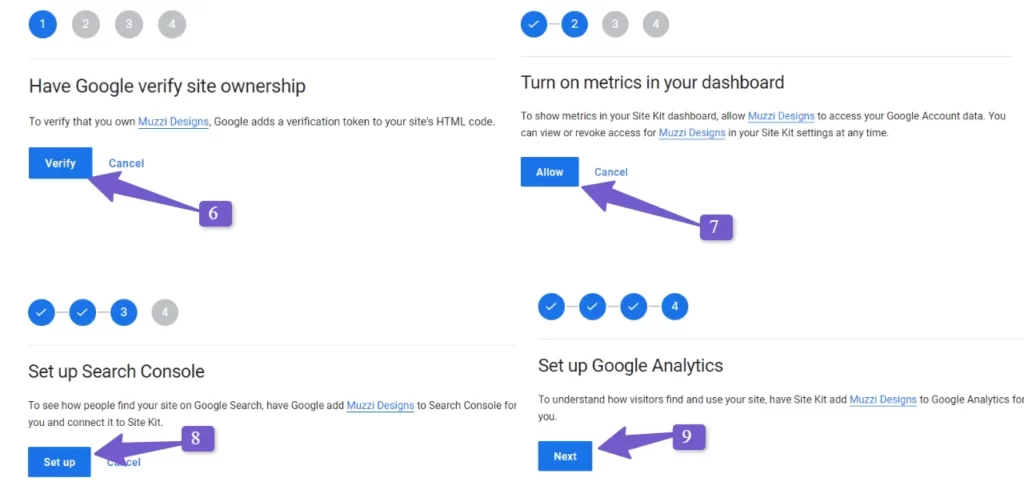
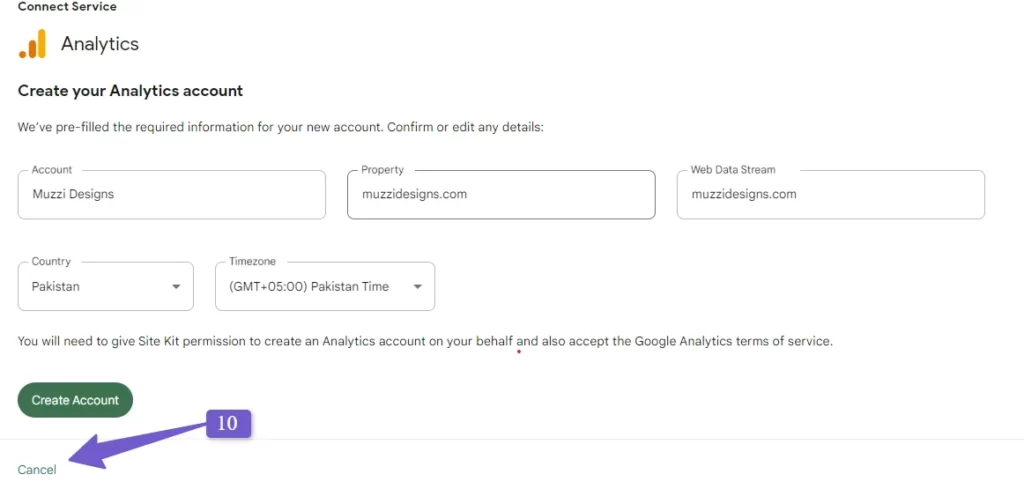
If you wish to set up Google Analytics as well, you can do that in the following step. But if you’re only adding Search Console, you can skip it.
That’s it! You’ve successfully integrated Google Search Console with your WordPress website.

Now to access your Search Console dashboard, sign in to your Google account and go to the Google Search Console. You’ll find all the metrics related to your website’s performance in Google search there.
Note: Initially, your Search Console dashboard might not have data, but as your website grows and has more content, you’ll start seeing information about your site’s performance on Google search.
We recommend using this method as it’s the official Google plugin, ensuring security and effectiveness.
However, if you prefer a different method, you can follow Google’s recommended approach for integrating Google Search Console, which is the HTML File Upload method.
2) Integrate Google Search Console with WordPress Using HTML File Upload
Google Search Console recommends the HTML file upload method for Google Site Verification. But also understand that this method might seem tricky, especially for non-tech folks.
Don’t worry, though! I’ll guide you step by step on how to do it.
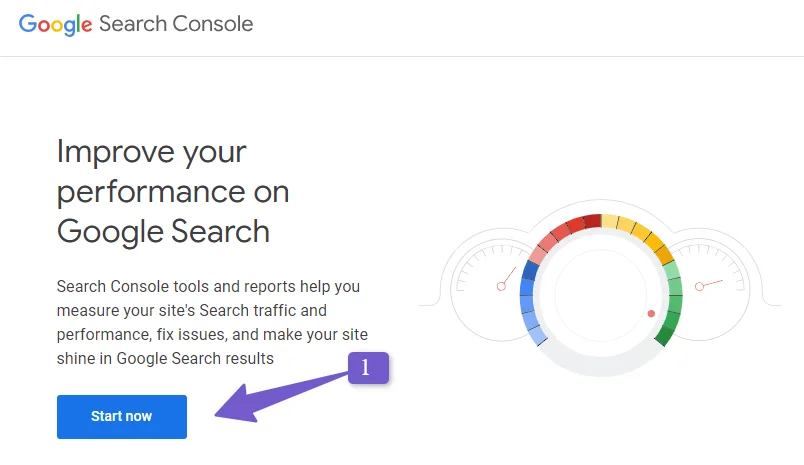
To start, visit the Google Search Console website and click “Start Now.” Sign in with the Google account you want to use.
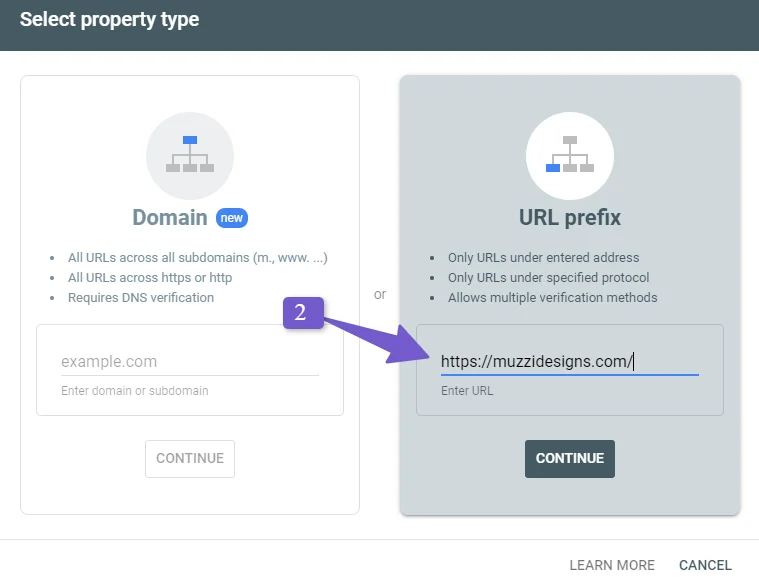
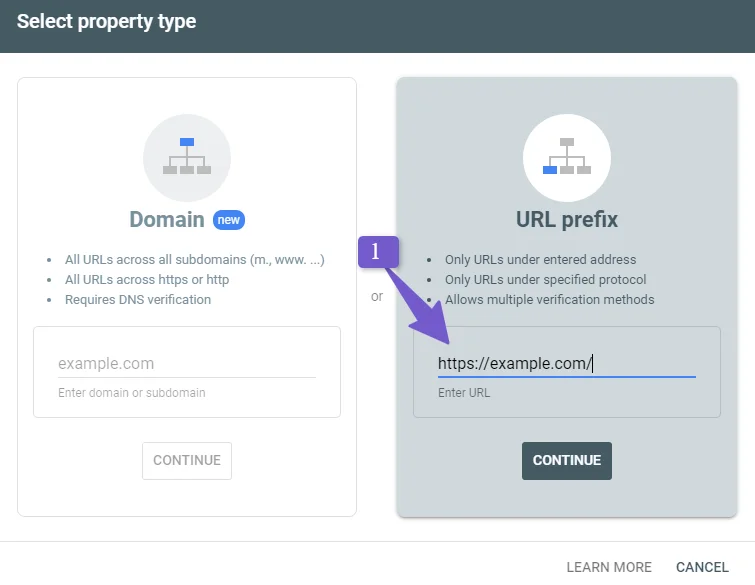
Next, you’ll need to enter your website URL. There are two methods: domain name and URL prefix. I suggest using the URL prefix method.
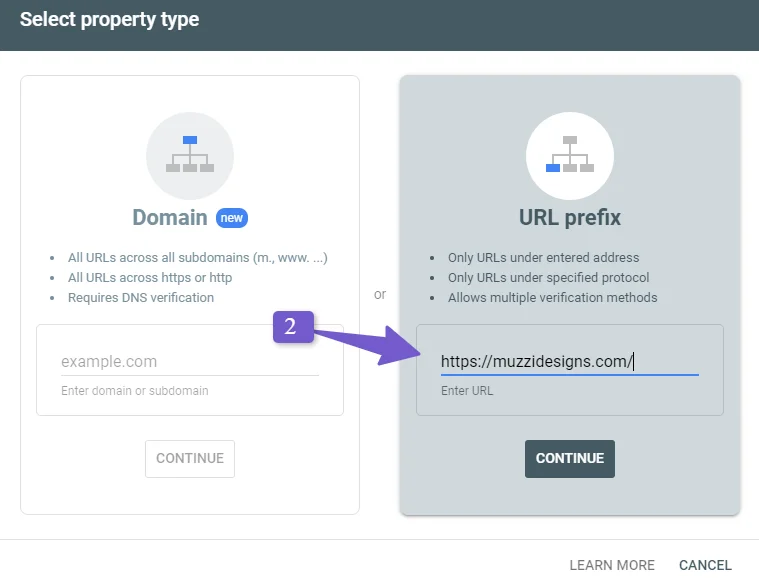
Note: Google treats “HTTP” and “HTTPS” as different protocols, meaning “https://www.example.com” and “https://example.com” are seen as separate websites. So, make sure to enter the correct URL.
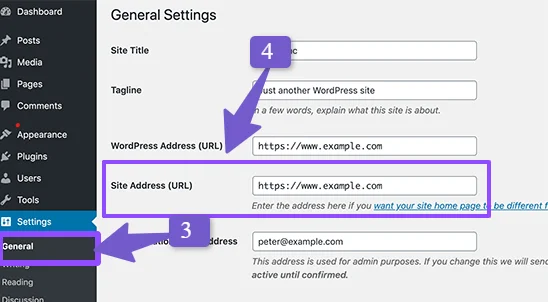
Head back to your WordPress dashboard, go to Settings > General, and copy your website URL from the Site Address field. Paste it in the Google Search Console setup wizard.
After that, download the HTML File provided as the recommended verification method.
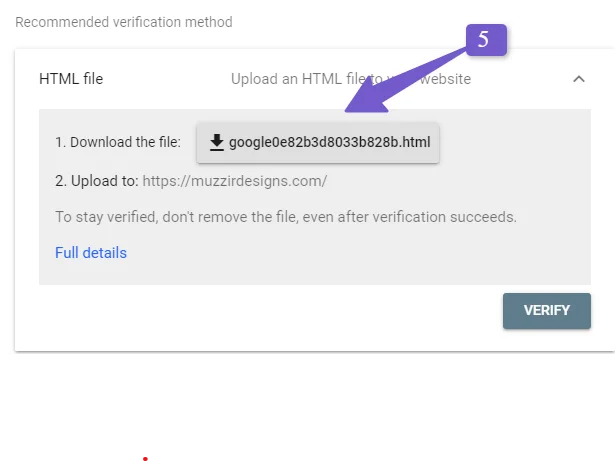
Now, access your hosting service; if you use Hostinger like me, the interface may differ slightly, but the process remains the same.
Go to your cPanel and open the File Manager. Find the root folder (usually named “public_html“), where essential folders of your WordPress installation like “wp_config,” “wp_content,” and “wp_Include” are located. Upload the HTML File to this folder.

Once you’ve done that, return to Google Search Console and click “Verify.” You’ll see a success message like this:
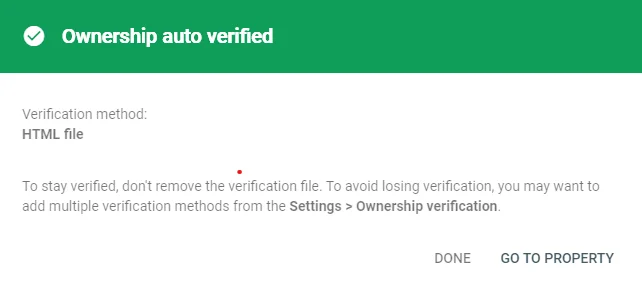
Note: Please be patient if you are still waiting for the success message. Give it about 5 minutes and clear your website cache. You should then see the verification successful message.
And That’s it! You’ve successfully added and verified your WordPress website with Google Search Console using the HTML file upload method.
3) Add Google Search Console to WordPress Using SEO Plugins
Using SEO plugins like Rank Math SEO, Yoast SEO, and All in One SEO can significantly improve your website’s SEO (Search Engine Optimization) and help it rank better in Google search results.
These plugins come with all the necessary features to enhance your website’s visibility.The good news is that these SEO plugins also offer an easy way to integrate various search engines and webmaster tools like Bing, Yandex, and Google Search Console.
SEO plugins in WordPress make it convenient to verify your Google Search Console without the need for additional plugins.
Also, many WordPress guides suggested adding the Google Search Console verification code to the header.php file of your website. However, this approach could be risky, as accidentally changing any files in that area could lead to losing access to your WordPress website.
Additionally, updating or changing themes could remove the Google-site-verification meta tag, requiring you to verify your site again.
By using an SEO plugin to add the Google verification code, you can have peace of mind knowing that any theme changes or updates won’t affect the verification process.
Let’s go through the steps for verifying Google Search Console using three popular SEO plugins: Rank Math SEO, Yoast SEO, and All in One SEO.
This will ensure that your website is correctly connected to Google Search Console, and you can enjoy the benefits of better SEO and website visibility.
Verify Google Search Console Using Rank Math SEO Plugin:
Go to Google Search Console and sign in to your Google account.
Choose the verification option with “Prefix” and enter your website URL there.
Note: “HTTPS” and “HTTP” are considered different, so make sure to use the correct URL of your website.
Copy your website URL from WordPress dashboard Settings > General > Site Address (URL) and paste it into Google Search Console.

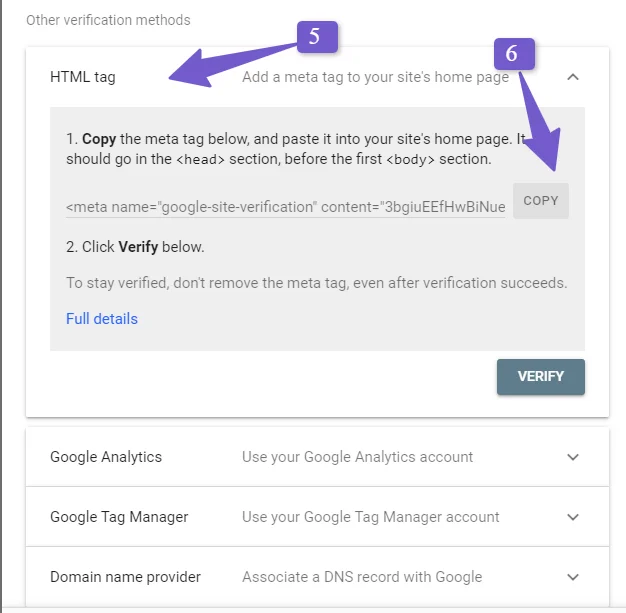
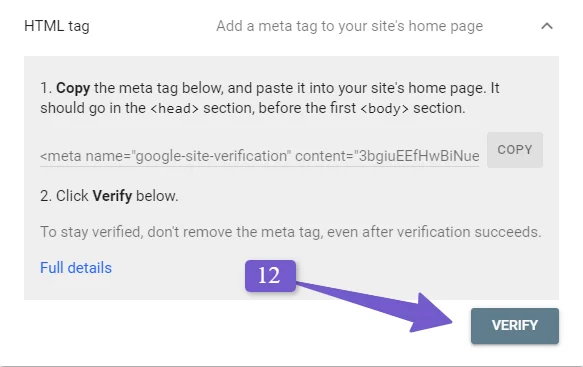
Select the “HTML tag” verification method and copy the provided HTML tag.
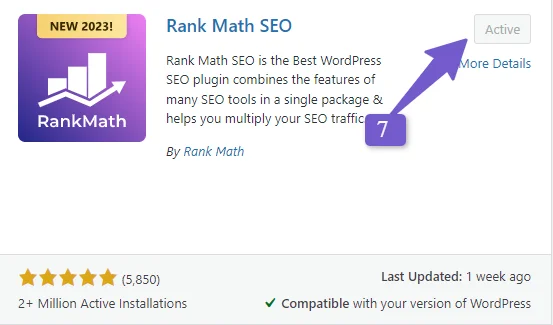
Install and activate the Rank Math SEO plugin from the WordPress dashboard > Plugins > Add New, then search for “RankMath SEO.”
In the WordPress Sidebar, go to Rank Math SEO Plugin Settings > General Settings > Webmaster Tools and paste the copied HTML tag. Save changes.
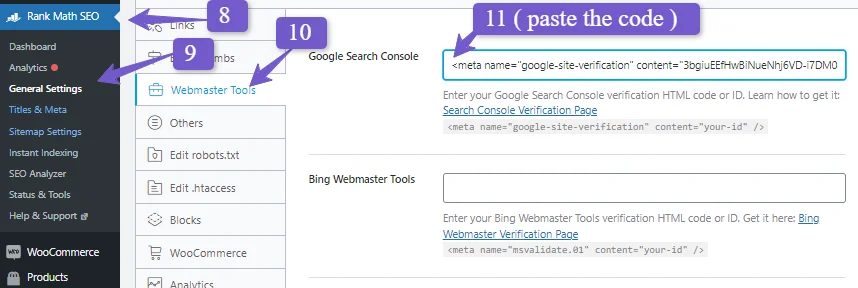
Verify the HTML tag in Google Search Console, and you should see a green verification popup.

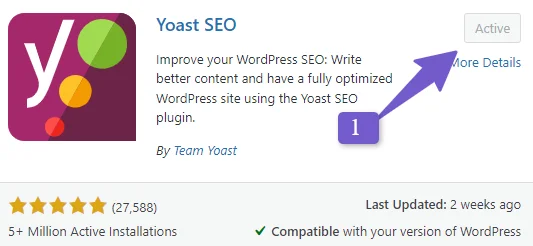
Verify Google Search Console Using Yoast SEO Plugin:
Install and activate the Yoast SEO plugin from the WordPress dashboard > Plugins > Add New, and search for “Yoast SEO.”
Go to Yoast SEO settings > Site Connections, and enter the HTML tag verification code from Google Search Console.
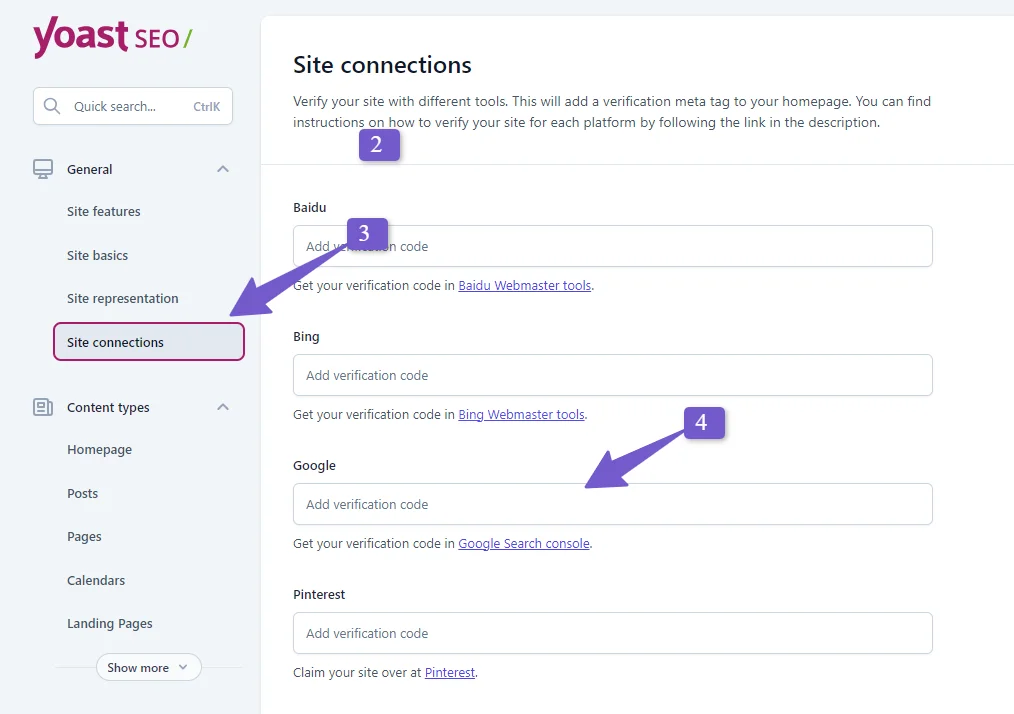
Go back to Google Search Console and click “Verify” to confirm the integration with WordPress.
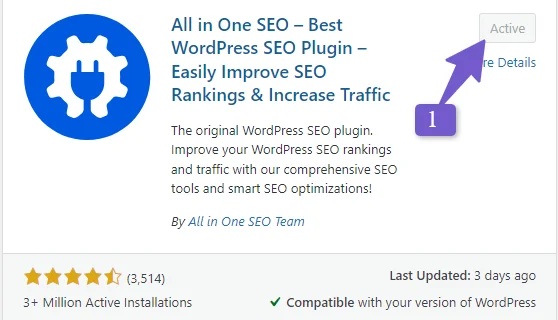
Verify Google Search Console Using All in One SEO plugin:
Install and activate the All in One SEO plugin from the WordPress dashboard > Plugins > Add New, and search for “All in One SEO.”
In All in One SEO plugin settings > Webmaster Tools, select “Google Search Console” and add the verification code copied earlier.
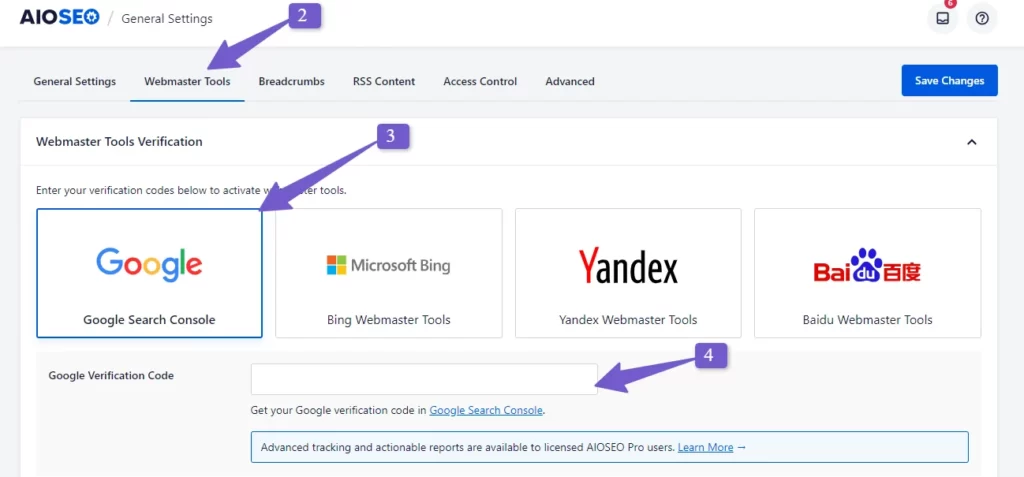
Return to Google Search Console, verify the code, and you’ll see a green popup confirming the verification.
By following these steps, you can successfully link your WordPress website to Google Search Console using different SEO plugins.
4) Add Google Search Console to WordPress Using DNS Configuration
If you have multiple subdomains and a mix of URLs with both HTTP and HTTPS prefixes, this method is recommended for you.
Using DNS configuration will direct all your website metrics to one central place, making it easier to manage.
Here’s how you can do it:
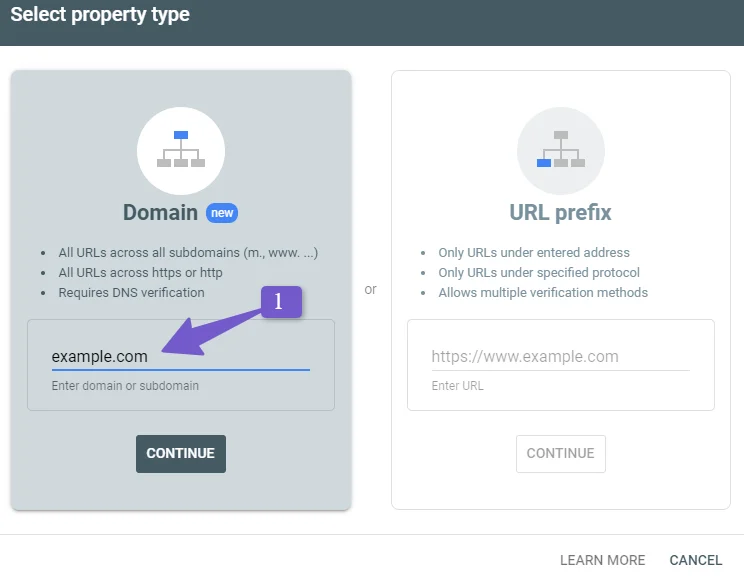
In Google Search Console, go to the domain option and add your website’s domain name without adding “https://” or “http://”—just the plain domain name, for example, “example.com.” Then click “continue.”
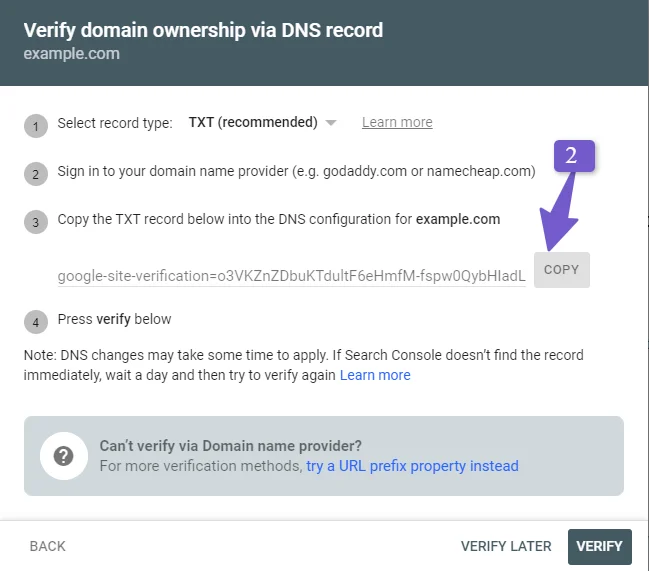
A popup will appear with your TXT record for your website. Copy this TXT record.
Go to the location where you manage your domain’s DNS settings. The location will depend on where you pointed your domain name. Here are three possible options:
- Hosting Account Control Panel: If you pointed your domain to your hosting account using name servers or purchased the domain in the hosting account, the DNS settings will be on your hosting account. Locate it, and it will likely be titled “DNS Zone Editor.”
- Domain Registrar: If you pointed your domain to the Hosting using an A record instead of name servers, the domain DNS settings will be on your domain name registrar’s platform. Popular registrars include Namecheap and Network Solutions, though this situation is rare.
- Cloudflare: Find your domain’s DNS settings in the Cloudflare dashboard if you use Cloudflare.
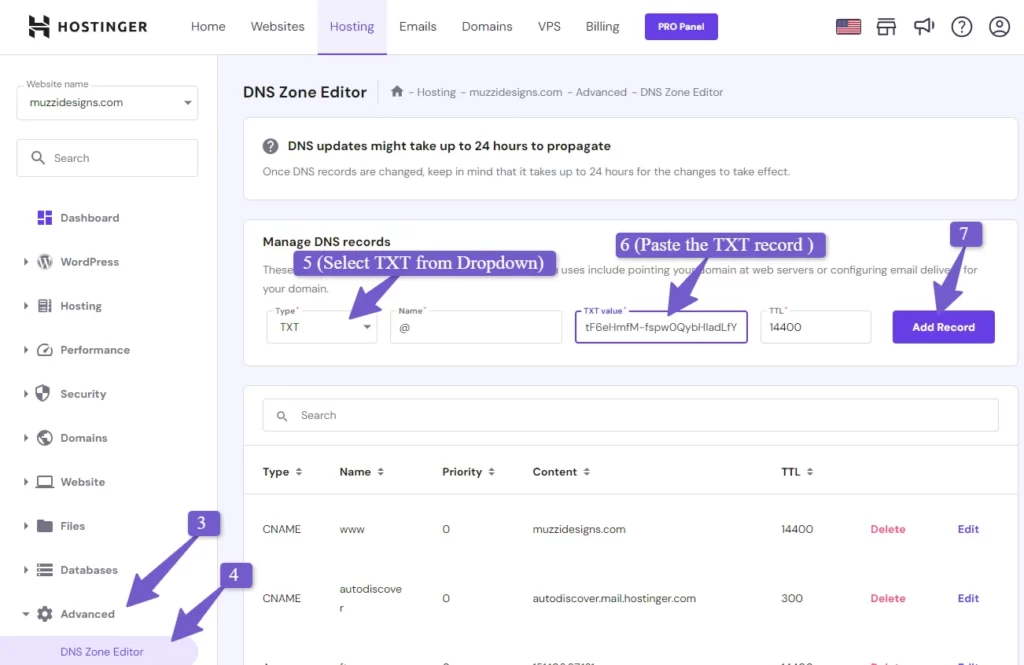
Most people have their domain DNS on the hosting account, so we will proceed with changing the Domain DNS using the hosting account. The process will be similar for other hosting providers, with slight interface differences.
In your hosting dashboard (e.g., Hostinger), go to Hosting and select the website you want to verify using the DNS configuration method. In the left sidebar, click on Advanced > DNS Zone Editor. Choose “TXT record” from the dropdown menu and paste the TXT value you copied into the “TXT value” field. Then click “Add record.”
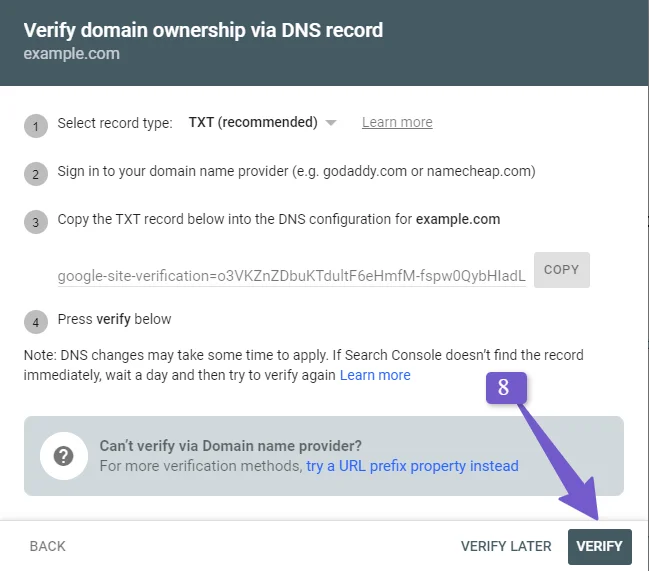
Now, go back to Google Search Console and click “verify.” Your website will be verified.

Note: If your domain is not verified immediately, don’t worry. The process may take some time, ranging from minutes to days. Just be patient.
5) Add Google Search Console to WordPress Using Google Analytics
I recommend this method if you already have Google Analytics tracking code installed in the <head> tag of your WordPress website.
If you don’t have the Google Analytics tracking code in the <head> tag, this method won’t work for you, and it’s better to use another way I’ve discussed earlier.
If your WordPress website has the Google Analytics tracking code in the <head> tag, follow these steps:
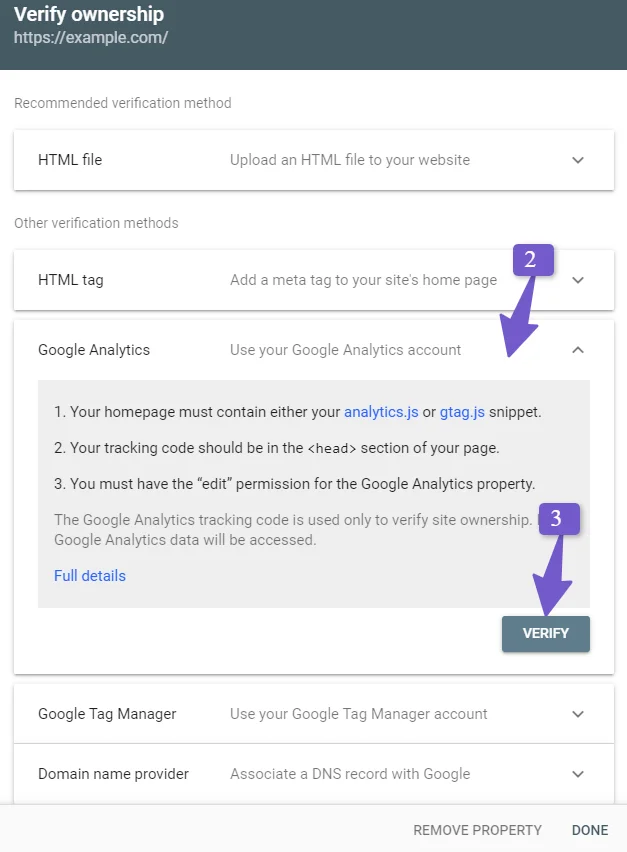
Login to Google Search Console using the same account you use for Google Analytics. Add your website URL in the “Prefix” field, as shown in the screenshot below:

You’ll see different options for Google Site verification code. Scroll down and click on “Google Analytics,” then click “Verify,” and the Search Console will be automatically verified for you.
If it doesn’t work, some possible reasons could be:
- You must use the same Google account for both Search Console and Google Analytics.
- The Google Analytics tracking code is not present on your website’s homepage.
- Your tracking code is not in the <head> tag.
- You must have “edit” rights for the Google Analytics account used by that page. In Google Analytics 4, the verification code is associated with a Google Analytics stream. For earlier versions of Google Analytics, the verification code is associated with a Google Analytics Web Property.
Make sure to check these points if the verification process doesn’t succeed.
6) Add Google Search Console to WordPress Using Google Tag Manager
Integrating your website to the Google search console by using the Google Tag Manager is also one of the ways if you are familiar with and already installed Google tag manager on your WordPress website.
Here’s how you can do it:
Log in to Google Search Console with the same Google account you used to create Google Tag Manager. Add your website URL Prefix option.
Scroll down and choose the Google Tag Manager method from the available Google site verification methods. Click “Verify,” and your website will be verified.
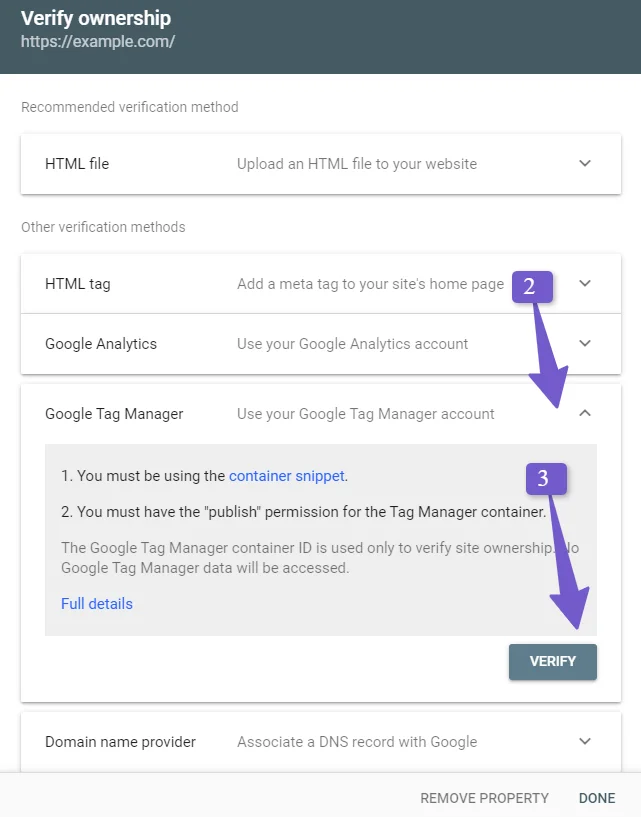
Keep in mind that this method will only work if you have the container snippet from Google Tag Manager on your existing website. The container snippet is a small piece of code that Google Tag Manager provides, which you need to add to your website and tags.
There are a few reasons why this method might not work on your website, and they are listed below:
- The Google accounts used for Search Console and Google Tag Manager must be the same.
- The correct tag must be placed in the proper location on the non-logged-in homepage.
- You need Publish or Admin permission for the Google Tag Manager container.
- No modifications should be made to the provided code.The <noscript> portion of the Tag Manager code must be placed directly after your page’s opening <body> tag. If not done this way, the verification will fail.
Following these steps and ensuring everything is set up correctly, you can successfully link your WordPress website to Google Search Console using Google Tag Manager.
Add XML Sitemap to Google Search Console
An XML sitemap is a file that lists all the important pages and content on your website. It’s like a map that helps Google understand the structure of your site, leading to better rankings in Google search results.
Adding an XML sitemap to Google Search Console is a recommended step after verifying your site. The good news is that it’s quite simple to do this in WordPress.
If you have an SEO plugin installed like Rankmath SEO, Yoast SEO, or All in One SEO, it will automatically generate the XML sitemap for your WordPress website. To access it, just go to your website’s URL and add “/sitemap.xml” at the end, like this: “example.com/sitemap.xml.”
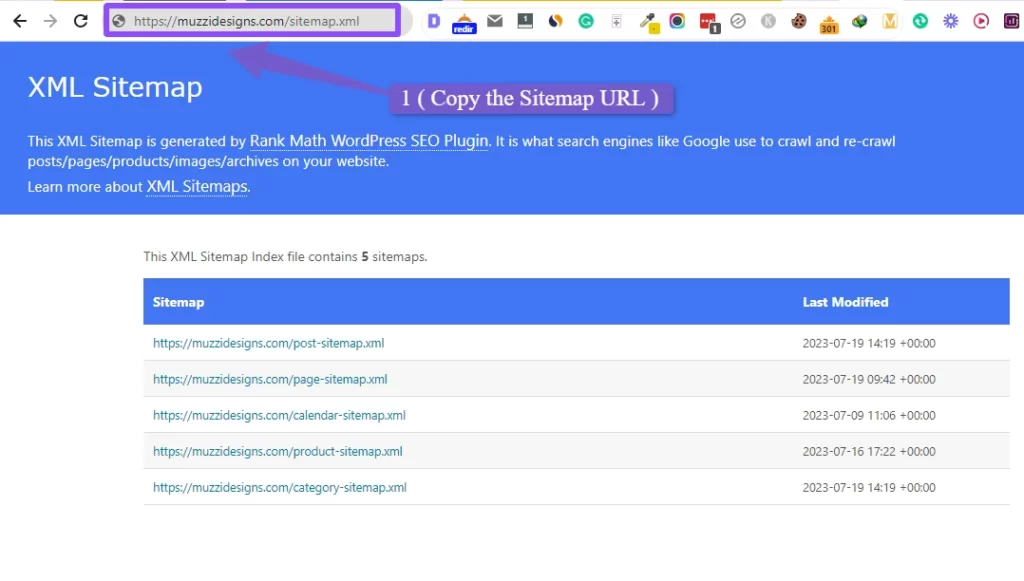
Once you have the XML sitemap, go to Google Search Console and find the “Sitemap” option in the sidebar. Click on it and add your sitemap link there, for example, “example.com/sitemap.xml.” That’s it!
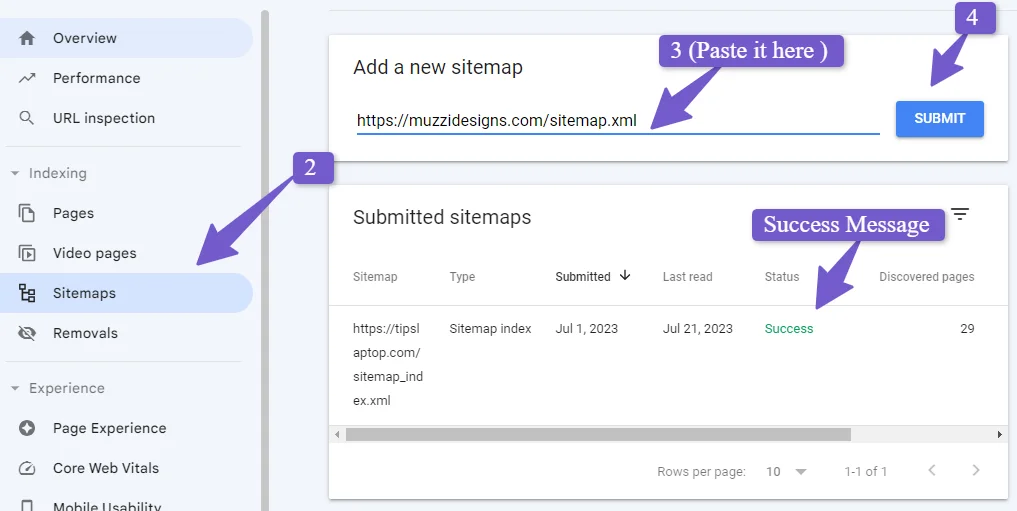
Google will add your sitemap to Search Console and show a green success message to let you know it’s done. This helps Google better understand and index your site, ultimately improving your website’s visibility in search results.
Troubleshoot: Why Google Site Verification Failed on Website
When you’re trying to verify your website with Google Search Console with different methods, you might encounter some common Google site verification errors. Here are the possible errors you could face:
- Incorrect tag/snippet/file errors: Double-check that you’re using the exact tag, code snippet, or file provided to you for verification. Using the wrong code can lead to errors.
- Connection timeout: If we can’t verify your file, it could be due to a server timeout. This might happen if your server is down or responding slowly. Make sure your server is working fine, and try again.
- Domain name lookup error: We may have trouble accessing your domain due to a DNS error. Check if your domain is resolving correctly, as this could be causing the problem.
- Too many redirects: If the download request was redirected multiple times, there might be an issue with the URL, like an infinite loop. Check the URL for any potential problems.
- Invalid server response: If your site requires password authentication or if we can’t access it for other reasons, we might get an invalid response.
- Server connection issue: Ensure that your server is up and running correctly before trying again.
- Internal error: If you keep encountering this error, check the Webmaster Central Help Forum for any updates or solutions.
- Timeout: This error can happen if either your site or the domain server stops responding during the verification process. Confirm that your site is responsive and try again.
- Domain not found: If we can’t recognize the site URL you provided, it might be unknown to the DNS service. Make sure you’re giving us the correct URL for your website.
If you face any of these issues, don’t worry. Just carefully review the possible causes and follow the suggested solutions to complete the verification process successfully. In addition, you can also Report verification issues in the Google search console.
FAQ ( Add Google Search Console to WordPress)
Where to upload the Google Search Console HTML file in WordPress?
To add Google Search Console to your WordPress website, upload the Google Search Console HTML file to the main folder (root folder) of your site in the Cpanel, usually named “/public_html/.” This verification step confirms your ownership and allows you to access valuable data and insights through Google Search Console.
Can you use Google Search Console for SEO?
Google Search Console’s primary purpose is website SEO, so you can use it to monitor your website performance on Google search results. In addition, you can also Diagnose and fix technical SEO issues to improve your website ranking chances.
How long does it take for Google to verify my website after adding the verification code?
Usually, when you verify your website with Google Search Console, it happens right away. However, in some cases, it might take a bit longer, like a day, especially when using the DNS configuration method. So, if you choose that method and don’t see instant verification, don’t worry; it just needs a little extra time to complete.
Do I need to configure any specific settings after adding Google Search Console to my WordPress site?
Adding your website sitemap to the Google search console will be best because Google crawler will easily crawl your website and index your website content in no time.
Conclusion
Integrating Google Search Console on your WordPress website will give you so much data about your website, which you can utilize to improve your website ranking in Google search results. So it’s the best free SEO tool you need to have in order to succeed in this ever-growing online competition on the internet.
Here In this complete guide, we have learned what is Google Search Console and its benefits. Show you the process of adding it using six different methods, starting from the easiest, most effective, and recommended method using the Google official WordPress plugin Google Sited kit.
So I hope you understand what Google search console is and its benefits, and how you can add your WordPress website to it easily. If you still have specific questions in mind, you can ask me via comment, and I will be happy to help you out. Thank you.