Text color is a very important part of web design that can change how your WordPress website looks and feels. It can help you make contrast, highlight important information, create a unique style, match your brand’s color scheme, and make your content easy to read and understand.
Now, if you are wondering how to change the text color on your WordPress website, then you have come to the right place. Well, you might think that changing text color in WordPress is hard or complicated but it is actually very easy and simple.
WordPress has many easy and simple ways to change text color for any part of your website, whether you want to change the color of one word, a whole paragraph, a heading, a widget, a header or footer, a whole page or the entire website.
In this simple guide, I will show you how to change text color in WordPress using four different ways: changing text color through the visual editor, theme customizer, using CSS code, or a page builder plugin. But it will also be great to first discuss why to change text color.
Why to Change the Text Color, Why it Matters?
When it comes to your website’s appearance and branding, the default text colors in WordPress themes may not always align with your vision or you can say branding of your website, and sometimes, it might also not be very easy to read or may not stand out well from the background.
This can make it hard for people to use your website comfortably, especially for people who have problem with their eyesight. So changing the text color in WordPress can address these concerns and provide a more comfortable experience for your visitors.
Whether you want to make a call to action more noticeable or differentiate subheadings, selecting the right colors is essential. Well, there can be different reasons why you might want to change the text color in WordPress. but whatever the reason is, one thing is for sure, enhancing the text color can make your website look better and provide a better experience for your visitors.
Also Read: How to Change Link Color in WordPress
So, without any further delay, let me show you how you can easily change font color in WordPress in four different ways:
1) Changing Text color in WordPress Theme Customizer
Changing text color in the WordPress Theme Customizer allows you to customize the text color for your entire website. This means you can easily customize the color of various text elements like headings, paragraphs, links, buttons, and more, across your entire site with the help of just WordPress Customizer.
So to change the text color in the Theme Customizer ( we are using astra theme ), follow these simple steps:
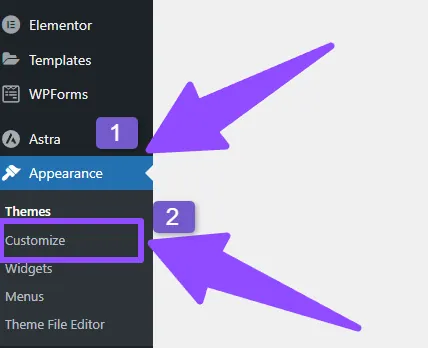
- Log in to your WordPress Dashboard and go to Appearance > Customize.
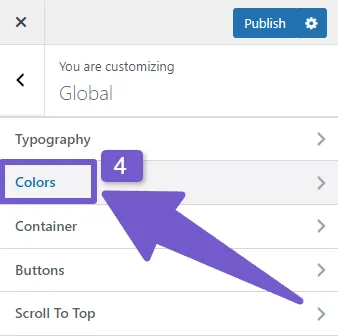
- In the Theme Customizer, locate the Colors section. Note that in some themes, Colors may be found under the Global Tab (Global > Colors).
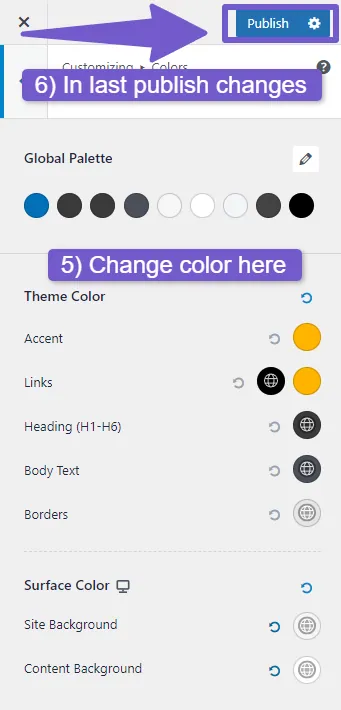
- Within the Colors section, you’ll find options to modify the text color for different tags like headings, paragraphs, and links. These tags may be labeled as Body Text, Headings (H1 – H6), and so on.
- To choose a new color for your text, simply click on the color picker or color swatch. You can either visually select a color or enter a specific color code.
- As you make changes, the live preview will instantly show you how the new text color will appear on your website.
- Once you’re satisfied with the color change, click the Publish button to apply the modifications to your website’s text color.

As I said, I am using astra theme so these steps are specific to the Astra theme, but the process is generally the same for all WordPress themes. For example, in the Ocean WP theme, you can go to Appearance > Customize, then navigate to Global > Typography ( Instead of going to Colors tab), and there you can change the font color of text elements.
2) Changing Text color in WordPress Using Gutenberg Editor
The Gutenberg editor is the default block editor in WordPress, which allows you to create and edit content using blocks. If you are using Gutenberg, you can easily change the text color in an individual post or page.
This method is useful when you only want to change the color of a specific sentence or phrase on individual page, instead of changing the entire website’s text color. So to change the text color in Gutenberg editor, simply follow these steps:
- Go to your WordPress Dashboard and navigate to Posts > All Posts (or Pages > All Pages) to open the post or page where you want to change the text color.
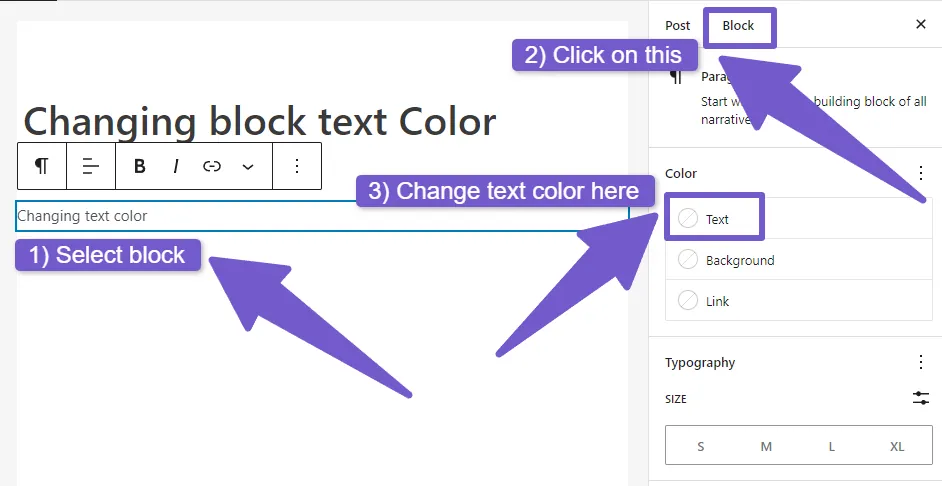
- The post or page will automatically open with the Gutenberg editor. Locate the text block that you want to change the color of and click on the block.
- On the right-hand side of the screen, you will see two tabs: Post and Block. Click on the Block tab.
- In the Block tab, find and click on the Text Color option. A color picker will appear, allowing you to visually select a color or enter a specific color code.
- Once you have chosen the desired text color, the text in the block will immediately update to reflect the change.
- If you have multiple text blocks in the post or page and want to change the color for each of them, repeat the process for each block individually.
- However, if you want to change text color for just few words on the block and not want to change entire block color, then highlight the text and click on little arrow dropdown in toolbar menu and change color there.
- After making all the desired changes, click the Update or Publish button to save your changes and make the updated text color live on your website.
Also read: How to Change WooCommerce Button Color ( 3 Easy Ways )
That’s it! Now you know how to change the text color in Gutenberg editor but some people still use the old Classic Editor in WordPress, which works differently from the new Gutenberg editor. So if you are using the classic editor and want to change the text color in your posts or pages, don’t worry, I’ll show you how to do that too.
Changing Text color in WordPress Classic Editor:
The process of changing text color in WordPress Classic Editor is a bit different from Gutenberg editor. Here’s how you can change the text color using the WordPress classic editor:
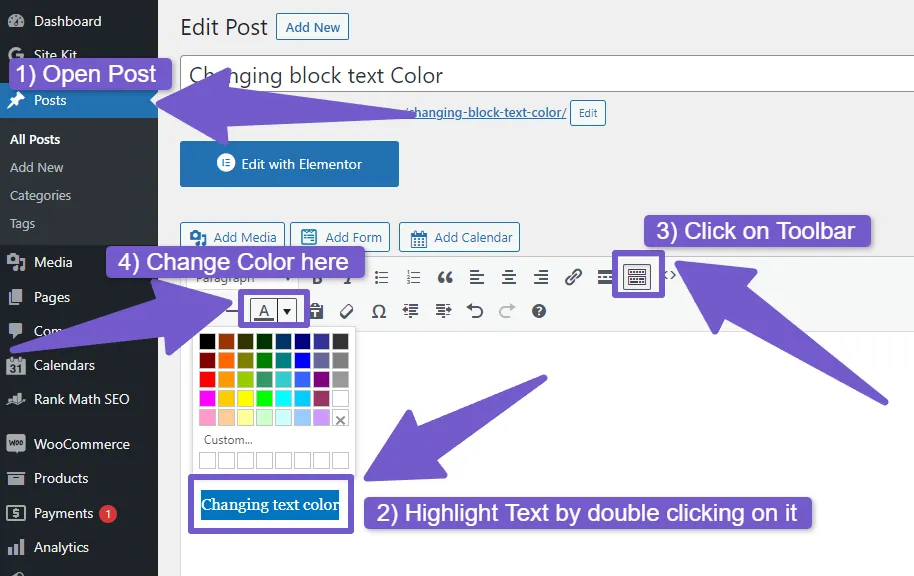
- In your WordPress Dashboard, open the post or page using the classic editor.
- Locate the text that you want to change the color of and highlight it with your cursor.
- In the classic editor, you won’t see a direct option to change the text color. However, there is a Toolbar Toggle option that you can find at the top of page in toolbar, so click on it and more options for text customization will appear.
- There, look for the Font Color option, which is usually represented by a letter “A” with a bar below it, so click on it and a color palette will appear.
- From the color palette, choose the color you want for the highlighted text. You can either visually pick a color or enter a specific color code.
- Once you have selected the desired text color, the highlighted text will update immediately to display the new color.
- If you have more text that you want to change the color of, simply repeat the process by highlighting and selecting a new color for each text element.
- Finally, click the Update button and make the updated text color visible on your live site.
Whether you are using Gutenberg or the classic editor, I have shown you how simple it is to change text color in a WordPress site. With Gutenberg, you can modify individual blocks, while in the classic editor, you can use the Toolbar Toggle for text customization.
Also Read: How to Change Logo Size WordPress ( 4 Easy methods )
3) Changing the Text Color in WordPress Using CSS Code
Customizing the text color in WordPress becomes very easy with CSS code. CSS (Cascading Style Sheets) allows you to modify the appearance of your WordPress website by applying styles to specific HTML elements, including text colors.
So, if you are looking for more control over the text color on your website or want to change the color of specific elements that aren’t covered by the theme customizer or default WordPress Editor, using CSS code is the solution.
To change the text color using CSS code in WordPress, follow these simple steps:
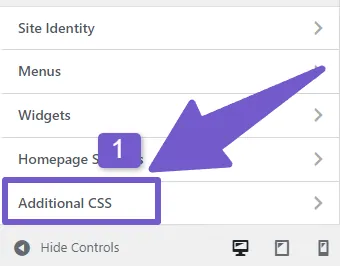
- In your WordPress Dashboard, navigate to Appearance > Customize.
- When the customizer opens, locate Additional CSS Tab in the Bottom.
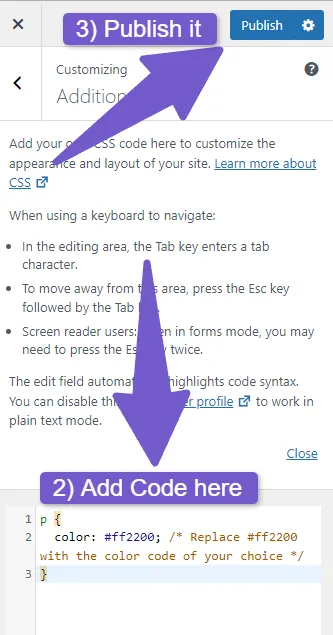
- So, to change the text color, you’ll need to target the specific HTML elements you wish to modify. For example, if you want to change the color of all paragraphs, you can use the following CSS code:
p {
  color: #ff2200; /* Replace #ff2200 with the color code of your choice */
}
To target different HTML elements, you need to use their respective selectors. For instance, to change the color of all headings (<h1> to <h6>), you can use:
h1, h2, h3, h4, h5, h6 {
    color: #00bfff; /* Replace #00bfff with the desired color code */
}
Note: You can also use the heading tags separately to give them different colors.
Like:
h1 {
    color: #00b6ff;
}

h2 {
    color: #30b6ff;
}

h3 {
    color: #3046ff; /*do the same with h4, h5, h6 */
}
You can also customize the color of particular text elements by assigning classes or IDs to them. Then, use these specific IDs in your CSS code to change the text color, like this:
#Your_ID {
  color: #4f2200; /* Replace #4f2200 with the color code of your choice */
}
Once you have added the CSS code with your desired changes, click the Publish button at the top in customizer to apply the new text color to your website.
Keep in mind that CSS can do a lot more than just changing text color. If you have some basic knowledge of CSS, you can customize many things on your WordPress website.
4) Changing the Text Color in WordPress With Page Builders
Changing the text color in WordPress becomes much easier when you use page builders like Elementor, Beaver Builder, or Divi. If you’re using any of these, and wondering how to change text color, don’t worry! The steps are pretty much the same for all of them, and I’ll show you how on each one:
If you are using Elementor:
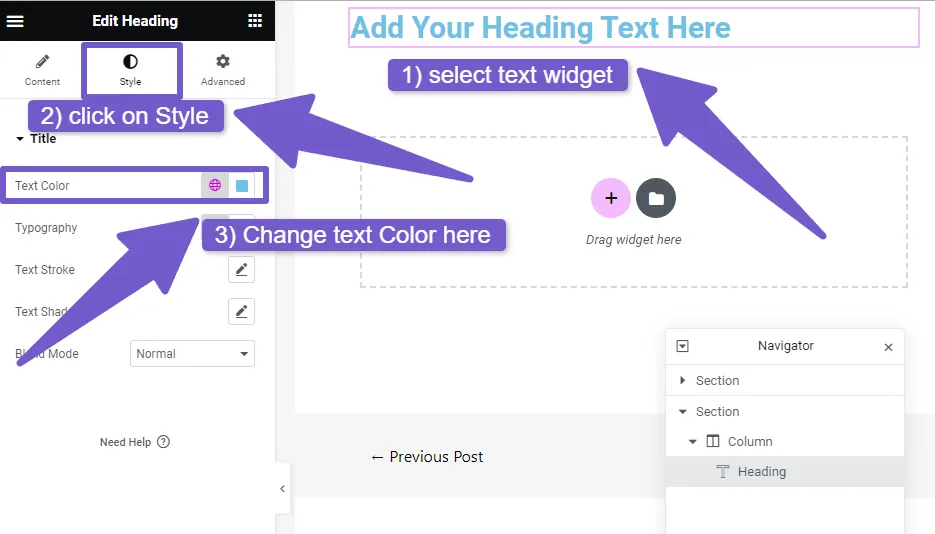
- Open the page you want to edit with Elementor.
- Find the text widget or element you want to change the color of.
- In the Elementor sidebar, look for the Style tab and open it.
- There you will the option to change Text color, so there you can easily adjust the text color by choosing a color or entering a color code.
- Save your changes, and the text color will instantly update on your page.
Also Read: How to Change Link Color in Elementor
If you are using Beaver Builder:
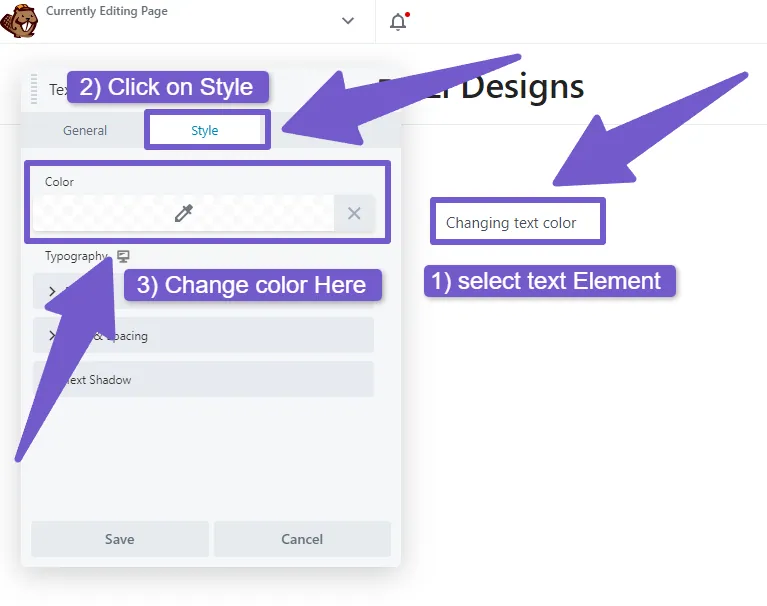
- open the page with Beaver Builder editor for which you want to make changes.
- Go to the text module that you want to change color of and click on it.
- The text editor tool will appear on the screen, there go to the Style tab.
- There look for the Text Color option , use the color picker to select a color or enter a specific color code to set the text color.
- Save your changes, and the text will now appear in the new color on your page.
If you are using Divi:
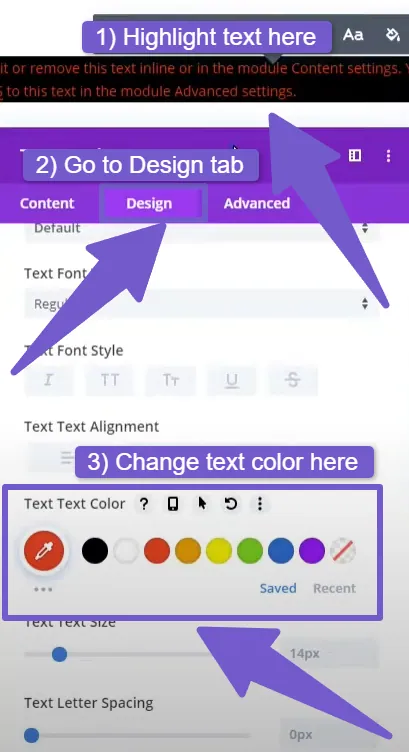
- Open the page in the Divi Builder.
- Find the text module you want to customize.
- In the text module settings, go to the Design tab.
- There look for the Text color option, and adjust the color using the color picker or by entering a color code.
- Save your changes, and the text will be updated with the chosen color.
Each page builder has its own easy-to-use interface, but the steps to change text color are similar.
However, if you want to change the text color just for the header and footer of your website, then how to do it.
Changing Text Color in WordPress Header or Footer Only
Changing the text color in the header or footer of your WordPress website is a bit different from changing text colors in the main content area. Most themes don’t let you directly change the text color in the header or footer using the default settings.
But don’t worry, there is a way to do it and I will show you a method that works for any theme, so you can change the header/footer text color no matter what theme you are using.
But still If you want to see if your theme has the option to change header or footer text color, follow these steps:
- Go to your WordPress Dashboard and click on Appearance > customize.
- There, look for the General tab, and find Colors.
- Depending on your theme, you may see options for Header or Footer.
- Check if there are settings to change text color or typography.
- Pick a color using the color picker or enter a color code.
If your theme does not have the option to change text color directly, don’t worry! You can still do it with a simple CSS code. Here’s how:
First, go back to your customizer home, and at the bottom, and go to Additional CSS tab. Click on it to add your CSS code.
To change the header text color, use this code:
.site-header p {
    color: #yourcolorcode;
}
But wait, before you add this code, you should check what HTML tag your header text is using. Often, they use the <a> tag. So, if that’s the case, you can write this instead:
.site-header a {
    color: #yourcolorcode;
}
Remember, you can change the <a> to other tags like <p>, <h1>, <h2>, <h3>, <h4>, <h5>, or <h6>, depending on what your theme uses for header text.
Similarly, for changing the footer text color, use this code:
footer p {
    color: #yourcolorcode;
}
FAQ( How to Change Text Color in WordPress )
Can I change text color in WordPress without using code?
Yes, you can change text color in WordPress without using code if your theme or page builder provides built-in options for text color customization. Many themes and page builders offer simple color pickers to easily modify text colors.
What if my theme or page builder doesn’t have text color options?
If your theme or page builder does not have direct text color options, you can still change the text color by using custom CSS code. CSS allows you to style your website, including text colors, according to your preferences.
How can I add custom CSS code to change text color in WordPress?
To add custom CSS code, go to your WordPress Dashboard and navigate to Appearance > Customize > Additional CSS. There, you can enter the CSS code to target the specific text element you want to modify and set the desired text color.
How do I change font color in WordPress?
To change the text color in WordPress follow these steps:
1) Open the post or page in the Gutenberg editor.
2) Locate the text block that you want to modify and click on it.
3) On the right-hand side, click on the Block tab.
4) Look for the Text Color option and click on it.
5) A color picker will appear, allowing you to visually choose a color or enter a color code.
Once you’ve picked the color, the text in the block will update to show the new color.
How to give ID to a specific text element in WordPress
To give an ID to a specific text element in WordPress, follow these steps:
1) Open the post or page in the WordPress Editor (Gutenberg or classic editor but I will be using Gutenberg editor) where you want to add the ID.
2) In the Gutenberg editor, click on the text block you want to give ID. On the right-hand side, select Block and there locate the Advanced field.
3) In the Advanced tab, you’ll see an option to add a CSS class or an HTML anchor.
4) Enter your desired ID name in the “HTML Anchor” field, without using any spaces or special characters.
However, in the classic editor, switch to the Text mode. Locate the text you want to add the ID to and wrap it with an HTML tag like <span> or <p>. Then, add id="your-desired-id" inside the opening tag. For example: <span id="your-desired-id">Your text </span>
After adding the ID, save or update the post or page.
Then you can use these id in CSS code for changing text color.
Conclusion
Changing text color in WordPress is pretty simple! You can do it using the default editor like Classic or Gutenberg. Or, if you want to have more control, you can use custom CSS code for specific changes.
You can change text color in different parts of your website, like the main content, header, footer, or page title as WordPress has many of ways to do it, so you can pick what works best for you ( from my methods above).
For easy changes, the editor options let you pick colors from a palette or enter color codes, however, for more advanced customization, as I said earlier, using custom CSS code gives you greater control over the font color for specific elements.
Remember to check your theme options and the editor settings first, however if you can’t find these text color option, don’t worry! you can do it by using our 3rd method of CSS code.
Well, with all these methods, changing text color in WordPress becomes very easy. I hope you found this guide helpful. If you want us to right on more WordPress Issues, just comment down below the topic name or contact us through our contact page Thanks for reading….!