
Do you want to know, how to change WooCommerce button color? if yes, then this guide is for you. WooCommerce buttons do not come up with their own styling but it generally adopts the design and colors of the theme which is installed on the WordPress site.
Every theme implies its default color on the website buttons and these colors are also implied on WooCommerce buttons. So if you don’t like the default color of WooCommerce buttons due to any reason, or maybe because it’s not matching the branding of your website, then you would definitely be looking for a solution to change WooCommerce button color.
4 Ways to Change WooCommerce Button Color in WordPress
In this guide, I am going to show you how to change the color of WooCommerce buttons in four simple methods. The first method is to manually change WooCommerce button color in the theme customizations, while in the second and third method I will be using inspect element and custom code to style WooCommerce buttons.
1) Manually Change WooCommerce Button Color
The WooCommerce button’s color can be manually changed in theme customization. To do so, go to Appearance > Customize and after clicking on the customization you will be directed to theme customizations

In theme customization, look for Global click on it, now you will see Buttons, click on it, and there you can see the color, font size, border color, etc of buttons, so here you can change the color of WooCommerce buttons to any desired color you want
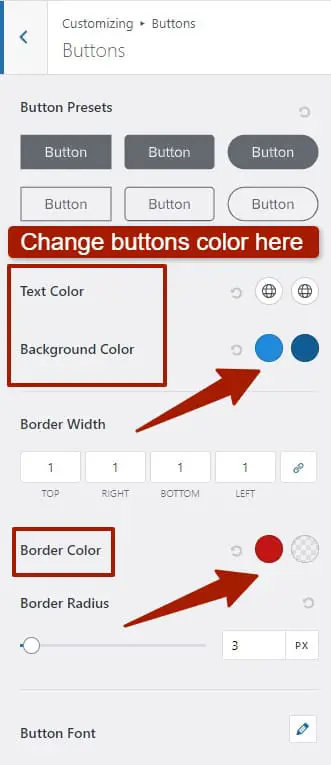
After changing the color of the WooCoomerce buttons, save the changes and check your site to see the new stunning colors on your website buttons.
Note: Changing Button color in theme customization will not only change the color for WooCommerce buttons but will change the entire website button colors.
You May like:
How to Change WooCommerce Add to Cart Button Text
How to Delete all Products from WooCommerce Easily
How to Make Accordion Closed by Default Elementor
2) Change WooCommerce Button Color With Inspect Element Tool
Whether you are an experienced or a novice WordPress developer, you can easily change the WooCommerce button’s color using custom CSS. To do so, open your website in Chrome Browser, right-click on any button( I am clicking on add to cart button) on your WordPress website, and then click on inspect element.

Chrome Dev tools will be opened, and you will see HTML and CSS code for that button. In HTML code you will see the classes for that button like this

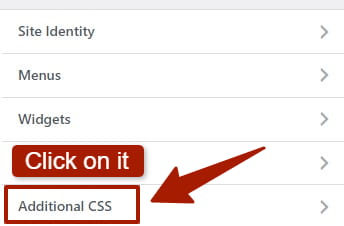
Now copy that class, and then go to your WordPress Dashboard > Appearance > Customize scroll down to the bottom, and there you will see Additional CSS, so open it and paste the classes there like this
Now add ( .woocommerce ) before the pasted code and also add a dot(.) before every class like this
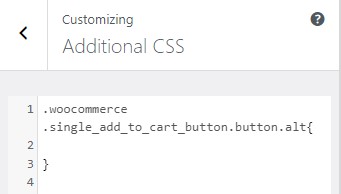
Now give a background and text color to the button like this:
.woocommerce .single_add_to_cart_button.button.alt {
background-color: blue; !Important  /* replace the blue color with your desired color */
color:white  !Important ;
}
Note: The above code can only change WooCommerce button color on the single product page because when I open inspect element tool, I was on the single product page.
To change add to cart button color on shop page then we have this class code:
.woocommerce .product_type_simple.add_to_cart_button{
background-color: blue; !Important /* replace the blue color with your desired color */
color:white  !Important ;
}
After you have inserted the code in Additional CSS, click on publish and check your site to see the changes.
3) Change WooCommerce Button Color With Custom CSS Code
This is the simplest method to change WooCommerce button color among all these methods because you only need to copy the below code and paste it in Additional CSS. To do so go to your WordPress Dashboard > Appearance > Customize and there click on Additional CSS, and paste the below code there.
Change WooCommerce Button color on Single Product Page
The below code will Change button background and border color to blue on a single product and checkout page only, so change the border, background color according to your desired color:
.woocommerce #content input.button.alt, .woocommerce #respond input#submit.alt, .woocommerce a.button.alt, .woocommerce button.button.alt, .woocommerce input.button.alt, .woocommerce-page #content input.button.alt, .woocommerce-page #respond input#submit.alt, .woocommerce-page a.button.alt, .woocommerce-page button.button.alt, .woocommerce-page input.button.alt {
background: blue !important;
box-shadow: none;
text-shadow: transparent !important;
color:white !important;
border-color:blue !important;
}
Change WooCommerce Button hover color on Single Product Page
The below code will Change button background and border hover color to blue on a single product and checkout page only, so change the border, background color according to your desired color:
.woocommerce #content input.button.alt:hover, .woocommerce #respond input#submit.alt:hover, .woocommerce a.button.alt:hover, .woocommerce button.button.alt:hover, .woocommerce input.button.alt:hover, .woocommerce-page #content input.button.alt:hover, .woocommerce-page #respond input#submit.alt:hover, .woocommerce-page a.button.alt:hover, .woocommerce-page button.button.alt:hover, .woocommerce-page input.button.alt:hover {
background:blue !important;
background-color:blue !important;
color:white !important;
text-shadow: transparent !important;
box-shadow: none;
border-color:blue !important;
}
Change WooCommerce Button color on All WooCommerce Pages
The below code will Change button background and border color to blue on all WooCommerce pages only, so change the border, background color according to your desired color:
.woocommerce #content input.button, .woocommerce #respond input#submit, .woocommerce a.button, .woocommerce button.button, .woocommerce input.button, .woocommerce-page #content input.button, .woocommerce-page #respond input#submit, .woocommerce-page a.button, .woocommerce-page button.button, .woocommerce-page input.button {
background: blue !important;
color:white !important;
text-shadow: transparent !important;
border-color:blue !important;
}
Change WooCommerce Button hover color on All WooCommerce Pages
The below code will Change button background and border hover color to blue on all WooCommerce pages only, so change the border, background color according to your desired color:
.woocommerce #content input.button:hover, .woocommerce #respond input#submit:hover, .woocommerce a.button:hover, .woocommerce button.button:hover, .woocommerce input.button:hover, .woocommerce-page #content input.button:hover, .woocommerce-page #respond input#submit:hover, .woocommerce-page a.button:hover, .woocommerce-page button.button:hover, .woocommerce-page input.button:hover {
background:blue !important;
background-color:blue !important;
color:white !important;
text-shadow: transparent !important;
box-shadow: none;
border-color:blue !important;
}
4) Change WooCommerce Button Color Using a Plugin
If you want to change the color of your WooCommerce buttons but don’t want to get into technical stuff like working with code or theme customizations and want a easy way to customize your button colors then you can use a simple tool called the Yellow Pencil plugin. It’s like a paintbrush for your website.
Here is how you can easily use this tool to change WooCommerce button color:
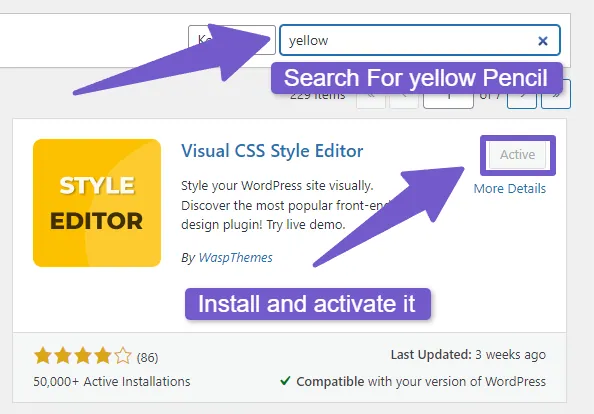
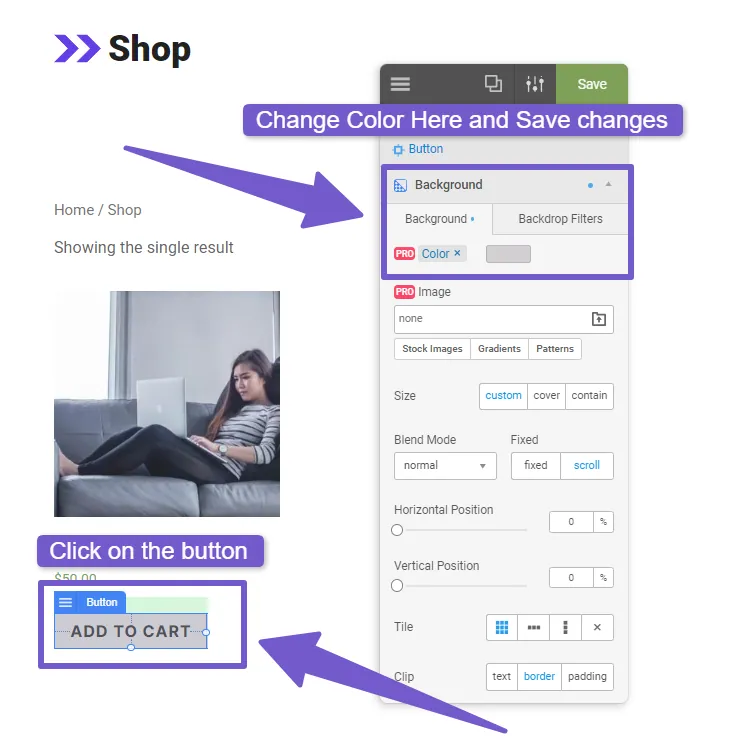
First, go to the plugins section in your Dashboard and there install and activate the Yellow Pencil plugin. After activating the plugin, navigate to the page where you want to change the button color, I will go to the shop page to change add to cart button color to give you an example of how to do it.
Once you are on the desired page, in the admin bar click on Edit with Yellow pencil icon, for some reasons if your admin bar is not showing in WordPress you can checkout my guide on how to fix admin bar not showing.

When you page is opened with Yellow pencil editor, move your mouse over the button and click on it, on the left side of the screen, you’ll see some options for this button. So there click on background color and change its color. Save your changes and visit the live site to preview the new button color you just applied.
Another similar plugin named SiteOrigin CSS. which you can use to edit WooCommerce button colors works the same way as yellow pencil, I mean the working process is same for both, just install and activate it, and edit the page with this editor from admin bar to change color of buttons on the page.
That’s it this was the simplest method of changing a WooCommerce button color in your WordPress site. With both these tools, you can not only change button color but can also do other styling customization to the site, so it depends on you to choose any of them whom UI/UX you like.
FAQ( How to Change WooCommerce Button Color )
How do I Customize the color of my WooCommerce buttons?
To customize the color of your WooCommerce buttons, Go to your WordPress Dashboard > Appearance > Customize and in theme customization go to > General > buttons and there you can change the color of your WooCommerce buttons.
How do I change the color of WooCommerce buttons?
To change WooCommerce buttons color add the below code in Additional CSS, which is located in your theme customizations
.woocommerce #content input.button, .woocommerce #respond input#submit, .woocommerce a.button, .woocommerce button.button, .woocommerce input.button, .woocommerce-page #content input.button, .woocommerce-page #respond input#submit, .woocommerce-page a.button, .woocommerce-page button.button, .woocommerce-page input.button {
background: blue !important;
color:white !important;
text-shadow: transparent !important;
border-color:blue !important;
}
.woocommerce #content input.button:hover, .woocommerce #respond input#submit:hover, .woocommerce a.button:hover, .woocommerce button.button:hover, .woocommerce input.button:hover, .woocommerce-page #content input.button:hover, .woocommerce-page #respond input#submit:hover, .woocommerce-page a.button:hover, .woocommerce-page button.button:hover, .woocommerce-page input.button:hover {
background:blue !important;
background-color:blue !important;
color:white !important;
text-shadow: transparent !important;
box-shadow: none;
border-color:blue !important;
}
Conclusion
Buttons play a vital role in the attraction of a website. So, in this guide, I showed you how to change the color of WooCommerce buttons using three easy methods. The first method is to manually change the color of your buttons while in the second and third method I used custom CSS code.
I hope you found this article helpful. By now, I am sure you must have got how to change WooCommerce button color easily by using custom CSS code as well as manually changing it in theme customizations
Changing button colors is just one way to customize your WooCommerce store. For complete product customization including custom fields, dropdowns, and real-time pricing, try PriceWise Pro.
If you have any questions or suggestions then feel free to leave a comment below. I will try my best to answer your question as soon as possible. Also, If there is anything else you would like us to cover, feel free to contact us via the comments section. Thanks for reading!