Featured images are an important part of any WordPress site, but it often becomes a challenge when trying to create a post or page. The auto-crop feature in the editor will cut off the bottom of your image if it doesn’t fit, which can be frustrating as you want the original size of the image.
Fortunately, there is a quick fix that you can use to disable featured image auto crop in WordPress by adding two lines of code to your theme’s functions file. This blog post will teach you how to do just that!
Method 1: Disable Featured Image Auto Cropping in WordPress
By default, WordPress automatically resizes the images to the sizes set by defaults in WordPress, but if you don’t want the auto crop of your original images, you can do that by simply disabling the auto-cropping in WordPress.
Follow the below steps for disabling auto cropping in WordPress.
Open the WordPress dashboard and navigate to Appearance > Editor
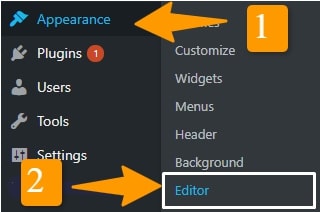
When you click on “editor,” pick the theme, you’re using. So you may modify your current theme to remove auto-cropping of the featured image
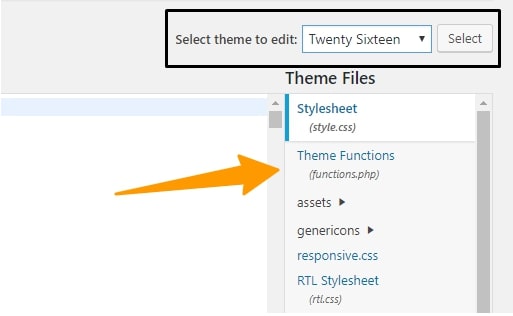
Then, from the left-hand side panel (Theme Functions), find the functions.php file.
Search for add_image_size by CTRL+F once you find the function.php file
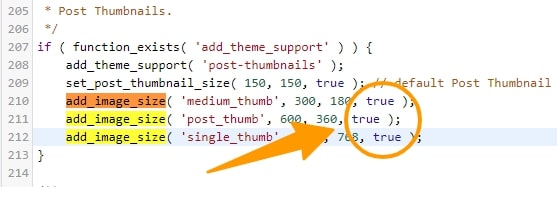
Once you find add_image_size, you will see True value in the code. Simply change it to false, and it will disable the auto-cropping of your featured image.
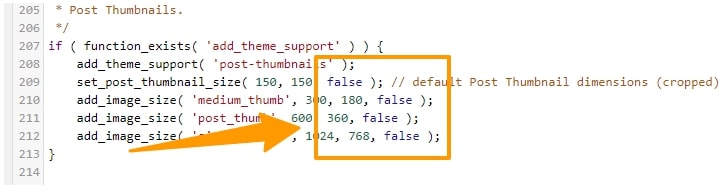
Now Update the file to save the changes you have made to the function.php file.
So as you have done with updating the setting and disabling the auto-cropping, these settings will apply to new images so you might be thinking about the previous featured image sizes.
Don’t worry. You can regenerate all the previous featured images just by using the Regenerate Thumbnails Plugin.
Regenerate Auto Crop Featured Images Using Plugin
By using the Regenerate Thumbnail Plugin, you can regenerate all the previous featured images that are auto-crop.
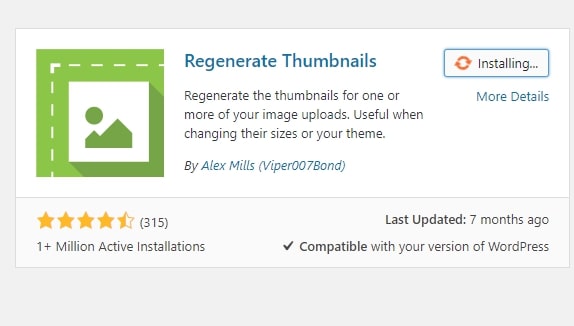
First, you have to install the Regenerate Thumbnail plugin by going to Plugins > Add New and search for the regenerate plugin.
Once installed and activated. Go to Tools > Regenerate Thumbnails.
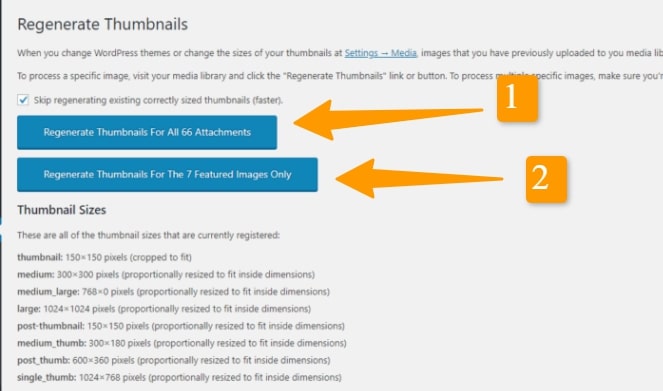
You will have 2 blue button labels: “Regenerate Thumbnails For All X Attachments” and “Regenerate Thumbnails For the X Featured Images Only.”
Click on both and wait for the process to complete. Once completed you have to check the featured image to make sure it worked.
Note: If you are unable to access the WordPress dashboard for some reason, you can still do this step by FTP (File Transfer Protocol) by navigating to (/wp-content/themes/your-theme-name/functions.php).and editing the functions.php file with the values we talk about earlier.
Method 2: Crop Featured Image to Exact Dimension
In the first method, we turn off the auto-cropping of the featured image by changing the code in the WordPress theme core files and then we use a plugin to again regenerate the featured images.
But here we will use a smart way to sort out the auto-cropping of our featured image in WordPress so whenever you upload a featured image in WordPress, it often gets automatically cropped to fit the default settings. But what if you want more control over the image size? Here’s an easy way to do it:
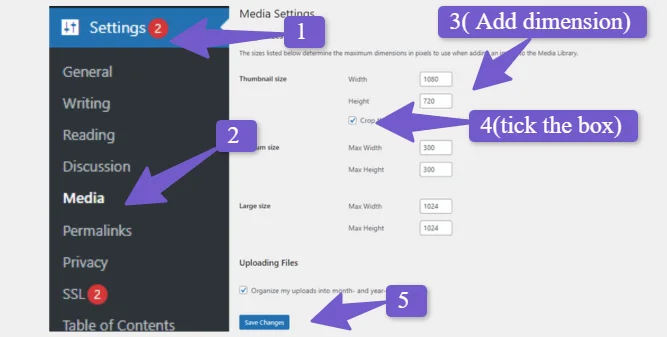
Choose Your Image Size: First, decide what size you want your featured images to be. For example, let’s say you want them to be 1080 pixels wide and 720 pixels tall.
Adjust WordPress Settings: Go to your WordPress dashboard and click on “Settings” and then “Media.” In the “Thumbnail size” section, enter the dimensions you want. So, for our example, put 1080 in the width box and 720 in the height box. Also, make sure to check the box that says “Crop thumbnail to exact dimensions (normally thumbnails are proportional).”
Resize Your Images: Now, you need to make sure your featured images match these dimensions. If you already have the images, you can resize them. Here’s how:
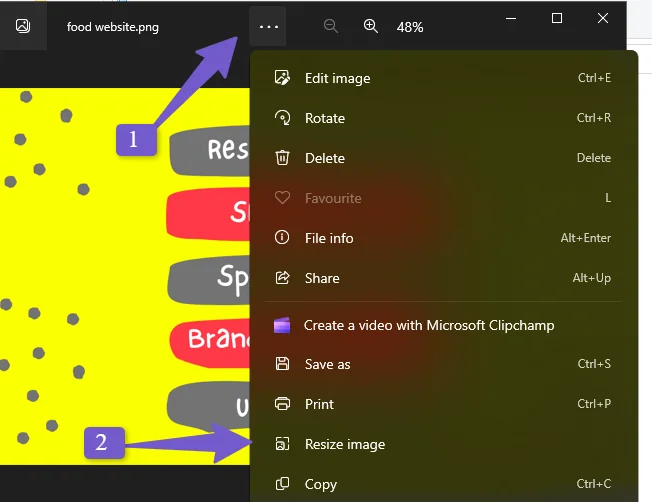
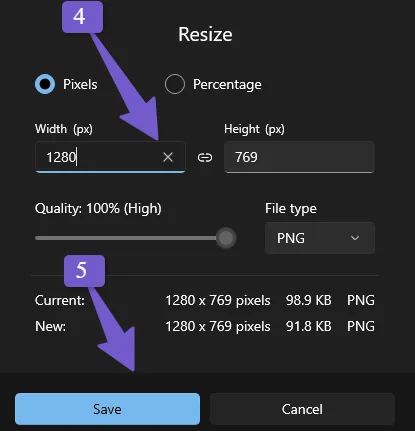
For Windows Users: Open the image, click on the three dots at the top, and choose “Resize Image.” Enter 1080 for the width and 720 for the height if you enter 1080 in the width and the height is automatically assigned then leave the heights section and save it.
For Mac Users: The process is similar to Windows, but the steps might be slightly different. You can figure it out or use an online image resizing website.
Upload Your Images: From now on, whenever you upload a featured image, make sure it’s in the exact dimensions you’ve chosen (in our example, 1080×720). This way, your featured images won’t get cropped, and they’ll fit perfectly on your WordPress website.
You may like:
Change Profile Picture in WordPress without Gravatar
How to Hide Featured Image in WordPress Post
How to Disable WordPress Admin Toolbar
FAQ(How to Disable Featured Image Auto Crop in WordPress)
Below are some of the most common FAQs users have regarding the auto-cropping of featured images in WordPress and ways to disable it.
How to Disable Featured image auto crop in WordPress?
To prevent WordPress from automatically cropping your original images, follow these steps:
- Open your WordPress dashboard and navigate to Appearance > Editor.
- Select the theme you’re using.
- In the left-hand panel (Theme Functions), locate the functions.php file.
- Use CTRL+F to find “add_image_size” in the functions.php file.
- Change the “True” value to “false” to disable auto-cropping.
- Update the file to save changes.
For existing featured images, you can use the Regenerate Thumbnails Plugin:
- Install and activate the plugin via Plugins > Add New.
- Go to Tools > Regenerate Thumbnails.
- Click both blue buttons for regeneration.
- Check your featured images to ensure the changes were applied.
How do I fix the featured image size in WordPress?
- Select Settings > Media from the WordPress dashboard.
- In the number boxes beside the Thumbnail size, input the dimensions of your featured images. (Both terms are used interchangeably by WordPress.)
- Simply click Save Changes at the bottom of the screen.
How do I stop WordPress from cropping my photos?
You can prevent WordPress from generating default image sizes by going to Settings » Media in the WordPress admin menu. WordPress has already defined your default picture dimensions; you’ll see them listed here. When you upload a new image, you must change these values to 0 so that WordPress does not auto crop the original images.
WordPress custom featured image size?
A good place to start when determining the optimum WordPress featured image dimension is 1200 x 628 pixels. These dimensions are common in WordPress themes and page layouts, and they look fantastic when shared on social media feeds.
Conclusion
By editing function.php and searching for add_image_size, you may turn off the auto-cropping of featured images. To disable it entirely, search for add_image_size in the function.php file and change the values to false. Alternatively, go to Settings > Media and modify the boxes to 0 to eliminate it completely.Also you can change the default featured image size in WordPress and the upload the featured image in the same dimension to avoid auto-cropping of featured image
Hopefully, after reading this article on how to disable WordPress auto-cropping of featured images, you will have a good understanding of what you should do or not do. If you have any queries, please leave them in the comments section.