
Have you uploaded a video and spotted a mistake in it, or are you about to make your first one and wondering how to edit YouTube videos without paying for software?
There are two places to do it. YouTube has its own editor for videos that are already up, and it keeps the link, the views and the comments. For anything bigger you edit on your computer or phone before uploading. YouTube’s editor is like the eraser on a pencil: perfect for rubbing out a mistake, no use for rewriting the page.
Here is which one does what:
- Cut off the start or the end, or take a part out of the middle: YouTube Studio
- Hide a face, a number plate or a screen: YouTube Studio’s blur
- Add music: YouTube’s Audio Library
- Add an end screen that points to your next video: YouTube Studio
- Titles, transitions, joining clips, colour: a free editor, before you upload
In this article you will learn how to use each part of YouTube’s editor, the two rules that stop people saving their changes, and which free editor suits which device.
So let’s get started.
1) Cut the start, the end, or a part in the middle
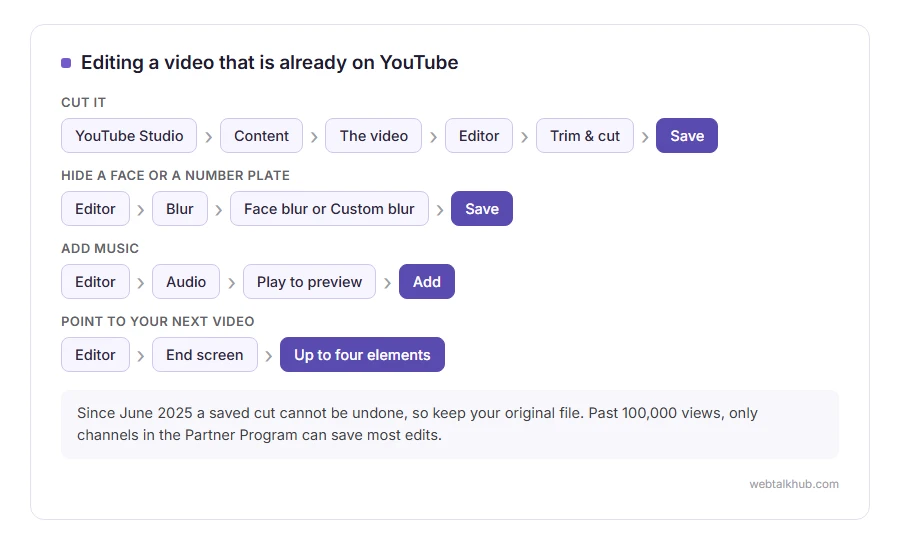
Before you touch this, keep your original video file. Since June 2025, YouTube’s Revert to original option is gone, so a cut you save in the editor cannot be undone.
Sign in to YouTube Studio, choose Content in the menu on the left, and click the video. In the next menu on the left, choose Editor, then Trim & cut. Drag the edges of the blue box so it holds only the part you want to keep, and click Save.
To take a section out of the middle, choose Trim & cut, then New cut, and move the red box over the part to remove. The video’s link, view count and comments all stay the same.
This does not work on popular videos outside the Partner Program: once an unedited video has more than 100,000 views, YouTube may refuse to save changes to it, apart from blurring faces.
2) Blur a face, or anything else
In the same editor, choose Blur. There are two kinds.
Face blur looks for the faces in your video. When it finishes, pick the ones to hide, click Apply, adjust the box if needed, and Save.
Custom blur is for anything else: a car’s number plate, a phone screen, an address on an envelope. Draw the box, choose Rectangle or Oval, and then choose Track object if the thing moves, or Fix blur position if it stays in one place.
Keep in mind that tracking follows the object, not the meaning. If it moves fast or leaves the frame and comes back, play the whole video through before saving and check the blur stayed on it.
3) Add music from YouTube’s Audio Library
Choose Audio in the editor. Use the filters to find a track, press Play to hear it, then Add. Drag the track along the timeline to decide where it starts, and drag its edges to decide how much of it plays. You can add more than one song.
The tracks are licensed by YouTube, and they can be used in monetised videos, which is the main reason to take music from here rather than from anywhere else.
The drawback is the same 100,000 view rule as trimming, and the feature only works on videos shorter than six hours.
4) Add an end screen
An end screen is the clickable panel in the last seconds of a video that suggests another video, a playlist or your channel.
In the editor, choose End screen and add up to four elements. They can appear in the last 5 to 20 seconds, so your video needs a few quiet seconds at the end to hold them.
Your video has to be at least 25 seconds long to have one, and it will not show on videos set as made for kids.
5) For everything else, edit before you upload
YouTube’s editor cannot add titles, join clips, change colours or add transitions, and it cannot swap the file behind a video. For those, edit first and upload the finished file.
Each of these is free:
- Windows 11: Clipchamp, which comes with Windows. Search for it in the Start menu. The free plan exports in 1080p without a watermark.
- Mac, iPhone and iPad: iMovie, Apple’s own editor, free from the App Store if it is not already installed.
- Any serious computer: DaVinci Resolve, the free version of a professional editor. It needs a strong machine, and I don’t recommend it on a laptop without its own graphics card.
- A phone: YouTube Create, YouTube’s own free editing app, on Android since 2023 and on iPhone since December 2025. It publishes straight to your channel.
For a first video, I recommend whichever of these is already on your device. From there, uploading your video to YouTube takes you through the last screens.
FAQ(Editing YouTube Videos)
Can I edit a YouTube video without losing its views?
Yes, with YouTube Studio’s editor. Trimming, blurring, music and end screens keep the same link, views and comments, as long as the 100,000 view rule in section 1 does not apply to you.
Can I replace a video with a new version of the file?
No. YouTube does not let you swap the file behind a video. Uploading the new version gives it a new link, and its views start again from zero.
Why will YouTube not save my changes?
Usually the 100,000 view rule, for a channel outside the Partner Program. A new edit also takes time to process, and the old version keeps playing until it is done.
Can I edit a video on my phone after uploading?
The details, yes: the YouTube Studio app changes the title, description, thumbnail and who can see it. For cutting, blurring and music, use YouTube Studio on a computer.
If you have any issues, you can ask me via comment, and I will love to help you out.
