Are you looking for a quick and easy way to fix the “This site can’t be reached” error in WordPress?
This error means that your browser cannot connect to your website, and it can affect both you and your website visitors. If you are the administrator of the website, you will not be able to access your site and make any changes and your website visitors will not be able to access the site content.
In this guide, I will explain what the “This site can’t be reached” error in WordPress is, what causes it, and how to fix it.
What Is the “This Site Can’t Be Reached” Error in WordPress and What Causes It?
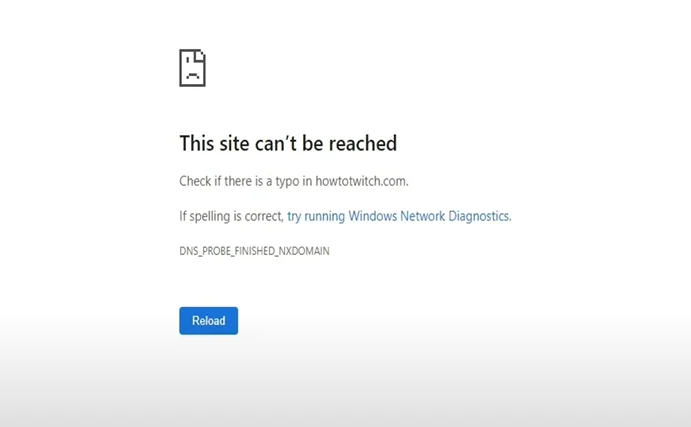
The ‘This Site Can’t Be Reached’ Error in WordPress is a common WordPress error that can prevent you from accessing your website or dashboard. It usually means that something is blocking the browser from connecting to the destination website.
There are many possible reasons why you may see the “This site can’t be reached” error on your WordPress site. However, to simplify the troubleshooting process I will divide them into two categories: one related to your network and browser settings, and the other related to your hosting and WordPress settings.
So let’s check what category your “This Site Can’t Be Reached” error is related to.
Identifying the Cause of Your Error
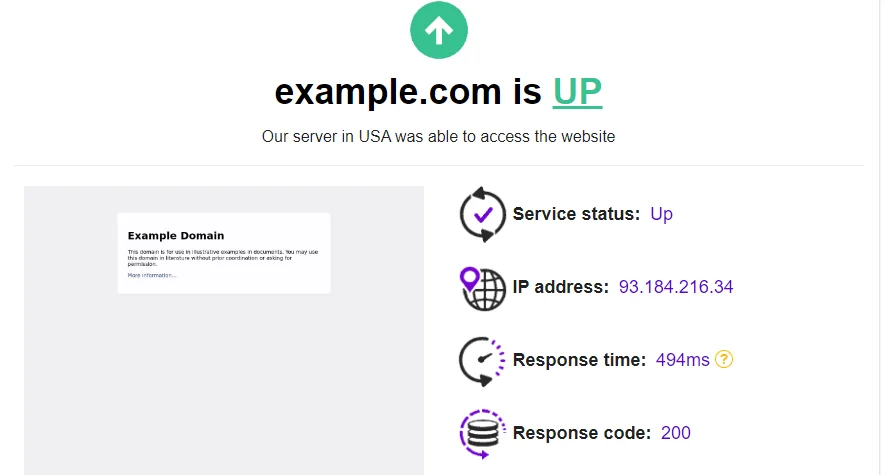
To Identify the cause of the “This Site can’t be reached ” error. First, you need to check if the website is down for everyone or just for you. To do this, go to websiteplanet, which lets you enter your website domain name and see its status whether it’s down or not.
If it shows “Up” as shown below, then it means the issue is only on your end, which means your browser and network settings have a problem.
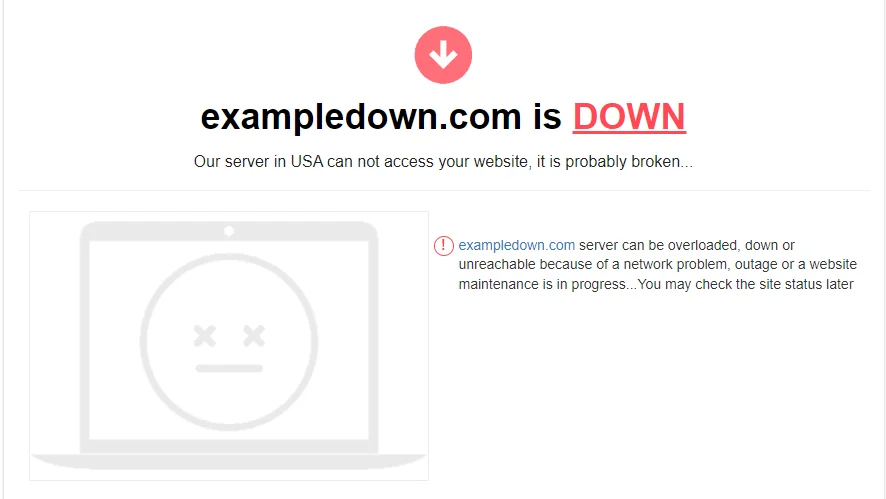
But if the site shows “Down” as shown below, then it means the issue is related to the server and WordPress settings, as the site is down for everyone.
Depending on the cause of the issue, you will have to select the appropriate solution from the list below to fix it.
Fixing “This Site Can’t be Reached ” Error in WordPress
I have outlined solutions to resolve the ‘This Site Can’t Be Reached’ error. These solutions are organized into two categories: the first addresses issues associated with network and browser settings, while the second focuses on those related to server and WordPress settings.
Fixes for Errors Caused by Network Settings and Browser Settings
If the site is up and running on the website planet, then the issue is with your network and browser settings. You can troubleshoot this problem by following a step-by-step approach that I will show you.
The guide covers both Mac and Windows operating systems, so you can use it regardless of what you have. I will start with the most common and important causes and solutions, and then move on to the less likely ones. This way, you can solve the issue quickly and easily.
1) Check your Internet Connection
The first step for you is to check your internet connection and see if you are connected or not. If the connection is okay, then the next step is to turn off your internet device.
If it is a modem, turn it off and leave it off for two minutes. If it is cellular internet, turn on the airplane mode on your mobile and then turn it off after some time. Then check your WordPress website.
If the problem is related to the internet, it will be solved by this method. If not, then follow the next method of clearing your browser cache and DNS.
2) Clear Browser Cookies and Settings
Since we have checked the internet connection in the previous method and it is working, we now have to clear our browser cookies and cache. This is because outdated cookies and cache can cause issues with accessing sites we have visited earlier. Also, to make sure we are okay from the browser end, it is better to reset the browser and clear the DNS. First, we will clear the browser cache, then we will reset the browser, and then we will clear the DNS.
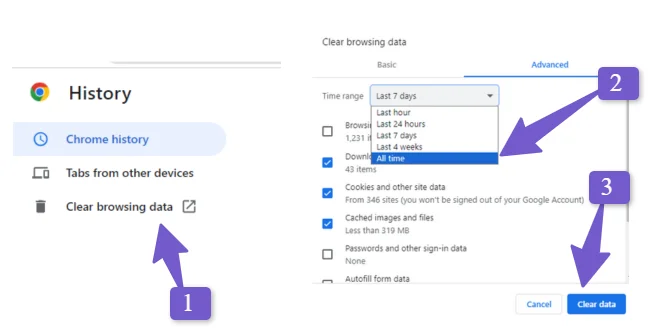
To clear the browser cache in Google Chrome, press Ctrl + H. It will open a browser history page and you will see an option to clear browsing data. Click on it and it will open a popup where you have to select all the boxes except for the password box and browsing history box. You can leave these unchecked if you don’t want to lose your passwords and browsing history.
Also, select the time frame for which you want to clear your cache. I suggest selecting “All time” as this will clear all the cache on your browser. Then click on clear data.
After clearing the cache, it is also better to reset Chrome to default settings. This will remove any settings that might be blocking the site access.
Note: Reset Chrome will deactivate all your extensions and other custom settings you have made on your Chrome. However, other settings like bookmarks, history, and saved passwords won’t be affected.
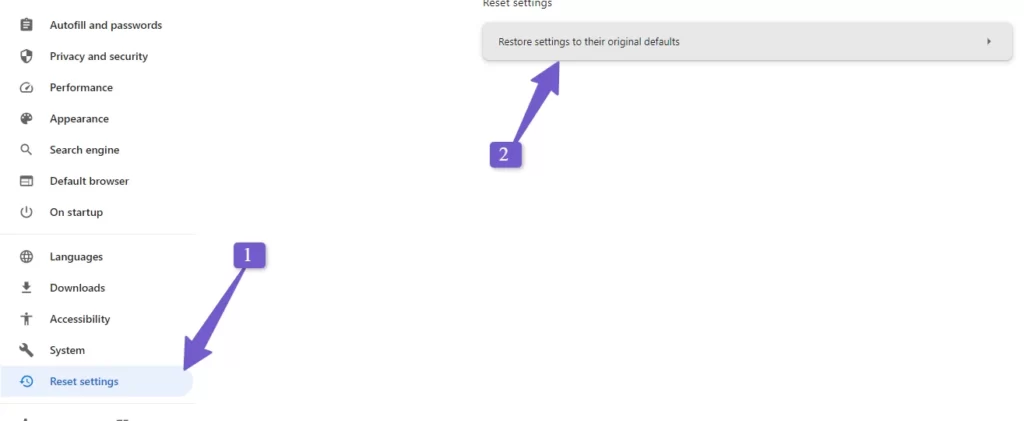
To reset Chrome, on the same browser history page, you will see an option “Reset Chrome” in the sidebar. Click on it and it will say “Restore the settings to their original defaults”. Click on it again and you will get a reminder. Click on reset settings and you are done.
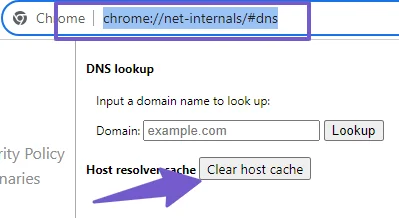
Finally, to make sure the browser is not the culprit, clear the browser DNS. You can access this in Chrome by putting this link in the address bar:
chrome://net-internals/#dnsOnce there, click on clear host cache.
Now check your site and most likely the error will be solved for you after this step. This is because it is the most common cause of this problem. If not, follow the next troubleshooting step.
3) Disable Your Firewall or Antivirus Software
Another possible cause of the ‘This Site Can’t Be Reached’ error is your firewall or antivirus software. These programs are designed to protect your computer from viruses and malicious websites, but sometimes they may mistakenly block your own website. To check if this is the case, you can temporarily disable the firewall or antivirus software and see if you can access your WordPress site.
To do this, first locate the firewall or antivirus software on your system. You can usually find it in your control panel or by searching for it on your computer. For example, you can type “virus” or “antivirus” in the search bar and see what comes up.
Once you find it, open it and look for an option to disable it. The wording may vary depending on the software, but it should be something like Disable, Pause Protection, or something similar.
After disabling the software, try accessing your WordPress site again. If the error disappears, then it means that the firewall or antivirus software was blocking your website.
Note: It is recommended to re-enable the firewall or antivirus software as soon as possible, as it protects your computer from many threats. If you find that your security software is the cause of the error, you can usually adjust its settings to allow access to your website without completely disabling it.
If disabling your firewall or antivirus software doesn’t solve the problem then now we have to try a more advanced method to fix the network setting because it seems something is wrong with our network, so follow the next method for a more advanced troubleshooting method.
4) Disable Your Proxy Server
A proxy is a middleman between your computer and the internet. When you use a proxy, your device connects with the proxy first and then the website.
If you encounter this error, disabling the proxy server temporarily can help troubleshoot the problem. Disabling the proxy server allows your device to connect directly to websites, eliminating any potential proxy-related issues.
Here are the steps to disable the proxy server in Windows and Mac:
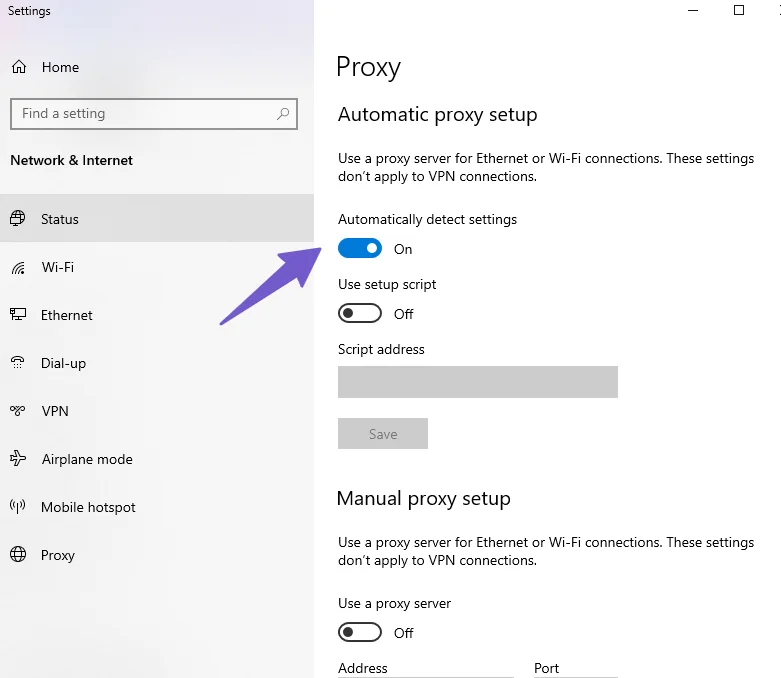
Disable Proxy Server in Windows:
Go to the search bar in the lower left corner of your desktop and search for Proxy settings. Open it and make sure the “Manual proxy setup” is disabled and the “Automatically Detect Settings” option is enabled.
Disable Proxy Server in Mac:
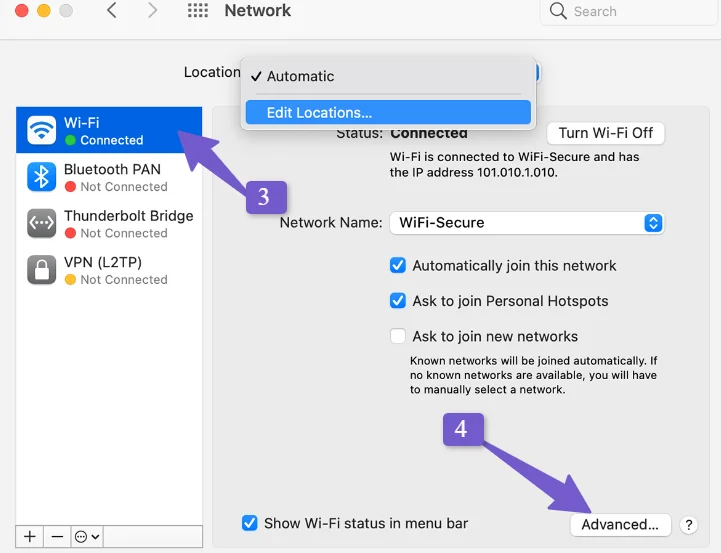
Click on the Apple Icon in the top left corner and select “System Preferences” in the popup menu. Click on “Network”

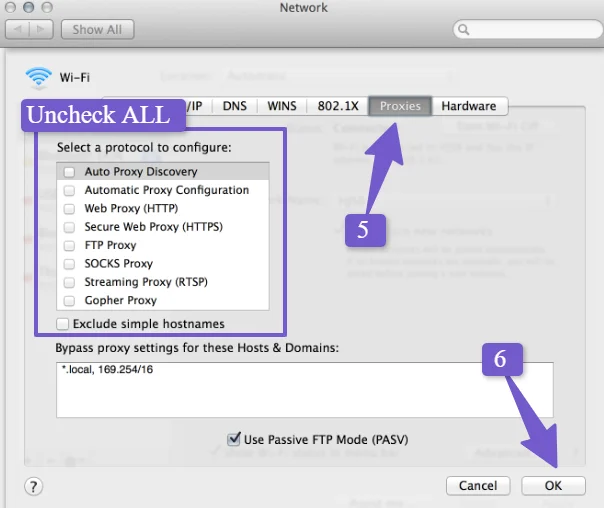
Now select the network you are using in the left menu. Click on Advanced and select the Proxies tab.
Uncheck all the protocols listed under “Select a protocol to configure” and click OK.
After you have disabled your proxy server, visit your website and check if it is working. If not, you can try another troubleshooting method.
5) Flush DNS Cache
Flushing the DNS of your system means clearing its memory of outdated data about websites. This can help in resolving network issues and also the annoying “This site can’t be reached” error while accessing your WordPress website.
To resolve the issue, we have to flush our system DNS. We will be doing this by using a few commands in CMD for Windows and in Terminal for the Mac operating system.
Flush DNS Cache in Windows:
Search CMD in the search bar and click on Run as administrator.
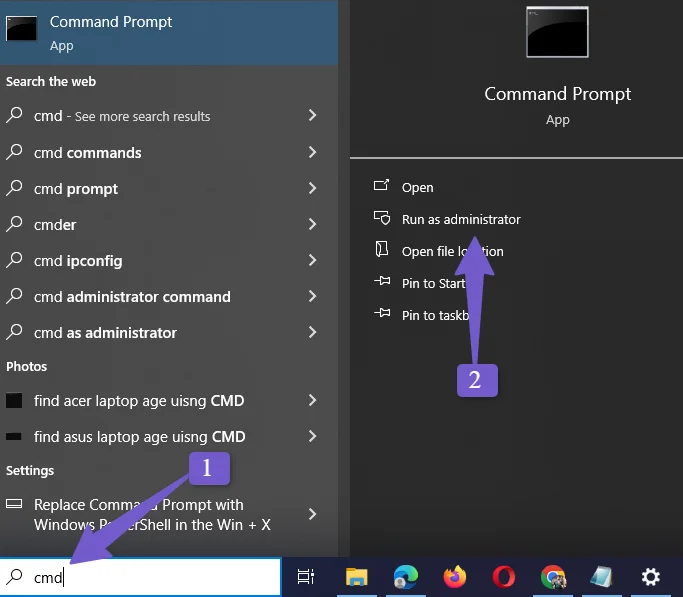
Once the CMD is opened, type the following command and press enter once the command is executed type the next one:
ipconfig /flushdnsnetsh winsock resetnetsh int ip resetRestart your PC after that and check if the issue is resolved.
Flush DNS Cache in Mac:
Open your Terminal by pressing the Command Key + Spacebar. It will open Spotlight search and now type for Terminal.
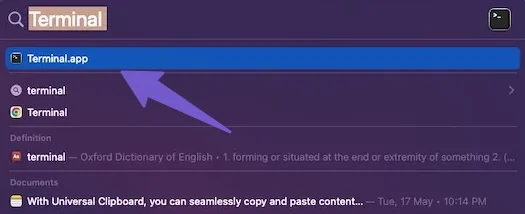
Once the Terminal is opened, enter the following command in the Terminal to flush the DNS cache.
sudo killall -HUP mDNSResponderRestart your PC after that and check if the issue is resolved. still having the site can’t be reached issue following the next method.
6) Change DNS Serve
Changing the DNS server means using a different service to translate website names into IP addresses. This can help if the current DNS server is slow or unreliable. You can update your network settings to use a different DNS server like Google Public DNS or Cloudflare DNS for faster and more reliable browsing.
Change DNS Server in Windows:
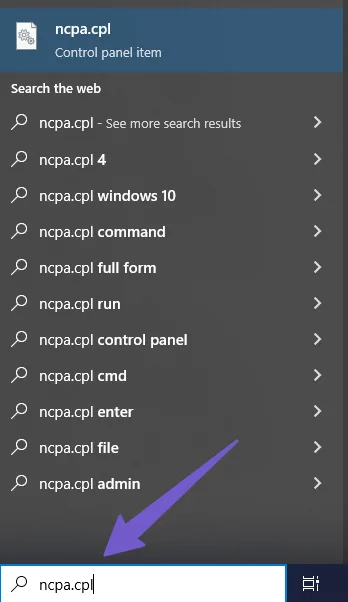
To change the DNS server in Windows, go to your search and type ncpa.cpl, This will open a network setting where you can see all your network connections.
Right-click on the network connection that you are using and click on properties.This will open the settings. Now, locate the “Internet Protocol Version 6(TCP/IPv6)” option and disable it.
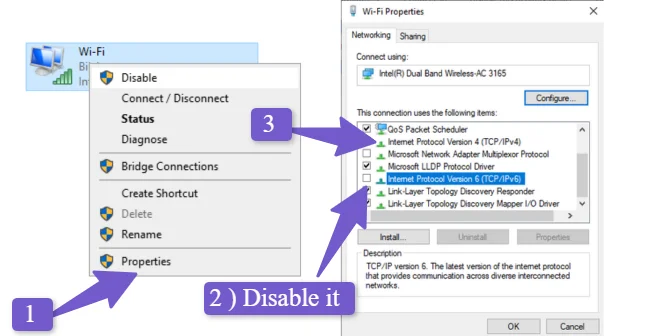
Then, locate the “Internet Protocol Version 4(TCP/IPv4)” option and double-click on it. This will open its settings.

If the “Obtain DNS server address automatically” option is selected, you have to select the “Use the following DNS server address” option instead. In the first field, which is the preferred DNS server, enter 1.1.1.1, and in the second field, which is the alternate DNS server, enter 1.0.0.1 Click on OK.
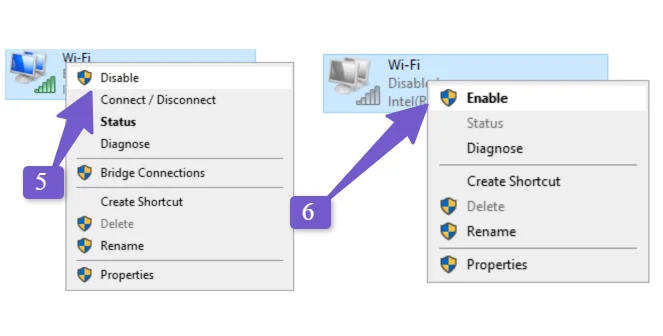
Now, right-click on the network and click disable. Once it is disabled, right-click again on it and enable it. Then, check if the WordPress can’t be reached error is solved or not.
Change DNS Server in Mac:
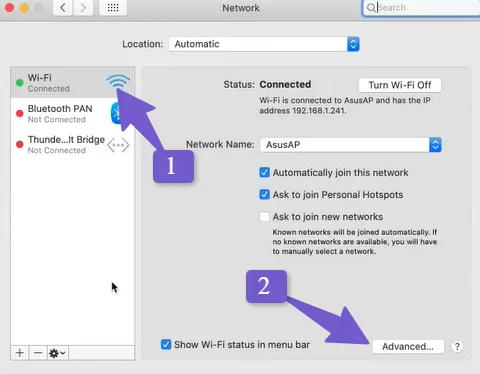
To change the DNS server on Mac, click on the Apple icon in the top left corner and then system preferences. A popup will appear. Select the network in it and then click on advanced.
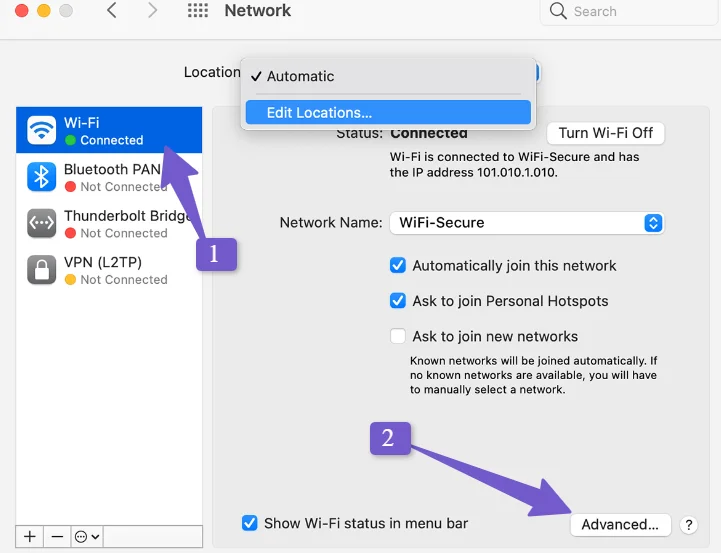
After that, select the DNS tab and click on the + icon in the bottom left corner. This will allow you to add a new DNS server. Enter 8.8.8.8 and then click on the + button again. Enter 8.8.4.4 click OK and then apply.
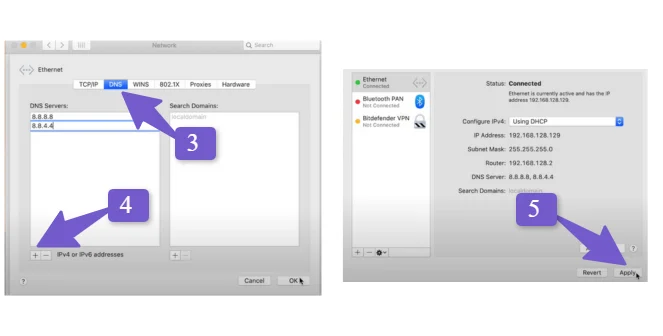
Now, restart your Mac for the changes to take effect, and then check if the“This site can’t be reached” error is solved or not. If this method does not solve the issue, you can try the next one.
7) Reset the TCP/IP Settings
Resetting TCP/IP settings is like giving your internet connection a fresh start. It can help resolve network issues and the ‘This Site Can’t Be Reached’ error. On Windows, you will need to use CMD, but on Mac, there is a very easy way to reset the TCP/IP settings.
Reset TCP/IP Settings in Windows:
We already reset the TCP/IP settings in the DNS cache method earlier, but as we are following the methods step by step for troubleshooting the error, it is better to reset them again. First, open your command prompt (CMD) by searching for it in search as CMD and run as administrator. Once opened, type the following commands and press Enter to reset the TCP/IP settings in Windows.
netsh winsock reset Once it is executed type:
netsh int ip reset This will reset the TCP/IP settings and after that, restart the computer and check the website.
Reset TCP/IP Settings in Mac:
For Mac, to reset the TCP/IP settings, you have to click on the Apple logo and then system preferences. After that, click on network select your network, and then click on the Advanced button.
After that select the TCP/IP tab. There, you have to click on the “Renew DHCP Lease” option.
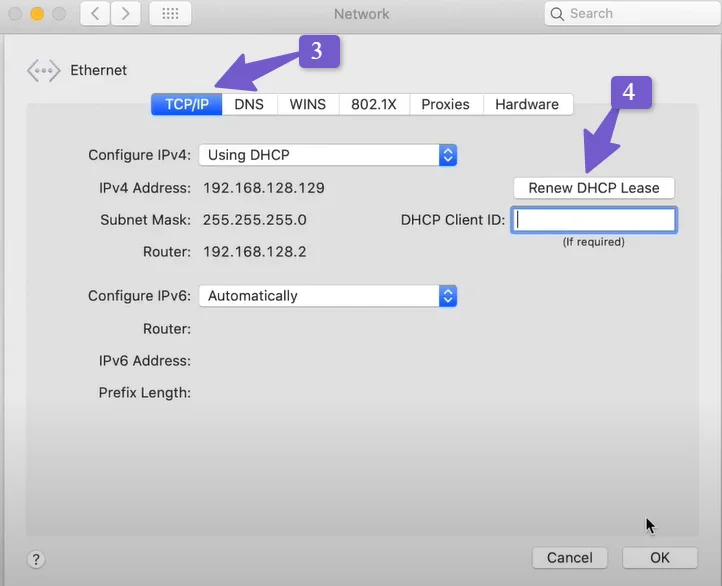
This will reset the TCP/IP settings on your Mac and after that, restart your Mac and check if the error is gone or not.
8) Reset Your Virtual Private Network
If you are using a VPN and experiencing network issues, resetting it can help. Disconnect and reconnect to your VPN service or restart the VPN client to resolve potential connectivity problems, including the ‘This Site Can’t Be Reached’ error.
If you don’t know how to reset or disconnect it you can take help from the documentation of the VPN you are using or ask their support team.
Fixes for Errors Caused by Server and WordPress Settings
If your site is down on the website planet, then the problem is with your server and WordPress settings. You can fix this problem by following the steps that I will show you.
I will begin with the most common and critical issues that affect your server and WordPress settings, and then I will give you the solutions. After that, I will cover the less common issues. This way, you can solve the problem quickly and easily.
1) Check Domain Nameserver
If you encounter the error “This site can’t be reached” on your WordPress site, the first step you should take is to check if your domain has not expired. You can do this by visiting the site where you registered your domain. Next, you should check the nameserver of your domain and make sure it is pointing correctly to your hosting provider.
Sometimes, it may take some time for the DNS propagation to take effect if you have recently changed your nameserver. You can check the status of your DNS propagation on sites like dnschecker.
If your nameserver is fine, then you need to follow the next method to troubleshoot the issue with your server and WordPress settings.
2) Review Debug Logs of WordPress
The second step to fix the error is to check your WordPress website debug logs, which will show you the error information if there is any.
To do this, go to your WordPress file manager from cPanel and find the wp-config.php file in the root folder (public_html folder). Right-click and edit it.
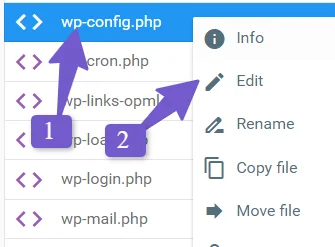
Now, look for the line that says define(‘WP_DEBUG’, false); and change it to true. If you don’t see this line in your wp-config.php file, you can add it at the end of the file like this:
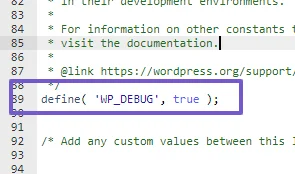
define(‘WP_DEBUG’, true); define(‘WP_DEBUG_LOG’, true);
Then, go to your website home page and refresh it. You will see the error log that will tell you where the problem is.
Usually, it is caused by a corrupted theme or plugin, which you can resolve by following our guide can’t access the wp-admin dashboard, you can also follow our other guide to access your WordPress site in recovery mode.
3) Check the .htaccess File for Configuration Errors
Another possible cause of the error “this site can’t be reached” on your WordPress site is a wrong or corrupted .htaccess file on your server. The .htaccess file controls important settings of your website, such as redirects, URL rewriting, and caching. If there is any problem with this file, you may not be able to access your site.
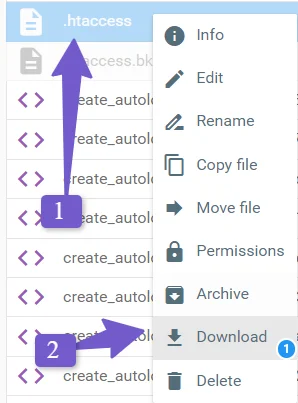
To fix this, go to your WordPress file manager from cPanel and find the .htaccess file in the root folder (public_html folder). Right-click on it and download it to your computer. Then, delete it from your server.
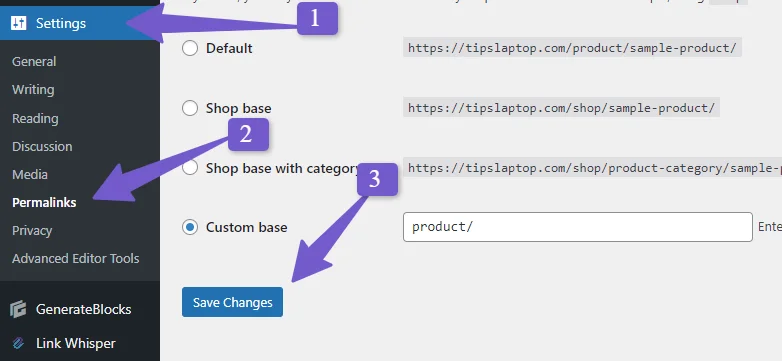
Next, check if you can access your site or not. If you can, it means the issue is with your .htaccess file. You can generate a new one by going to Settings > Permalinks in your WordPress dashboard and clicking Save. This will create a new .htaccess file.
If you still see the error “This site can’t be reached” after deleting the file from your server, then upload the .htaccess file back to the same location. This means your .htaccess file is not the problem and you need to check the next solution.
4) WordPress Address and Site Address Should be the Same
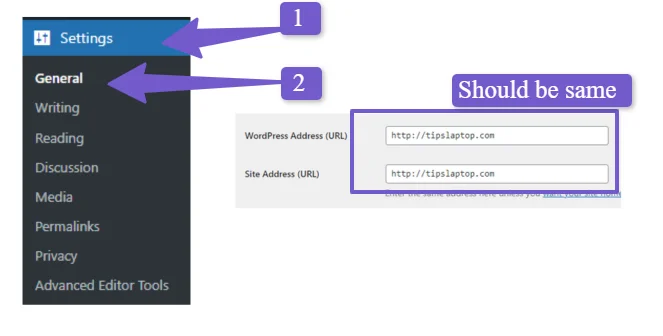
If your WordPress Address and Site Address are not the same, you may encounter an error while accessing your WordPress site.
To fix this, there are two scenarios. The first one is if you have access to your WordPress dashboard. Then, go to Settings > General and make sure the Site Address and WordPress Address are the same. If they are, you don’t need to do anything. This means you don’t have an issue there.
The second scenario is if you don’t have access to your WordPress dashboard. Then, you can access your wp-config.php file in your public_html folder, which we did earlier in method 2 if you are following the step-by-step troubleshooting. In that file, add the following code:
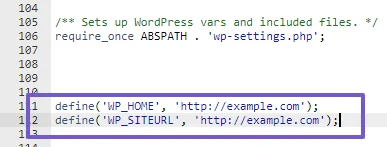
define('WP_HOME', 'http://example.com');
define('WP_SITEURL', 'http://example.com');
But make sure to replace example.com with your own domain name. Then, check if you can access your site or not.
5) Check CDN Settings
If you are using CDN and encounter the “This Site Can’t Be Reached” error on your website, then you need to check some important settings on your CDN (Content Delivery Network) service.
To troubleshoot the error, you need to log in to your CDN dashboard and make sure that everything is working properly. Some of the settings you need to check are:
- The CDN status, shows if your CDN service is active and running smoothly.
- The origin server configuration connects your CDN to the server where your WordPress site is hosted.
- The cache settings, which optimize the performance and loading times of your website’s static files, such as images, CSS, and JavaScript.
- The SSL/TLS configuration, which supports the encryption used on your WordPress site if you’re using HTTPS.
- The firewall and security settings, protect your website from malicious attacks and block unwanted traffic or access.
- The content delivery regions, which distribute your content to different geographic locations for your audience.
You can also try to purge the cache, which clears the cached files on your CDN servers, or double-check the CDN resource URLs, which load resources from the CDN servers on your WordPress site. If you still have problems, you can monitor the logs and reports from your CDN service or contact their support team for help.
6) Contact Hosting Support
If nothing works and you still see the ‘This Site Can’t Be Reached’ error, you should ask your hosting support for help. Hosting support has experts who can check your server and WordPress settings. They can find out what is causing the problem and give you the best solutions.
Before you ask for help, make sure to tell them everything about the issue and what you have tried to fix it. This can make the process faster.
Hosting support is your last option, but it’s often the most helpful way to solve hard issues that you might not be able to handle or understand.
FAQ(WordPress Site Can’t Be Reached)
Below are some most common FAQs related to the This site can’t be reached error in WordPress.
How do I fix this site can’t be reached in WordPress?
To resolve the “site can’t be reached” issue in WordPress, follow these steps:
- Check your internet connection.
- Ensure your domain is correctly configured.
- Verify your DNS settings.
- Review your hosting provider’s status.
- Clear browser cache and cookies.
- Restart your router.
- Disable VPN or firewall temporarily.
- Contact your hosting support for assistance.
How do I know if my domain has expired?
To check if your domain has expired, visit your domain registrar’s website and log in to your account. Check your domain’s status and renewal information.
Can I avoid the ‘This Site Can’t Be Reached’ error in the first place?
While some issues are beyond your control, regular maintenance of your website, server, and WordPress configurations can help prevent such errors. Ensure your domain is up-to-date, keep backups, and monitor site performance to address issues proactively.
Conclusion
This site can’t be reached error in WordPress is a frustrating error that can have many causes. In this guide, I have shown you how to find out if the problem is with your network settings, browser settings, WordPress settings, or server settings.
Once you identify the cause of the error, you can choose from two categories of solutions: one for network and browser settings, and another for server and WordPress settings. You can follow the easy steps in each category to fix the issue quickly.
This article is written for WordPress administrators, but it is also a complete guide for any network-related problem on your computer. You can use this guide whenever you have trouble accessing a site or the internet. Bookmark this guide so you can have a handy solution for the “This site can’t be reached” error.
If you have any questions about resolving the error, feel free to ask me in the comments. I will be happy to help. Thank you for reading.