Typography is one of the most important aspects of web design. The fonts you choose and their sizes can greatly affect the readability and aesthetics of your website, that’s why you need to choose a font size that is readable, balanced, and consistent throughout your site.
If the font size is too small, readability may become a challenge, while if it’s too large, it could potentially overwhelm your visitors.
I know that you are here to learn how to change font size on your WordPress site, but you don’t know how?. Don’t worry, I have got you covered. WordPress offers a lot of ways to change font size in your site.
In this guide, I will show you how to change font size in WordPress website with multiple methods, such as using theme customizer, block editor, CSS code, page builders, and visual page editor plugins.
Whether you want to change the font size for the whole site, a specific section, or a single paragraph, you will find suitable solutions here.
Why You Should Change Font Size? Does it matter?
The size of the font you use on your website is not just a matter of aesthetics, it can have a significant impact on your site’s performance, user experience, and SEO.
Here are some of the benefits of changing font size on your WordPress site:
Improve readability:
Font size affects how easy it is for your visitors to read and understand your content. If your font size is too small or too large, it can strain the eyes and cause fatigue, frustration, and confusion.
A well chosen font size ensures that your content is easily readable, especially on various devices like desktops, tablets, and smartphones.
Enhance design:
Font size can also influence the overall look and feel of your site. It can create contrast, hierarchy, harmony, and balance among the different elements of your site. By changing font size, you can highlight the most important parts of your content, such as headings, subheadings, quotes, and call to actions.
Boost SEO:
Font size can also affect your site’s SEO (search engine optimization). Search engines use various factors to rank your site, such as content quality, relevance, speed, and user experience. Font size can impact all of these factors in one way or another.
For example, your bounce rate (how many visitors leave after one page) can go up if your font size is too small or too large, because visitors will not stay if they have trouble reading. This can hurt your SEO. On the other hand, if your font size is optimal, it can increase your dwell time (the amount of time visitors spend on your site), which can positively affect your SEO.
6 Ways to Change Font Size in WordPress
Now that you know the importance of changing font size, let’s see how you can do it in WordPress with six methods, these methods will include changing font size globally or for specific elements.
1) Changing Font Size in WordPress Theme Customizer
One of the easiest ways to change font size in WordPress is to use the WordPress theme customizer. It is a built-in feature that allows you to customize various aspects of your site, such as: colors, backgrounds, menus, widgets, and fonts.
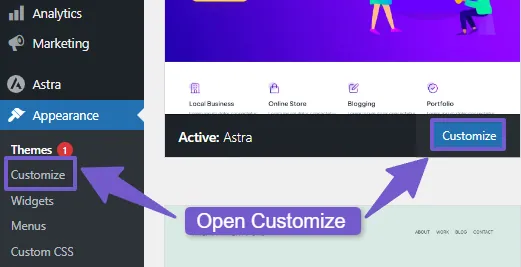
To access the theme customizer, first login to your WordPress dashboard and navigate to Appearance > Customize. This will open a live preview of your site with a sidebar menu on the left.
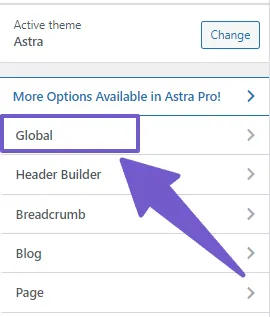
Next, depending on your theme, you may see different options in the sidebar menu. Look for an option that says Typography or Global then > Typography, or something similar.
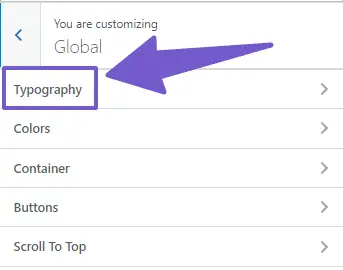
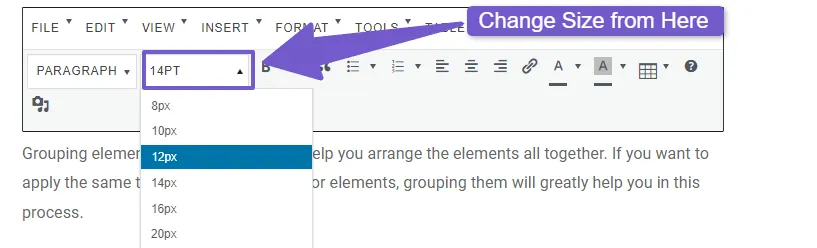
Then, in the Typography tab, you will see a list of different text elements that you can change the font size for, such as: Site Title, Tagline, Headings, Body Text( p )
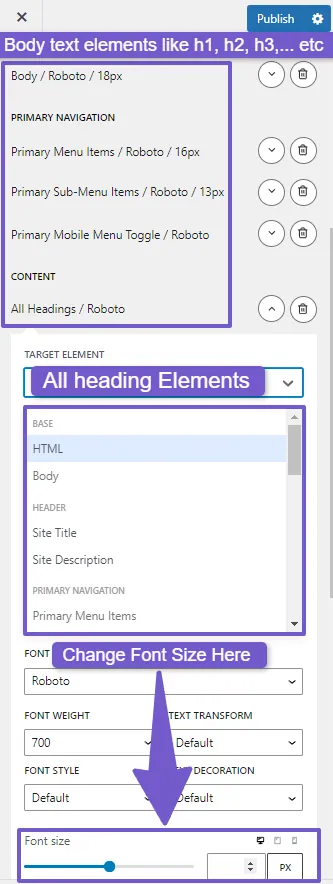
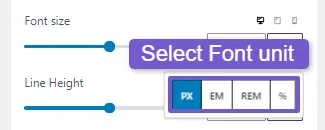
Now to change the font size for any element, simply click on it and choose a unit for the font size, such as px, em, or rem. Then adjust the font size using the slider or input box. As you make changes, you will see them reflected in the live preview.
Once you find the perfect size, click on the Publish to save your changes to make them live on your site.
By using the theme customizer, you can easily change font size in WordPress for various elements of your site. However, not all themes support font customization. If you don’t see any option related to fonts in your theme customizer, you can check out more methods in this guide.
2) Change Font Size in WordPress Default Block Editor
Another way to change font size in WordPress is to use the default block editor, also known as Gutenberg. This method allows you to change the font size for individual blocks, such as paragraphs, headings, lists, quotes, and more.
Also read: How to change link color in WordPress
If you are already using the block editor for your posts or pages, you can easily adjust the font size for any block that you want. Here are the steps to follow:
Step 1: Access the font size settings in the block editor
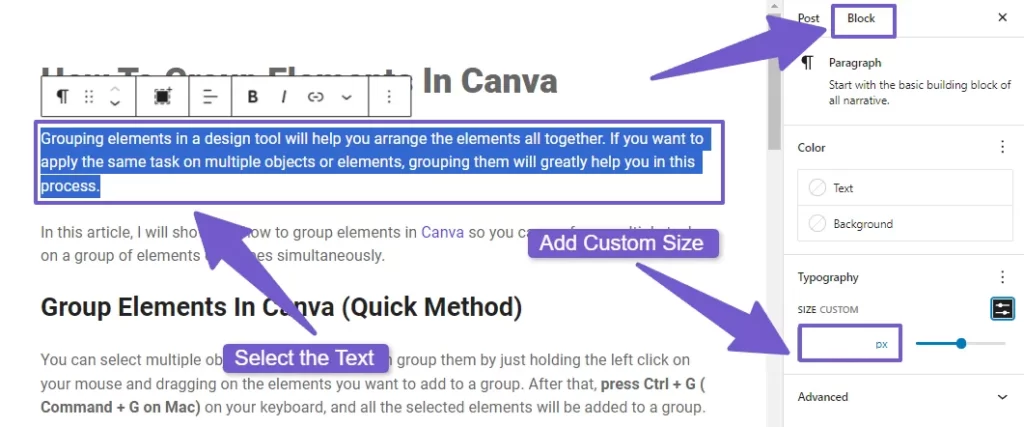
On your page, select the block that you want to change the font size for. In the right sidebar panel, click on the Block tab and there you will see the Typography option.
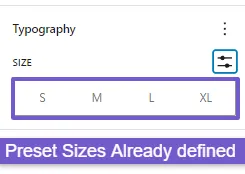
Step 2: Select a preset or custom font size for your block
You will see two options: Preset and Custom. The Preset option lets you choose from a predefined set of font sizes, such as Small, Normal, Large, Huge, etc. The Custom option lets you enter a specific font size value in pixels.
Step 3: Preview and apply the font size changes to your block
Click on the preset option that you want or enter a value in the input box, you will see changes in the live preview of your block. Repeat this process for any other block that you want to change the font size for.
If you want to use a block as a title or subtitle ( Heading ) in your content, you don’t need to increase its font size manually, you can use the heading blocks that are already available in the block editor.
These blocks have different levels of headings, such as h1, h2, h3, etc. The h1 heading is the biggest( have larger font size ) and most noticeable, while the h6 heading is the smallest( have smaller font size ) and least visible.
You can pick the suitable level of heading for your content based on its structure and significance.
Add Heading in Block Editor:
To add a heading block in the WordPress editor, you can follow these steps:
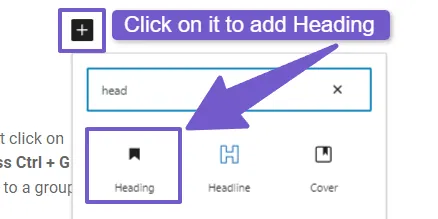
- Click on the plus + icon at the top left corner of the editor.
- Search for or select the heading block from the list of blocks or press ” / ” on your keyboard and add heading.
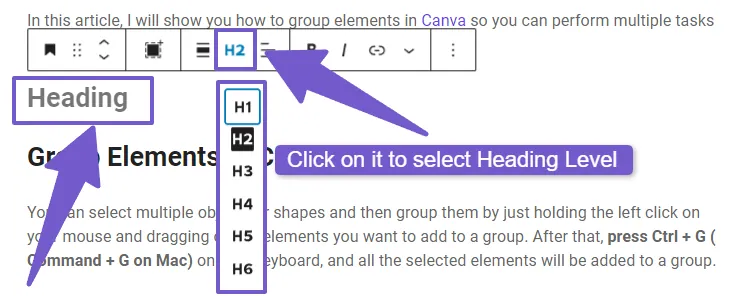
- Type in your heading text in the block. The default heading level will be H2.
- To change the level of the heading, click on the heading block and use the toolbar at the top of the block to select any h3, h4, h5 or h6 level.
3) Change Your Font Size Through CSS code
One of the easiest ways to change font size in WordPress is by using CSS code. CSS code lets you style your web pages by applying rules to different elements or groups of elements.
You can use CSS code to change the font size for any element or class on your site, such as paragraphs, headings, links, buttons, etc. Here are the steps to change font size with CSS code:
- First, you need to find out the name of the element or class that you want to change the font size for. For example, if you want to change the font size for all paragraphs on your site, you need to target the p element like this:
p {
  font-size: 18px;
}
- Next, you need to add this code to the Additional CSS Tab in Theme Customizer, which is located at Appearance > Customize > Additional CSS.
- You can target any element like h1, h2, or h3… and button font like this:
/* This will style the h1 tag with a 36px font size */
h1 {
  font-size: 36px;
}
/* This will style the h2 tag with a 30px font size */
h2 {
  font-size: 30px;
}
/* This will style the h3 tag with a 24px font size */
h3 {
  font-size: 24px;
}
/* This will style the button tag with a 26px font size */
button {
  font-size: 26px;
}
Change Font Size for Specific Element in Website
If you want to change the font size for a specific section of your site, you need to do the following:
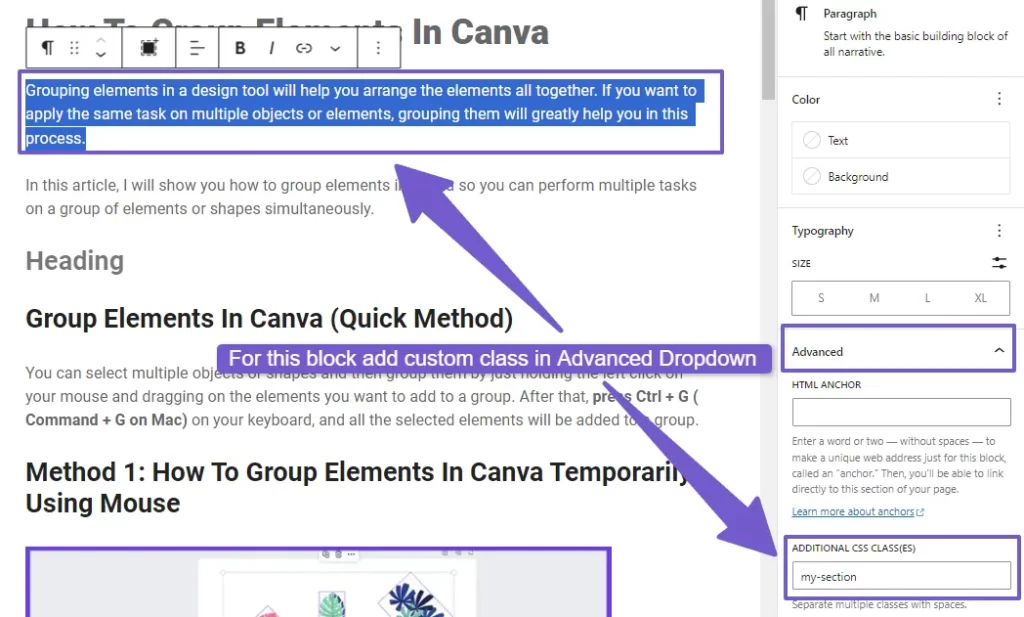
- Create a custom class for that section and add this code to the Additional CSS tab:
.my-section {
  font-size: 18px;
}
- Go to that page section where you want to change the font size, click on the block, and in the right side toolbar, click on advance dropdown and there in ADDITIONAL CSS CLASS(ES), add my-section class. This will change the font size for that specific section.
- You can repeat these steps for any element on your site to change its text size.
Also Read: Change line spacing of text in WordPress
4) Changing text size in WordPress Page Builders
If you are using a WordPress page builder plugin to create your website, you can easily change the text size for any element on your page. Page builders let you design your pages using drag and drop block widgets, and each block widget has its own settings to customize the text size.
Here are the steps to change text size in WordPress page builders:
Step:1
If you don’t have a WordPress page builder plugin installed, you need to install and activate one. Some popular choices are Elementor, Beaver Builder, Divi, and WPBakery Page Builder, however, If you already have it installed, skip to step 2.
Step:2
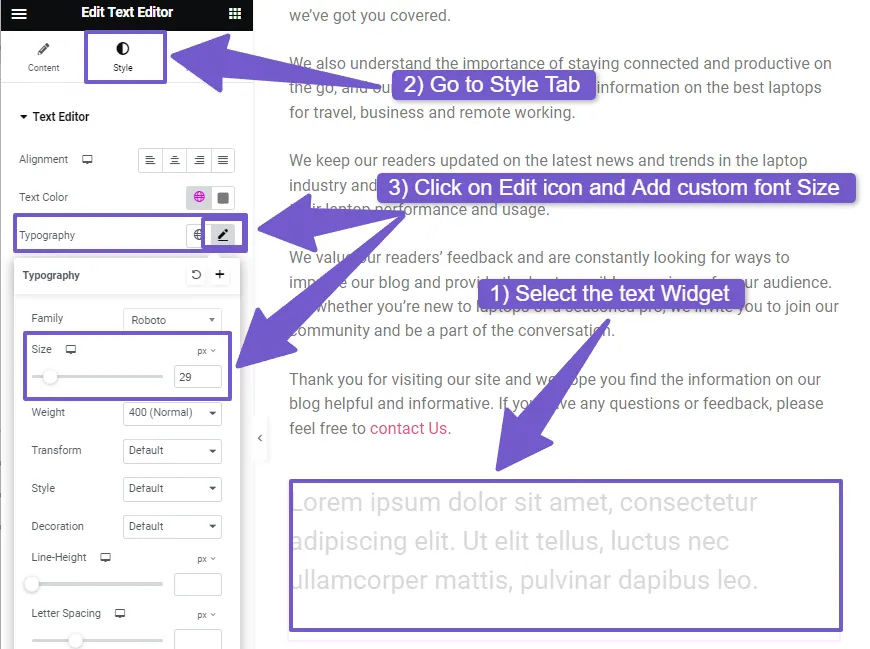
Now edit the page where you want to change the text size, select the text widget that has the text you want to change. For example, to change the text size for a paragraph, click on it.
Step:3
Go to the widget settings panel on the left or right side of the screen (depending on the page builder). Look for the Typography option where you can change the text size for that widget, you can use the slider or enter a custom value in pixels.
Finally, save your changes and preview your page. You will see that the text size has changed for that text widget. You can do the same for any widget on your page that has text and you can also change other typography options such as font family, font weight, color, alignment, etc there.
The process of changing text size in WordPress page builder is similar for all page builders, so you can use these general steps for any page builder.
For example: In elementor, you can change font size by selecting the text widget, in widget toolbox, click on Style tab, here in Typography change the size.
5) Resizing Font Size with WordPress Visual Page Editor
Did you know that you can change the font size for any element on your WordPress page without writing any code or manually adjusting the block editor settings? Yes, you can do this by using a WordPress visual page editor, such as SiteOrigin CSS Editor.
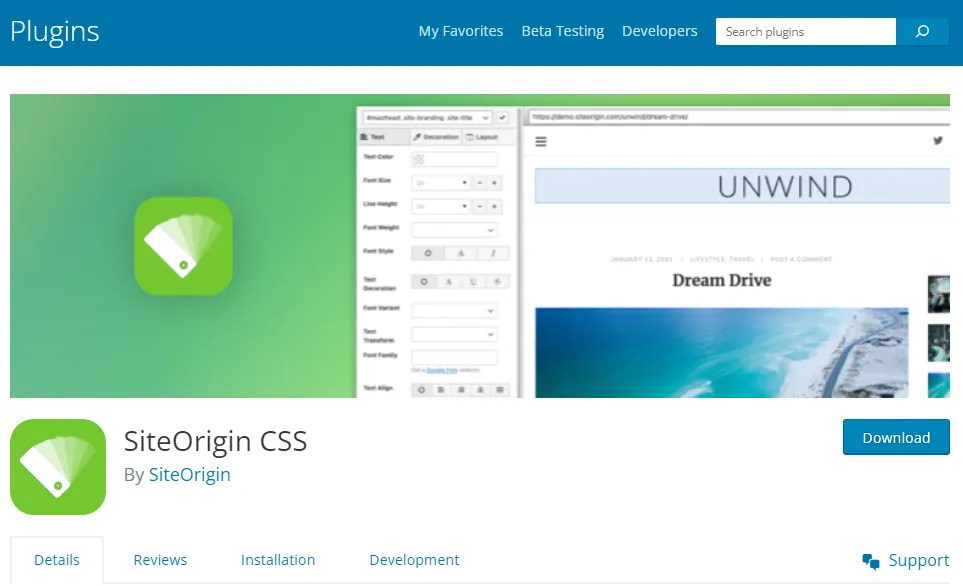
This plugin lets you select any element on your site and change its font size with just a few clicks. Here is how you can change font size with SiteOrigin CSS Editor:
First, install and activate the SiteOrigin CSS Editor plugin from the WordPress plugin directory. Then go to Appearance > Custom CSS. There, you will see an eye icon that opens your site in Visual Editor Mode. Click on it, and the SiteOrigin Editor will show up.
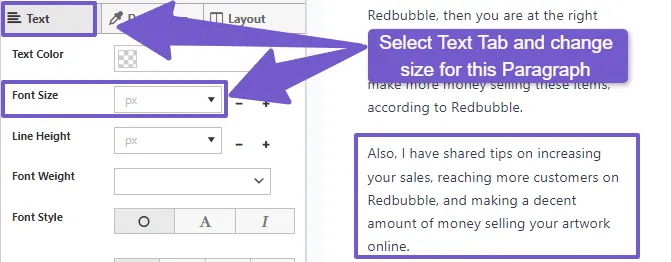
Now select the text that you want to change the font size for, in the Text tab, you will find different options including font Size, here change it to your desired value, save your changes and preview your site. You will see that the font size has changed for the text that you selected.
6) Modifying Font Size With the Help of Plugin
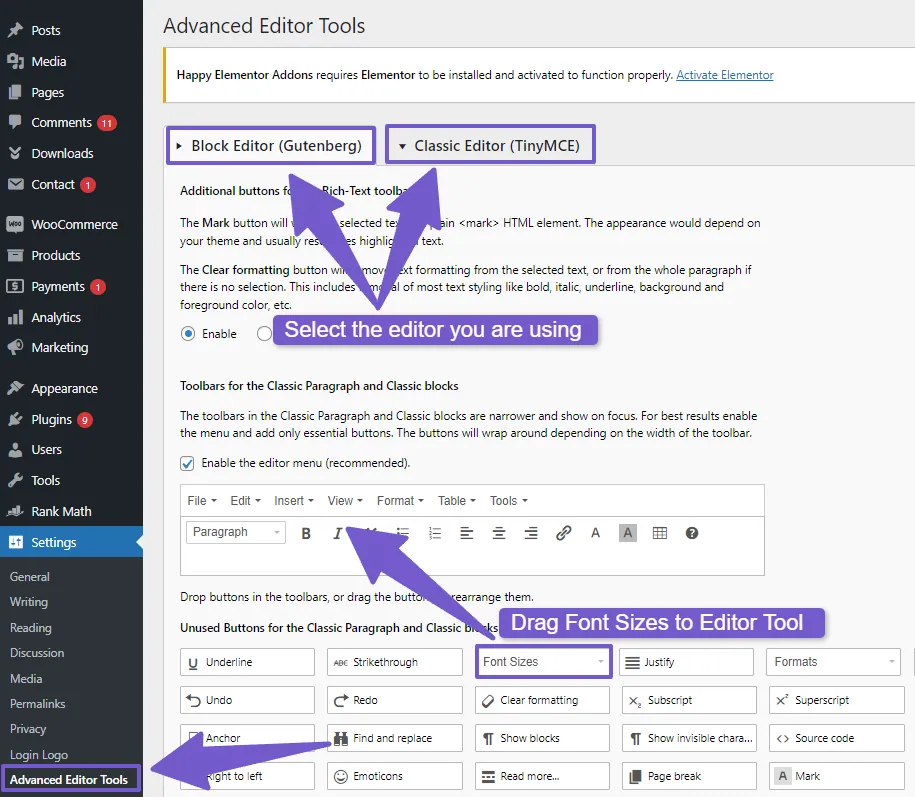
There are many plugins that can help you adjust the font size in your posts, pages, widgets, and more. One of the plugins that you can use is Advanced Editor Tool plugin which is also known as TinyMCE Advanced.
This plugin enhances the WordPress editor (Gutenberg/Classic) with more formatting tools and options, including changing font size. To use this plugin, you need to install and activate it first. Then, go to Settings > Advanced Editor Tools and choose the tab that matches your editor.
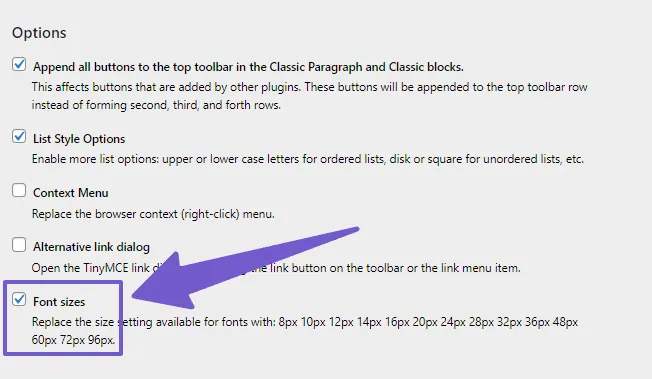
If you are using the Gutenberg editor, select Block Editor (Gutenberg). If you are using the Classic editor, select Classic Editor (TinyMCE). Next, drag the Font Sizes button from the unused buttons section to the toolbar of your editor. Also, scroll down and tick the font sizes option to enable more font size choices and don’t forget to save your changes.
Now, edit the page or post where you want to change the font size and select the text that you want to modify and click on the Font Sizes button in the editor menu for text block. Then, choose a size from the dropdown menu, this way you can change font sizes with the help of this plugin.
Note: In Gutenberg editor, you can change font size easily without this plugin, as I showed you in the second method. However, this plugin is useful if you are using the classic WordPress editor, which does not have a option to modify font size by default.
Bonus Section: Let Visitors Change Font Size on Your Site
You have learned how to change font size in WordPress using various methods, but what if you want to let your visitors choose their own font size on your site? This can be a great way to enhance the user experience and accessibility of your site, especially for people with different screen sizes or visual impairments.
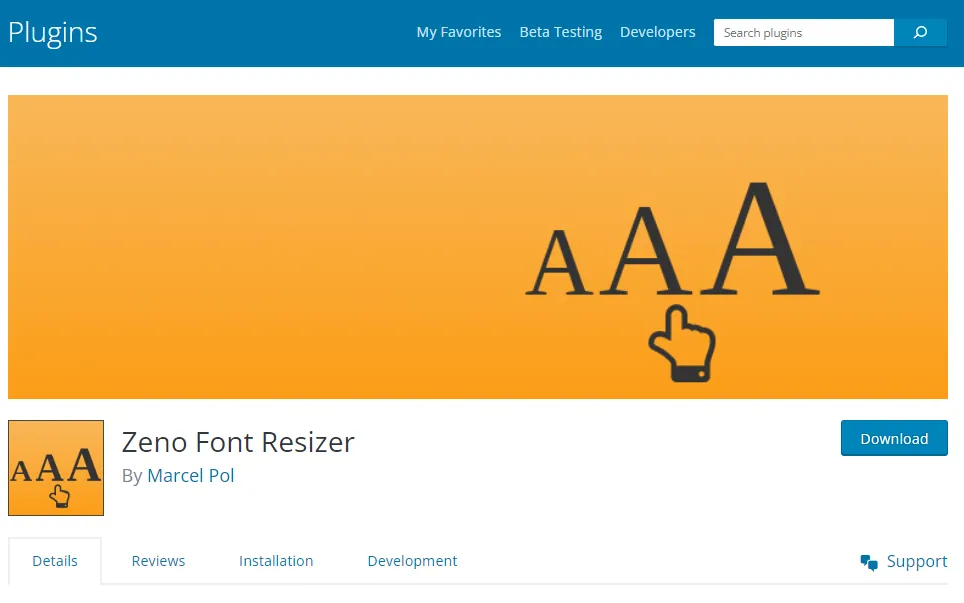
In this bonus section, I will show you how to use a plugin Zeno Font Resizer to add a simple font resizer widget to your site. This widget will allow your visitors to increase or decrease the font size of your text with a click of a button.
This plugin also remembers the font size settings of each visitor using cookies, so they don’t have to adjust it every time they visit your site.
Once the plugin is installed and activated, go to Appearance > Widgets and drag and drop the Zeno Font Resizer widget to any widget area on your site, such as the sidebar or footer.
You can also customize the widget settings in Settings > Zeno font resizer, such as the HTML elements, the button text( by default its A ), the font size range( minimum and maximum ), and cookie setting.
Once you have done that, you can save the widget and visit your site to see it in action. You will see a font resizer widget on your site, which looks something like this:
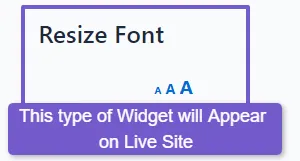
So click on the big A icon to increase the font size, or small A to decrease it( by double or triple clicking it will keep on increasing ). You can also click on the middle A button to reset the font size to the default value. The plugin will resize the text elements that you have specified in the widget settings, such as paragraphs, headings, lists, etc.
That’s it! Now your visitors can enjoy reading your content with their preferred font size.
Best Practices for Font Size Changes
Changing font sizes on your WordPress site is not hard, but you need to follow some best practices to make it look good. Here are some tips to help you do that:
Consistency: Don’t use too many different font sizes on your site. It can make your site look messy and confusing. Use the same font sizes for the same types of content, such as headings, paragraphs, lists, etc.
Responsive Design: Your site should look good on any device and screen size. Your font sizes should adapt to the device that your visitors are using. Test your site on different devices and screen sizes to see how your font sizes look.
Legibility: Your font sizes should be easy to read. If they are too small, your visitors may have a hard time reading your content. If they are too large, they may take up too much space and distract from your content.
FAQ( How to Change Font Size in WordPress )
I found these as most frequently asked questions on internet for this topic, so here are my answers:
How do I change the font size in WordPress?
To change the font size in WordPress follow these steps:
- In WordPress Dashboard, go to Appearance > Customize.
- There, look for the Typography or Fonts tab( in most themes its under Global > Typography ).
- Choose the font element (e.g., headings, paragraphs) to modify.
- Finally, adjust the font size for that element there.
Can I change the font size for specific parts of my content?
You can change the font size for different parts of your content using different methods. For example:
- If you are using the block editor, you can select the specific text block that you want to change and use the font size options on the right side in the block tab.
- If you want to change the font size based on its class name, you can use CSS code like this and add in Additional CSS tab in theme Customizer:
.specific-text{
  font-size:16px;
}
Depending on where you are changing font size, like if you are using block editor, then select the text element on right side in block tab change font size for that specific element, however if you want to change size based on its class name you can you CSS code like this:
.specific-text{
font-size:16px;
}
What is the recommended font size for content in WordPress?
There is no fixed answer to this question, as It depends on how your site looks and who you are writing for. But a good rule of thumb is to use a font size between 16px and 18px for your content. This will make it easy to read for most people but I will say, you can adjust it based on your specific needs.
How to globally change content text size?
The content is p tag in WordPress. You can change its size by adding this code in Appearance > Customizer > Additional CSS:
.p{
font-size:17px; // change 17px to your specified number
}
This code will change the size of all the content on your site.
How can I change the font size in my navigation menu or header?
To change the font size in your navigation menu or header, you need to find out the class name of your header element. You can do this by going to your live site, right-clicking on the header, and selecting inspect. Now, in the style tab, you will see the class name of your header, something like [ .header ]
Then, you need to add some custom CSS code to your theme customizer. You can go to Appearance > Customize > Additional CSS and add this code:
.header a {
  font-size: 18px;
}
This code will change the font size of your navigation menu or header links. You have to use <a> tag because they are links. You can change the 18px value to any number you want.
Will changing font size affect my site’s SEO?
Changing font size should not have a big impact on your SEO by itself. But you need to make sure that your font size is easy to read and use. If your font size is too small or too big, it may hurt your user experience. And if user experience is not good, it will gradually start affecting your site’s SEO.
Wrapping Up the Topic ( My ending Thoughts )
WordPress offers various ways to change the font size of your site, depending on your level of expertise and customization needs. You can use the theme customizer, the block editor, CSS code, page builders, or visual editors, you can also use plugins to help you with this.
This guide covers everything you need, no matter if you are using block editor, WordPress page builders or prefer using CSS code, you will also learn different ways to change the font size no matter which theme you are using these method work in any theme.
I hope you found this guide helpful and enjoyable. Thank you for your time and attention. If you encounter any other issue in WordPress, feel free to check out our other guides. We hope we have covered all your WordPress needs.