If you are seeing an error message saying “The site is experiencing technical difficulties please check your site admin email box for instructions” it means your site has a problem with its themes, plugins, or code and it is in WordPress recovery mode.
WordPress recovery mode is a core feature of wordpress that lets you access your site even when it is down or locked out. You can safely deactivate the plugin or theme that is causing the problem, without losing any data or functionality, you can also get helpful information about the error, such as the file name, line number, and error message.
In this article, you will learn how to use WordPress recovery mode and what are its benefits. You will also learn three ways to access it: using an email link, entering the recovery link manually, or adding code to your wp-config.php file.
By the end of this article, you will be able to fix any WordPress site critical errors by using the wordpress recovery mode.
What is WordPress Recovery Mode and What Does It Do?
WordPress recovery mode is a core feature of WordPress introduced in version 5.2 in May 2019. It helps to prevent the white screen of death page that appears when a fatal error occurs on a WordPress site.
WordPress recovery mode helps the site admin to fix the site when it is facing a fatal error. It identifies the plugin, theme, or code that is causing the problem and sends a recovery email with a link to the WordPress dashboard. The admin can use the link to access the site and remove the faulty plugin, theme, or code.
WordPress recovery mode also provides information about the theme, plugin, or line of code that is causing the issue. This helps the admin to pinpoint the issue causing the fatal error and resolve the issue quickly.
Only the site admin can access the recovery mode. The user will see the error message and not the site content until the admin fixes the issue.
Common Errors That Trigger WordPress Recovery Mode
The wordpress recovery mode can be triggered by different wordpress issues from themes and plugin conflicts to wrong integration of code and max execution time exceeded error, so below are the most common reasons for which the wordpress recovery mode can be triggered.
- Plugin Conflicts: WordPress websites often rely on multiple plugins for added functionality. Sometimes, two or more plugins may not play nicely together, leading to conflicts that can disrupt your site’s normal operation.
- Theme Problems: Your site’s theme is responsible for its appearance and layout. Issues with your theme’s code or compatibility can result in errors.
- Code Errors: Mistakes in your site’s custom code or a poorly coded theme or plugin can lead to critical errors.
- Plugin or Theme Updates: Updating plugins or themes can introduce compatibility issues, especially if the update is not compatible with your current WordPress version.
- Server Problems: Occasionally, issues on the server where your site is hosted can lead to technical difficulties, prompting Recovery Mode.
- Database Errors: Errors within your site’s database, which stores all of your content and settings, can trigger recovery mode.
- Hosting Configuration Issues: Incorrect server settings or misconfigurations on your hosting environment can also result in issues.
- PHP Version Incompatibility: If your website is using an outdated or incompatible PHP version, it can lead to errors.
- Exceeding Resource Limits: Shared hosting plans, in particular, have resource limits. Exceeding these limits can lead to technical difficulties.
- Security Breaches: In some cases, security breaches or attacks on your website can trigger technical difficulties, resulting in a Recovery Mode to protect your site.
Now that you know what WordPress recovery mode is and what can trigger it, let’s learn how to use it to fix our fatal WordPress issues and access the site dashboard.
1) Using Recovery Mode through Email Link
When wordpress detects plugins and themes conflict or any other code-related issue which is critical in nature then it will automatically trigger the wordpress recovery mode and will send you an email having information about the error which triggers the recovery mode and a special link to access your site in the recovery mode.
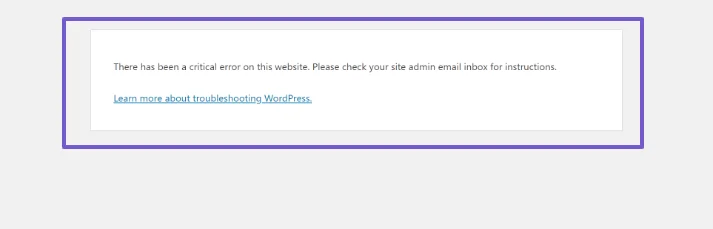
Below is the preview of the error message your wordpress website will show you when it is in recovery mode.
So now the first step you have to do is check your administrator email account for an email from WordPress with the subject line “[Your Site Name] Your Site is Experiencing a Technical Issue”. Make sure to check the spam or junk folder as well.
Open the email and read the details about the error. WordPress may be able to tell you which plugin, theme, or file is causing the issue.
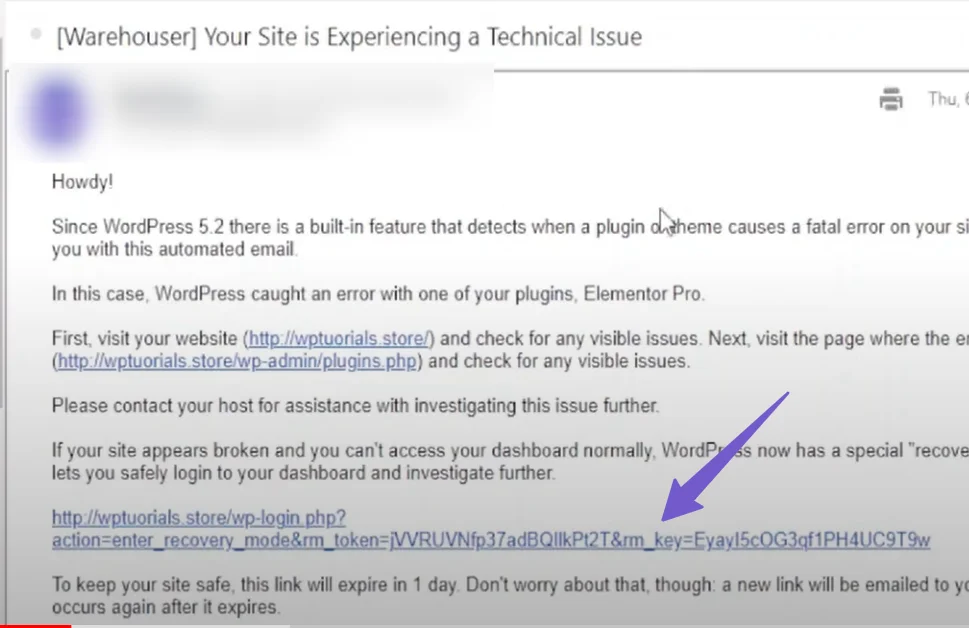
Click on the link that says “Click here to enter recovery mode”. This link will look something like this:
https://yoursite.com/wp-login.php?action=enter_recovery_mode&rm_token=KfHPAWSJ&rm_key=s0OG1KyTAdwk0
This link is valid for 24 hours from the time that the email was sent. If you don’t use it within that time, WordPress will send you another email with a new link.
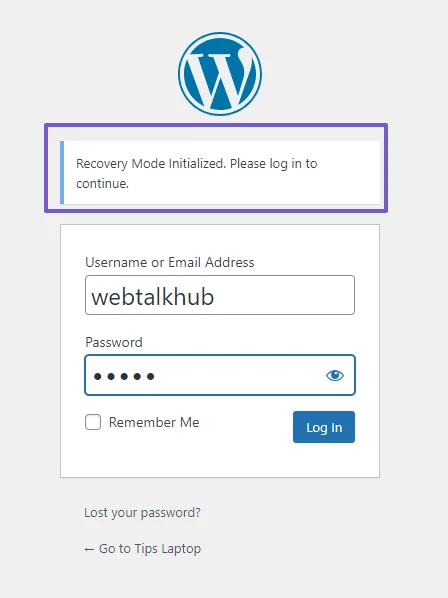
You will be taken to the WordPress login page with a notice at the top saying “Recovery Mode Initialized”. Log in with your username and password as usual.
You will see a banner at the top of your admin dashboard saying “Recovery Mode Active”. This means that WordPress has paused the code that was causing the error and you can now access your site normally.
To fix the error, you need to deactivate or delete the plugin, theme, or file that was causing it. You can do this by going to Plugins » All Plugins or Appearance » Themes and clicking on the “Deactivate” or “Delete” link under the problematic item.
If you are not sure which plugin, theme, or file is causing the error, you can try deactivating all of them and then activating them one by one until you find the culprit.
Once you have fixed the error, you can exit recovery mode by clicking on the “Exit Recovery Mode” button at the top of your admin dashboard.
And once you exit the recovery mode the error message will be gone and your site will be accessible to users without any issues.
Changing Recovery Mode Receiving Email
You can add another email address to receive the WordPress recovery mode email if you forgot or don’t have access to the administrator email of your site.
However, keep in mind that WordPress will not send another email until the previous one expires, which happens in 24 hours. So, even if you add a new email, you have to wait for the next recovery email.
To add another recovery email, go to your WordPress site and open the file manager in your hosting cPanel. In the root folder, which is public_html, locate the wp-config.php file and edit it. Add the following line of code at the end:
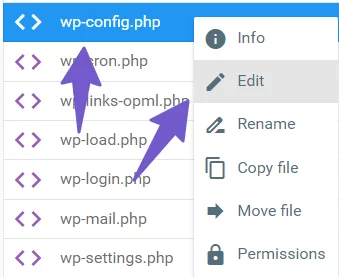
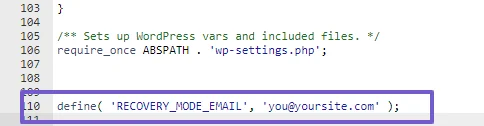
define( 'RECOVERY_MODE_EMAIL', '[email protected]' );
Make sure to replace [email protected] with your email address.
I don’t recommend this method if you are already in recovery mode and want to fix your site quickly. You don’t want to wait for 24 hours to receive an email for recovery.
But this method can be useful when you have client sites that you want to monitor and receive an email to your specific email address. This way, you can keep an eye on the site and fix any issues as soon as possible.
Don’t worry if you didn’t receive an email for recovery mode. Follow the next method in which I will show you a way to access recovery mode without the need for an email link.
2) Accessing Recovery Mode Manually
The easiest way to access WordPress recovery mode is to follow the link that WordPress sends you in the email. However, if you don’t receive the email or don’t have access to your administrator email account, you can still use WordPress recovery mode by manually creating a recovery mode link.
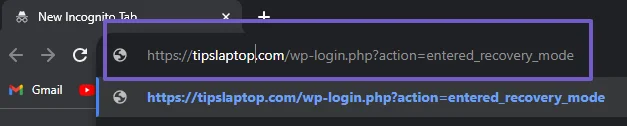
To Create a recovery mode link first add ?action=entered_recovery_mode at the end of your WordPress login URL. For example, if your login URL is https://yoursite.com/wp-login.php, then your recovery mode link will be:
https://yoursite.com/wp-login.php?action=entered_recovery_modeIf you have changed your wordpress login URL and now you don’t know what it is, you can follow our guide. It will show you how to find your wordpress login URL.
Remember to replace yoursite.com with your own domain name.
Copy and paste the recovery mode link in your browser’s address bar and hit enter. You will be taken to the WordPress login page with a notice at the top saying “Recovery Mode Initialized”. Log in with your username and password as usual.

You will see a banner at the top of your admin dashboard saying “Recovery Mode Active”. This means that WordPress has paused the code that was causing the error and you can now access your site normally.
However, the drawback of accessing the recovery mode manually is that you will not see the error message that tells you which theme, plugin, or line of code is causing the issue.
To troubleshoot this, you can start by changing the theme to the default WordPress theme and checking your site. For plugins, you can deactivate all of them and then activate them one by one to find the faulty one.
But the main concern is the code errors, for which I will show you another method that is most effective in troubleshooting errors that trigger the WordPress recovery mode.
3) Debugging in wp-config for Recovery Mode
If you have disabled all the plugins and themes that might have triggered the WordPress recovery mode, but you are still unable to exit it, then this issue is probably caused by a corrupted file, wrong code syntax, or wrong placement of code.
To fix this issue, go to your WordPress wp-config.php file, which is in your public_html folder (root folder). You can access your WordPress file in Cpanel through File Manager.
Once you locate the wp-config file, edit it and look for a code like this:
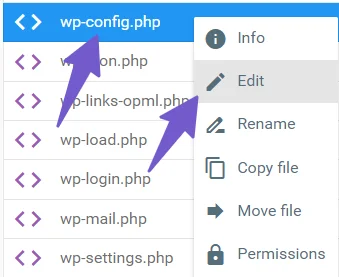
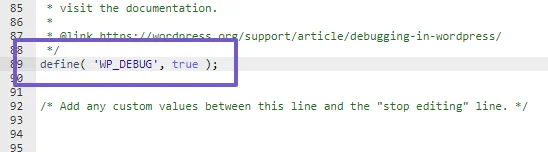
define( 'WP_DEBUG', true );If you don’t have the code, you can add it at the end of your wp-config file. However, if it’s already there, make sure the value is set to “true” like the code above.
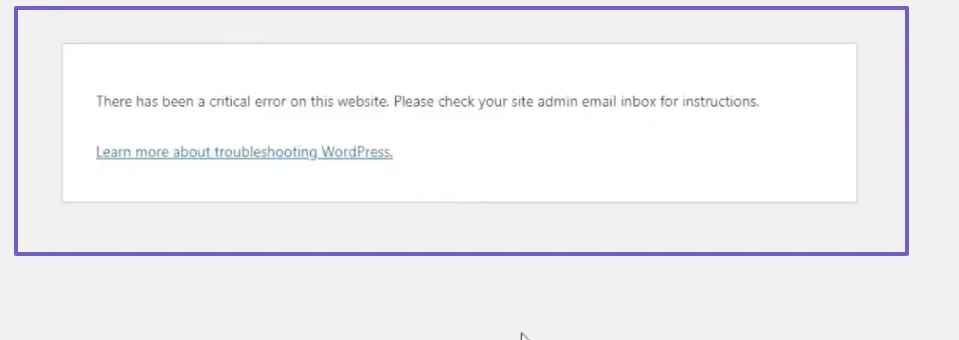
After that, go to your site and refresh it. You will see an error message like this:
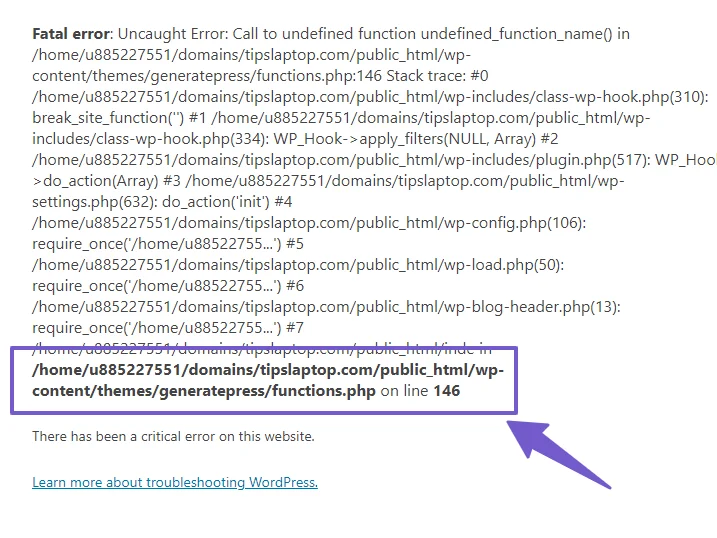
The error message will show you the code that is causing the issue and the path to the file where you can find it. You can follow the path and remove or fix the code that is causing the issue.
Also, if a plugin or theme is causing the issue, it will be mentioned in the debug menu. By using this method, you can fix your WordPress issues that trigger the WordPress recovery mode.
Additional WordPress Recovery Mode Tips to Fix the Fatal Error
I want to share some additional WordPress recovery mode tips that you can use to effectively troubleshoot your WordPress website.
If you are in your WordPress recovery mode dashboard, but you don’t have an error message to tell you what to fix, then you might need to look beyond your WordPress site.
I know you might have tried to disable the theme and plugins or to edit the wp-config file for code issues, but sometimes the issue can be more complex and may involve your hosting server.
For example, your server configuration might have a problem or a limitation that can affect your site functionality.
Other hosting-related issues include resource limitation, security settings, and misconfiguration that can disrupt the normal operation of your site and trigger the WordPress recovery mode error.
To fix these issues, you can install a plugin named Health Check & Troubleshoot, which you can find in the WordPress plugin library by going to Plugins > Add New and searching for it.

Once installed and activated, go to the plugin settings by going to Tools > Site Health.
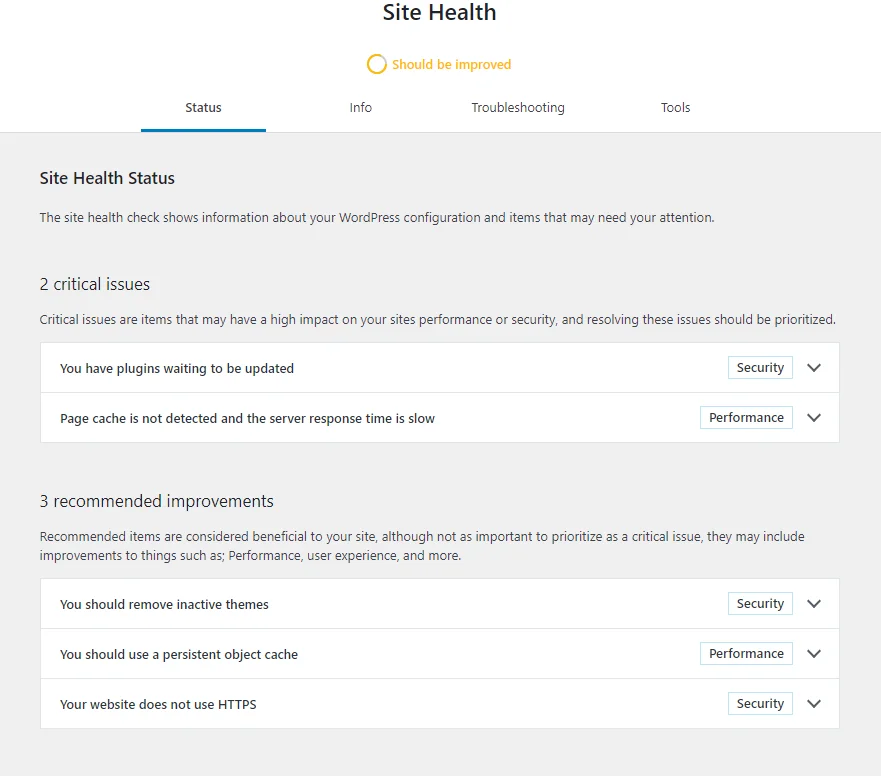
There you will see all the problems your site is facing and how to fix them. Solving these problems will make the recovery mode disappear.
Another troubleshooting method I recommend is to scan your WordPress site for malware using security plugins like Sucuri or BulletProof Security.
Using these plugins will help you to troubleshoot your site and fix your issue. Then you will be able to access your site without recovery mode.
FAQ(Accessing Recovery Mode for WordPress)
Below are some most common FAQs related to fixing WordPress errors with Recovery Mode.
How do I get to recovery mode in WordPress?
When WordPress encounters critical issues like plugin or theme conflicts, it activates Recovery Mode. Here’s how to access it:
- Check Your Email: Look for an email with the subject “[Your Site Name] Your Site is Experiencing a Technical Issue.” It may identify the problematic plugin, theme, or file.
- Access the Recovery Mode Link: Open the email and click the “Click here to enter recovery mode” link. It resembles:
https://yoursite.com/wp-login.php?action=enter_recovery_mode&rm_token=KfHPAWSJ&rm_key=s0OG1KyTAdwk0. Use it within 24 hours. - Log In: You’ll land on the WordPress login page with a “Recovery Mode Initialized” notice. Log in as usual.
- Resolve the Issue: In your admin dashboard, the “Recovery Mode Active” banner indicates you can now fix the error. Deactivate or delete the problematic plugin, theme, or file through Plugins or Appearance. If unsure, deactivate all and reactivate one by one.
- Exit Recovery Mode: Click “Exit Recovery Mode” on the admin dashboard. Your site will be error-free and accessible to users.
How to access wordpress recovery mode without email?
To access WordPress recovery mode without an email link, follow these steps:
- Manually create a recovery mode link by adding “?action=entered_recovery_mode” to your WordPress login URL. Example: If your login URL is “https://yoursite.com/wp-login.php,” your recovery mode link will be: “https://yoursite.com/wp-login.php?action=entered_recovery_mode”
- Copy and paste the recovery mode link into your browser’s address bar and hit enter.
- You’ll be redirected to the WordPress login page with a notice at the top that says “Recovery Mode Initialized.”
- Log in with your username and password as usual.
- Once logged in, you’ll see a banner at the top of your admin dashboard that says “Recovery Mode Active.” This means WordPress has temporarily paused the code causing the error, allowing you to access your site normally.
How Can I Prevent WordPress Recovery Mode?
Regularly update your themes and plugins to minimize the risk of encountering issues. Ensure that your code syntax is correct and also don’t install untested themes and plugins on your wordpress site.
Conclusion
In conclusion, WordPress Recovery Mode is a great feature that WordPress has added. It not only gives you access to your site dashboard when you encounter an error, but also shows you information about the error, such as which plugin, theme, or part of code is causing the issue. This saves a lot of time when troubleshooting.
This guide covers WordPress Recovery Mode in detail, such as what it is, how it is triggered, and how you can access and use it to solve your WordPress fatal errors.
I hope after reading this guide, you will be a pro in diagnosing your WordPress issues with the help of WordPress Recovery Mode. But if you still have any questions about WordPress Recovery Mode or have a specific issue, you can ask me via comment and I will be happy to assist you. Thank you for reading.