Are you struggling with the frustrating Maximum Execution Time Exceeded Error in WordPress website and looking for a Fix then you are at the right place.
The Maximum execution time exceeded is a very common error and every wordpress website user faces this issue at some point, which is displayed as:
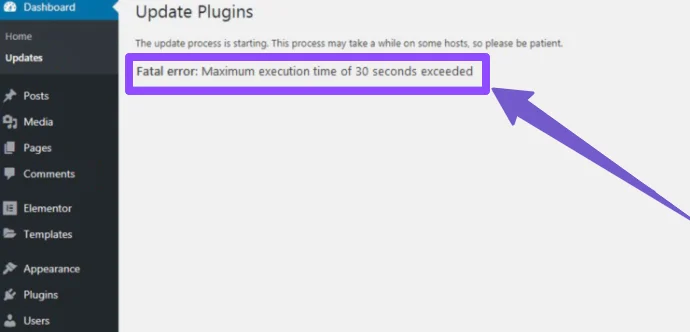
- maximum execution time of 30 seconds exceeded
- maximum execution time of 60 seconds exceeded
- maximum execution time of 300 seconds exceeded
But don’t worry, this guide will effectively fix the Maximum Execution Time Exceeded Error in WordPress.
First, I will adjust the settings in the WP-Config file. Next, I will introduce you to a user-friendly plugin designed to handle the Maximum Execution Time Exceeded issue effortlessly.
If the above methods don’t fix the issue, I will show you more advanced and complex solutions, such as modifying your .htaccess file and editing the php.ini file to extend execution time. I will even share tips on optimizing your WordPress code for better efficiency.
If these methods don’t do the work, I will discuss clearing the cache and contacting your hosting provider as a last option. Stay with us as we break down these in easy-to-follow steps to get your WordPress site running smoothly without facing the Maximum Execution Time Exceeded Error again.
What is the “Maximum Execution Time Exceeded Error” and Why Does it Happen?
The Maximum Execution Time Exceeded Error in WordPress happens because WordPress is built using the PHP programming language. To prevent misuse and load on web servers, there’s a set time limit for how long a PHP script can run.
Hosting companies often set this limit at around 30 to 60 seconds, which is typically sufficient for most PHP scripts to complete their tasks.
When a script runs for longer than this limit, it triggers the Maximum Execution Time Exceeded Error on your WordPress site.
This error essentially tells you that a particular task on your website took too much time to execute, and couldn’t finish within the server’s allowed time frame.
To resolve the Maximum Execution Time Exceeded Error in WordPress, I’ll be sharing seven effective methods. Let’s get started!
1) Use WordPress Recovery Mode
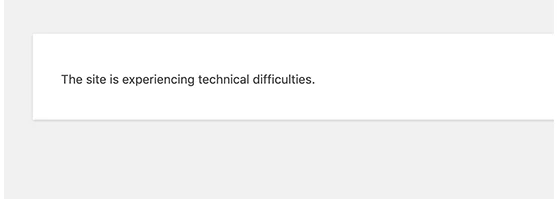
If you see the “Maximum Execution Time Exceeded Error” on your WordPress site, it might display a message saying “This site is experiencing technical difficulties” to your visitors.
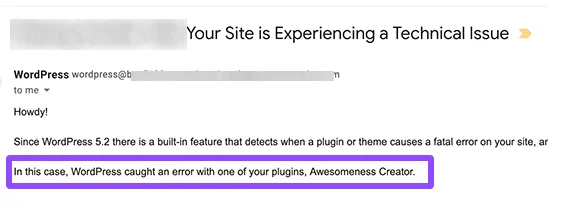
In WordPress 5.2 a new feature is introduced that lets you know when there are issues with plugins or themes by sending an email to the site administrator with details about the problematic plugin or theme and a link to the WordPress recovery mode.
You can use this link to access your site in recovery mode and deactivate the troublesome plugins or themes.
If you don’t receive the recovery mode email from WordPress, you can try the next method, which involves using the wp-config.php file to fix the issue.
2) Editing WP-Config.php
You can extend the maximum execution time in your site’s wp-config.php file. This file holds important details about your site, like its name, host, login, and password.
This method is great if you want to set a specific PHP maximum execution time. It’s not too complicated; you just need to add some code to your WordPress file.
Before you make changes, it’s smart to create a backup of your whole WordPress site. The wp-config.php file is crucial, and making a mistake could be hard to undo. With a backup, you can easily return to your old settings.
Here’s what to do:
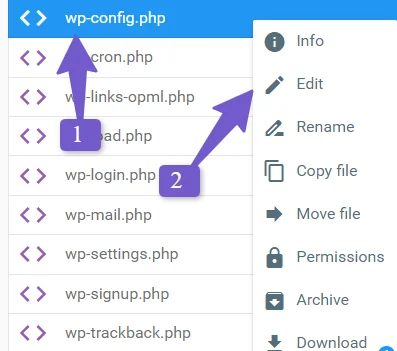
- Go to your hosting and open File Manager (the process is similar on all hosting platforms).
- In the public_html folder, find the wp-config.php file and edit it.
- Add this code at the end, just before the line “/* That’s all, stop editing! Happy publishing.*/”
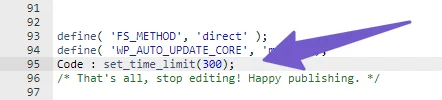
set_time_limit(300);
This line sets the maximum execution time to 300 seconds, which should solve your problem.
3) WordPress Maximum Execution Time Exceeded Plugin
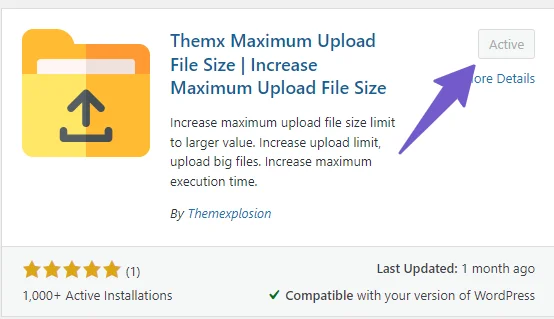
If you prefer a method that uses a plugin because you want to avoid making changes to the core files of WordPress yourself because you are not comfortable or familiar with working on the core files of wordpress, then the Themx Maximum Upload File Size Plugin is what you need to increase your website’s execution time.
To install this plugin, go to your WordPress dashboard, navigate to Plugins > Add New, and search for the ‘Themx Maximum Upload File’ plugin Install it. The plugin display picture is shown below in the image.
Once installed, activate the plugin Go to Media > Increase Maximum Upload Limit and there you can change the maximum upload limit and also the Maximum Execution Time. This plugin also gives you information about the PHP Maximum Execution time limit set by your hosting provider.
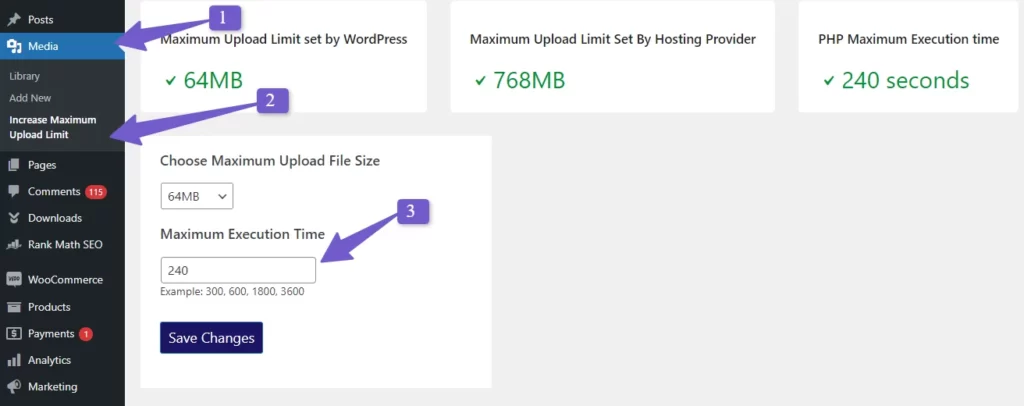
If you want to return to the original settings, simply deactivate and uninstall the plugin. Your execution time will revert to its original state.
By changing the execution time using this plugin you will be able to fix the issue still If the problem persists, you can explore the next method, which involves modifying the .htaccess file.
4) Modify .htaccess File
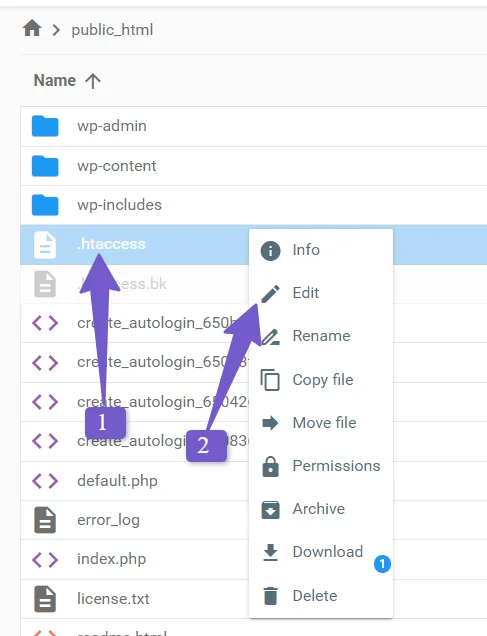
To resolve the “Maximum Execution Time Exceeded” issue, you can edit your .htaccess file. Here’s how:
Locate the .htaccess File: First, find your website’s .htaccess file. It’s usually in the root directory of your WordPress installation which is public_html.
Backup the File: Before making any changes, create a backup of the .htaccess file. This ensures you can revert to the original if something goes wrong.
Edit the .htaccess File: Edit the .htaccess file and Add the following line at the end:
php_value max_execution_time 300
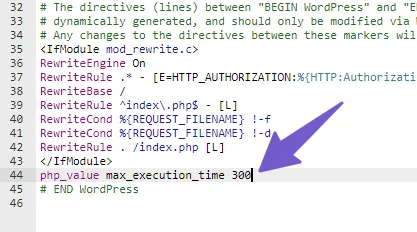
You can adjust the “300” to your desired maximum execution time in seconds. For example, “60” for 60 seconds.
Save .htaccess File: Save the changes to the .htaccess file.
This should extend the maximum execution time for PHP scripts on your WordPress site, helping to resolve the error.
5) Edit php.ini File
Another way to fix the “maximum execution time exceeded” error in WordPress is by changing a file called php.ini.
Think of php.ini as a rulebook for PHP on your server. But sometimes, it’s not in your main folder(public_html).If you can’t find it, no worries! You can make a new php.ini file in your WordPress main folder( public_html) using the File manager in cPanel.
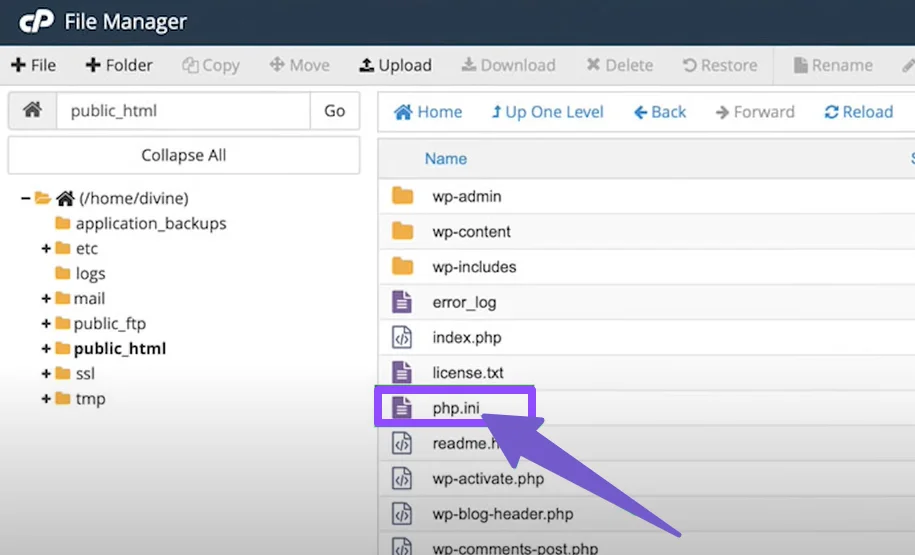
Then, just open that php.ini file and write this line of code:
max_execution_time = 60
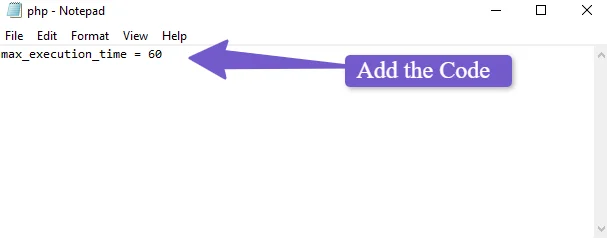
This code tells your server to give more time (in this case, 60 seconds) for tasks to finish.
This method is effective for CMS like WordPress because it affects all the scripts at once, saving you from editing each one separately.
However, it’s important to note that not all servers support php.ini files. To find out if your hosting service does, you can simply search on Google. For instance, you can search ‘Does Hostinger support php.ini file?’ The search results will provide information about whether your hosting service supports php.ini or not.
You May Like to read :
Fix Favicon Not Showing in WordPress
Backup WordPress Site for Free
Add Google Search Console to WordPress
Fix ‘Failed To Load Resource’ Error in WordPress
6) Clear Cache
Clearing the cache can sometimes help resolve the “maximum execution time” error in WordPress, but it’s not a guaranteed solution. Caching plugins or server-side caching can sometimes store older versions of your website, which might include outdated settings for maximum execution time.
Here’s how you can clear the cache:
Using a Caching Plugin:
- If you are using a caching plugin like WP Super Cache or W3 Total Cache, go to your WordPress dashboard.
- Navigate to the caching plugin settings and find an option to clear or purge the cache.
- Clear the cache and check if the error is resolved.
Server-Side Caching:
If your hosting provider uses server-side caching, you might need to contact their support or use the hosting control panel to clear the server cache.
The steps to clear server-side caching can vary depending on your hosting provider, so it’s best to consult their documentation or support for guidance.
Clearing the cache is a good troubleshooting step, but if the error persists after clearing the cache then the last option we have is to contact the Hosting support.
7) Contact Hosting Provider
If you have tried all the methods above but still are not able to solve the maximum execution time exceeded error then the last recommended option we have is to directly contact the hosting provider support.
The Hosting provider stores all your website files and data on a server and this server has certain rules and limits, including the “maximum execution time,” which determines how long a task can run on the server.
Sometimes, your website might hit this limit, causing the “maximum execution time” error. If you’re on shared hosting, it means you’re sharing server resources with other websites, and you might not have direct access to change these limits yourself.
So, in this situation, you can contact your hosting provider, the company that manages the server where your website lives. You can tell them that you’re getting a “maximum execution time” error in WordPress, and it’s causing issues on your site.
They have the ability to adjust these server settings for you. They can increase the maximum execution time to a higher value, like 300 seconds (which is 5 minutes), so your website has more time to complete tasks without hitting that limit. So I hope contacting the hosting provider support team will solve your max execution time exceeded error.
FAQ( Resolving Maximum Execution Time Exceeded Error in WordPress )
Below are some most common FAQs related to Solving the WordPress Maximum Execution Time Exceeded Error.
How do I Fix the Maximum Execution Time Exceeded Error in WordPress?
- Step 1: Go to the Plugins section in your WordPress Dashboard, Install and activate the “Themx Maximum Upload File” plugin.
- Step 2: Navigate to “Media” and choose “Increase Maximum Upload Limit.” Adjust the execution time and upload limits as needed.
- Step 3: To return to the original settings, deactivate and uninstall the plugin.
What does max_execution_time do?
max_execution_time is a PHP setting that defines the maximum time (in seconds) a script is allowed to run on the server. It helps prevent excessively long-running scripts from overloading your web servers.
What is the best value for max_execution_time in PHP?
The best value for maximum execution time in PHP often depends on your website’s specific needs. A common starting point is 60 seconds, but for more resource-intensive tasks, consider increasing it accordingly.
Conclusion
In conclusion, the “Maximum Execution Time Exceeded” error in WordPress is a common issue caused by PHP scripts taking too long to run as a return wordpress gives us the error because the server doesn’t allow the PHP scripts long execution as it will load the server. We’ve provided seven methods to fix it:
- WordPress Recovery Mode: For disabling troublesome plugins/themes.
- Editing WP-Config.php: Adjust the execution time in your site’s configuration.
- WordPress Maximum Execution Time Exceeded Plugin: Use a user-friendly plugin to manage execution time limits.
- Modify .htaccess File: Edit the .htaccess file to extend execution time.
- Edit php.ini File: Change PHP settings via php.ini, if supported.
- Clear Cache: Sometimes, outdated caches can trigger the error.
- Contact Hosting Provider: Seek help from your hosting support for server-level adjustments.
The methods discussed in this guide will solve your maximum execution time exceeded error but if for some reason you are unable to fix the issue using these methods you can tell your specific problem via comment and I will help you to fix the issue.
The Themx maximum upload file plugin method is so easy and it solved my problem so if you are beginner just try the method 3 its easy and effective
I am glad to help you 😊