
As a WordPress user and developer, I understand the importance of personalizing every aspect of your website, and one of the great things about WordPress is that it lets you change how your site looks and works, using different themes and plugins.
When you first set up your WordPress site( WordPress installation is done ), you might see a default footer text like ‘Another WordPress Site’ or ‘Powered By WordPress’. Even some WordPress themes can also automatically put in a footer text like ‘Built By Theme Name’.
While these serve a functional purpose( like this website is build on WordPress platform ), but that may not align with your brand’s image. So this copyright notice area is an important part of your website in which you can tell everyone who owns the content on the site and you will not want to have these copyright text.
Well, you might be wondering how to change footer copyright text in WordPress to add your own copyright notice etc. Well, don’t worry, in this article, I am going to show you different ways that will help you change the footer copyright.
So no matter how less experienced you are with WordPress, my easy to follow ways with proper steps will be helpful to customize footer copyright notice. This way, you can ensure every detail of your site, including the copyright footer, aligns perfectly with your brand’s image.
Is it Allowed to Change WordPress Default Copyright text
Now, you have decided to change copyright footer text but you might have a question that is it legal or is it allowed to change these default WordPress copyright text?
So the answer is Yes, you can change the default copyright text in WordPress. WordPress is open-source platform which means anyone using WordPress can change its code including the default copyright text like ‘Another WordPress Site’ or ‘Powered by WordPress’.
So with that being said, let me now show you how to modify the footer copyright text in five ways.
5 Ways to Change the Copyright Footer in WordPress
As previously mentioned, this guide is intended for all levels of users, from novices to experts, so my methods will involve from the easiest solutions to more technical but believe me all of them can easily be applied if you follow properly, so lets start from easiest to more technical ones.
1) Using a Plugin to Change footer Copyright Text
One of the simplest ways to change the footer copyright text in WordPress is by using a plugin. This method is particularly useful for those who are not so tech-savvy, and want to make modifications to their website without having to touch any code.
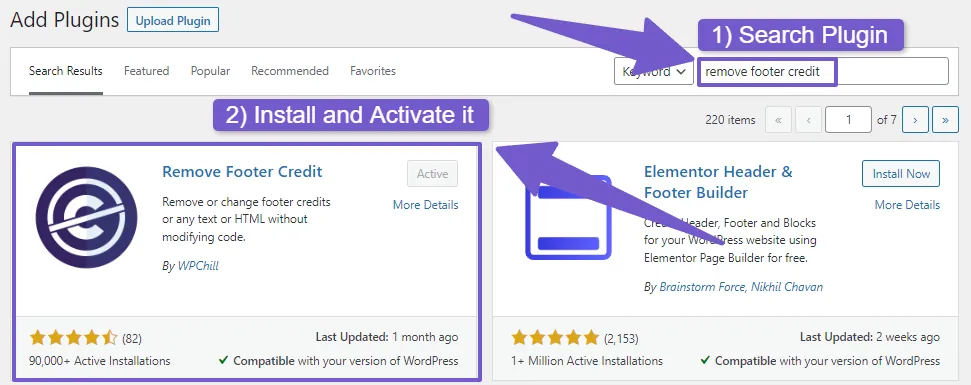
The Plugin name is Remove Footer Credit, using this plugin, you can remove the copyright text from footer and not only removing it, this plugin also allows you to add your own footer credentials. So let me show you how to use this plugin in order to get rid of copyright text.
First, you need to install and activate this plugin, simply go to Plugins > Add new plugin. There in search bar write Remove Footer Credit, this plugin will appear.
After installing and activating, navigate to your Dashboard, go to Tools and click on Remove Footer Credit. In this new tab, you will see two boxes. The first box is for the text you want to remove, and the second box is for the text you want to replace it with.
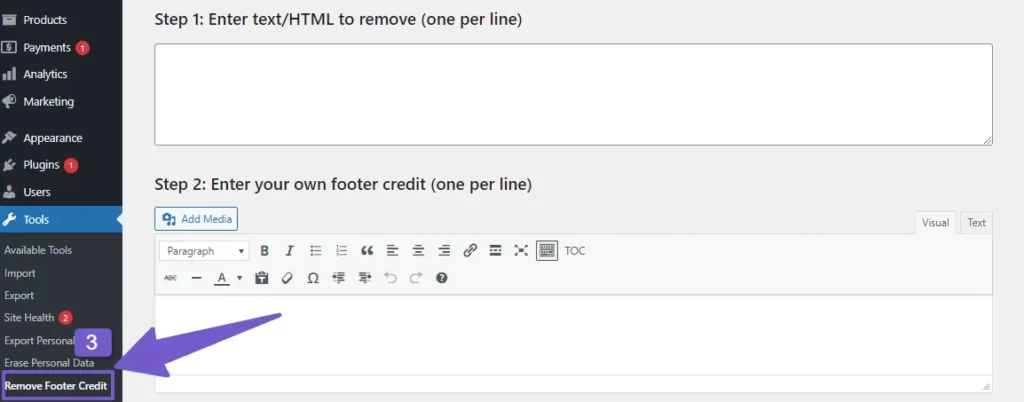
If you only want to get rid of the footer credit, you just need to fill out the first section( add the same text which is currently on your footer ). But if you want to replace the old copyright text with your own details, you’ll need to fill out both sections. Now, let’s see how to change the copyright text.
First, go to your live website and scroll down to the footer. There, you will see the default footer copyright text. Right-click on it and choose inspect.

Now in the inspect element, you will see the HTML code for this copyright text like this:
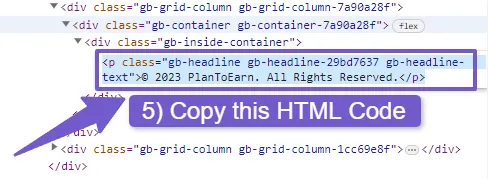
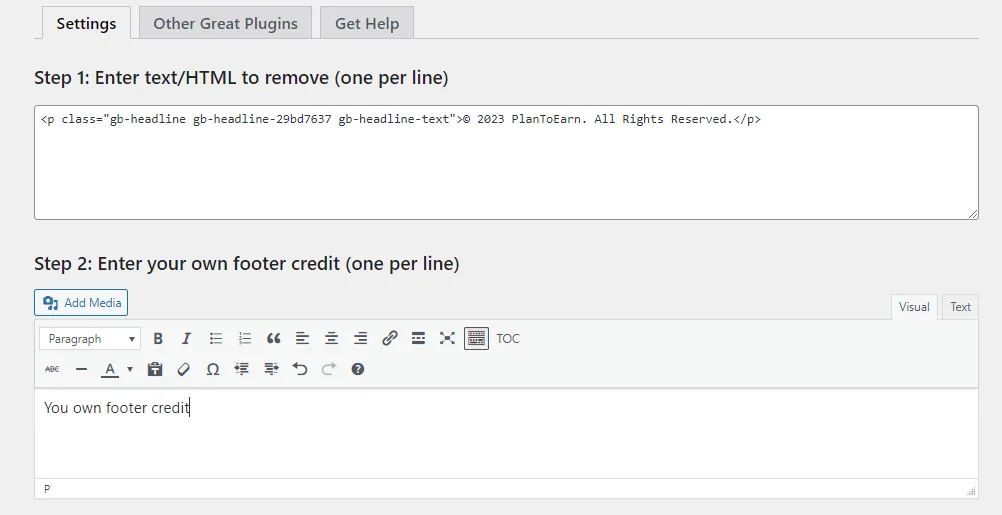
So, copy this code and paste it into the first box of the Remove Footer Credit plugin that says “Step 1: Enter text/HTML to remove (one per line)”. This will delete the footer copyright details. However, if you want to add your own details, type any text into the second section that says “Step 2: Enter your own footer credit (one per line)“. This will change copyright text to your own text.
Also Read: How to Remove Header and Footer in WordPress page
2) Using WordPress Theme Customizer
Another way to change the copyright footer text in WordPress is by using the built-in WordPress Theme Customizer. This method allows you to make changes to your website’s appearance and content without using any additional plugins, moreover it’s also very easy to apply just like using a plugin. Here’s how you can do it:
First of all access your WordPress Theme Customizer by going to your WordPress Dashboard > Appearance > Customize. There you will see a list of options depending on your theme providing Customization options.
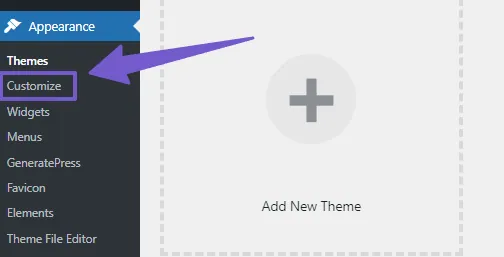
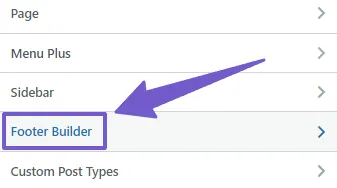
So there click on Footer tab or look for any option that relates to your website’s footer or copyright text, which will open footer customization settings
There, you should see a text field or content box where you can edit the copyright text, just like this:
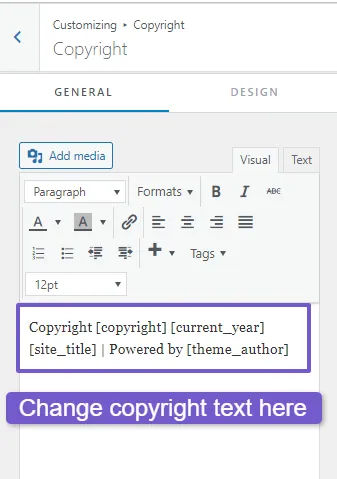
Simply replace the existing copyright text which will be either written as (Proudly Powered by WordPress or Powered by your Theme Name) with your desired copyright notice or any other text you want to display in the footer.
Now, save your changes and visit the live site to preview now footer credits. However, as I said every theme offers different customization options, the theme which I am using is Astra Theme which is offering to change Footer Copyright text, but you may be using a theme which does not offer this feature, so don’t worry, I have more methods to show you. So, keep on reading..!
3) Editing Code in Footer.php file of Theme to Change Footer Copyright Text
If you are not comfortable working with code, you can skip this method. It also might not work for everyone because different themes have different code structures. I am using the Twenty Twenty-One theme as an example, but this method is for those who want to learn more ways to customize their WordPress site. So here’s how you can change the footer copyright text by editing the code in the Footer.php file.
Note: Make sure to backup your site before editing code in your theme
Navigate to your WordPress Dashboard > Appearance > Theme file Editor, on the right side you will see Theme Files.
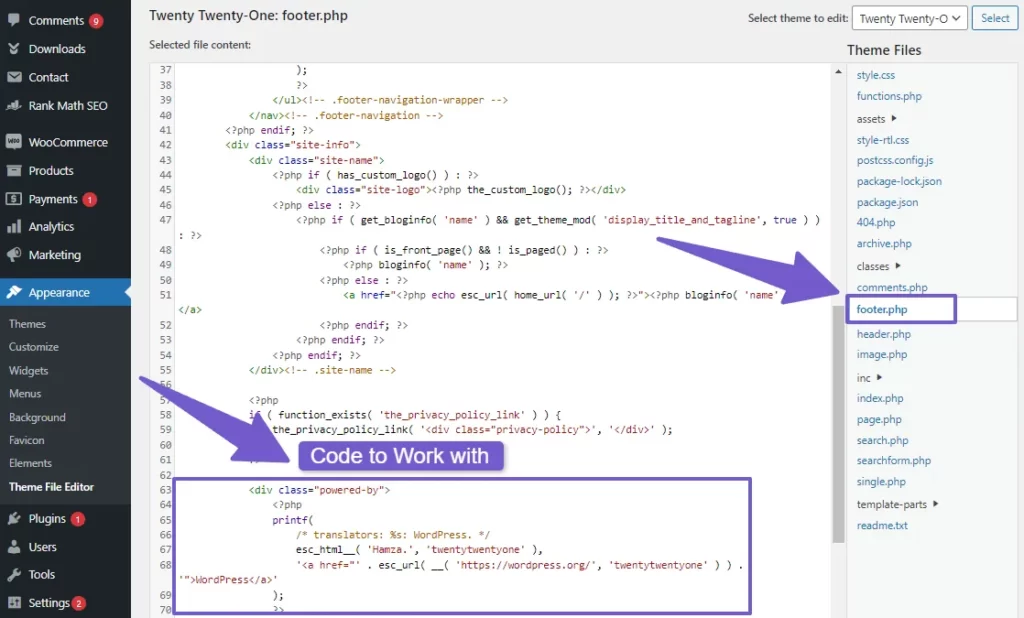
There, click on footer.php and scroll down below to the end, you will see this code:
<div class="powered-by">
<?php
printf(
/* translators: %s: WordPress. */
esc_html__( 'Proudly powered by %s.', 'twentytwentyone' ),
'<a href="' . esc_url( __( 'https://wordpress.org/', 'twentytwentyone' ) ) . '">WordPress</a>'
);
?>
</div><!-- .powered-by -->
You have now two options here. First, you can change the text to something else. Second, you can remove that part of code completely to hide it. However, If you want to change it, just replace the words “Proudly powered by %s.” with whatever words you like.
4) Using Page Builders to Change Copyright Footer Text
If you are using a page builder like Elementor, you can easily change the copyright text in your website footer. However, in the free version of Elementor, you can’t directly edit the footer. So, I’ll explain how to change the copyright text in both the free and paid versions of Elementor.
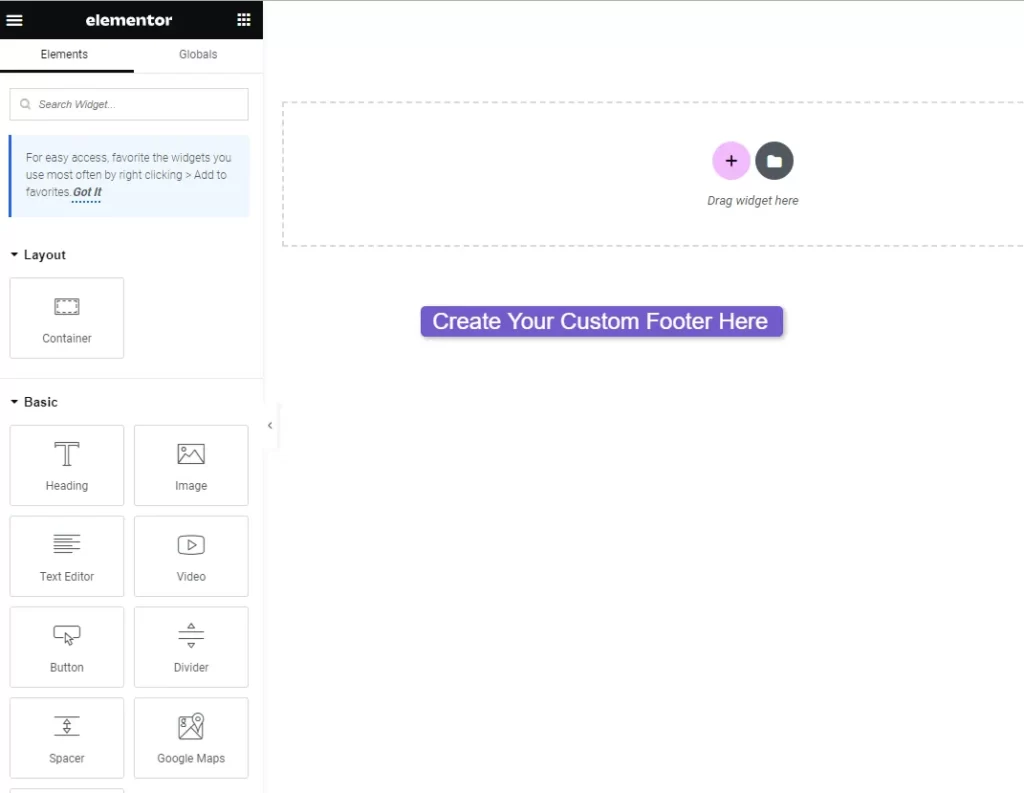
First, let’s change the copyright notice in the free version. To do this, you will need to replace the old footer with a new custom footer. This new footer will also remove the old copyright notice. I have written a separate guide on how to add or edit a custom footer in WordPress with elementor. Please visit that guide first before continuing here.
Once you have your custom footer, you can start editing it. Add your own copyright notice and any other text you want. This will replace the old footer with the copyright notice, and it will no longer be there.
In the free version of Elementor, you will need to install additional plugins to create a custom footer.
However, if you have Elementor Pro, it’s much easier. You can edit your footer directly without needing extra plugins, plus, Elementor Pro gives you access to many pre-made footer templates. This means you don’t have to start from scratch when creating your footer.
Now to get rid of old footer with copyright notice text, follow these steps:
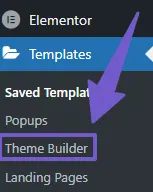
- Go to the Templates section below the Elementor tab.
- Click on Theme Builder.
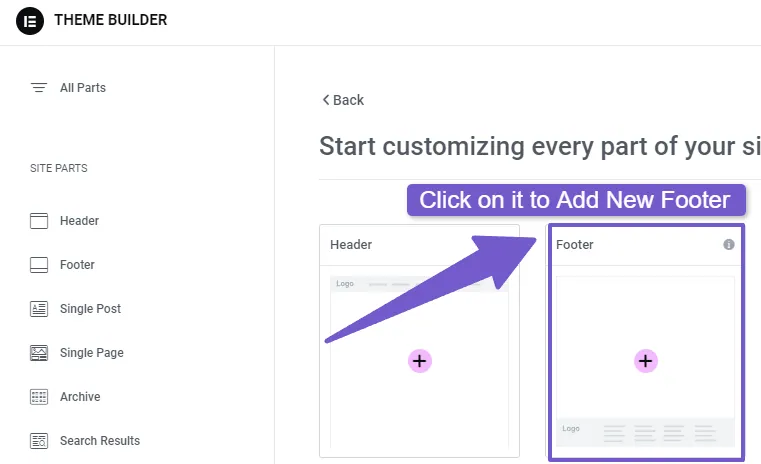
- Find the Footer section and click Add New.
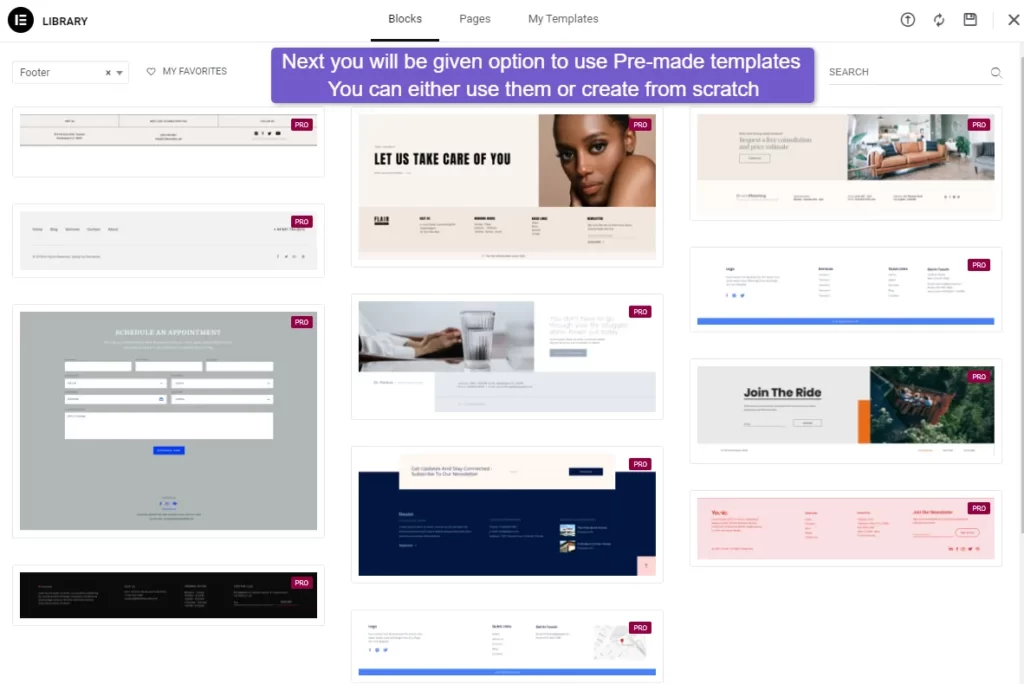
- You can even use ready-made footer templates if you want.
- Now, edit your new footer, customize its rules in settings to make it show up on your entire website.
- That’s it! The old footer with the copyright notice will be gone, and your new footer will be used on your website.
5) Remove/Hide Copyright Footer Text in CSS code
This method is for those who just want to hide the copyright footer text from displaying, To do this using CSS code, follow these steps:
- Go to your live website and scroll down to the footer.
- Right-click on the footer and choose inspect. This opens an inspect tool.
- Inside the inspect tool, you will see the class name for the copyright footer text, like this:
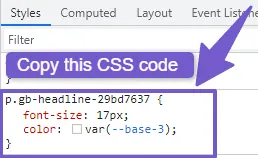
Now, go to your WordPress Dashboard, navigate to Appearance > Customize. In Customizer, scroll down to find the Additional CSS tab and click on it. Paste the code you copied earlier and between the brackets add display:none like this:

FAQ( How to Change Footer Copyright Text in WordPress )
How do I change the footer copyright text in WordPress?
To change the footer copyright text in WordPress, navigate to your WordPress dashboard, go to Appearance > Customize, and look for an option like Footer or Footer Copyright, depending on you theme options and there you can edit the copyright text.
What if my theme doesn’t have a built-in option to change the copyright text?
You can change the footer copyright text in WordPress if your theme doesn’t have an option for it by using the Remove Footer Credit plugin. Install and activate the plugin, access its settings in your WordPress Dashboard, and either remove or replace the existing copyright text. This plugin simplifies the process for non-technical users, allowing you to customize your footer copyright text with ease.
Is it essential to have a copyright notice in the footer of my website?
While it’s not legally required to have a copyright notice in the footer, however it is a good practice, It shows that you own the stuff on your website and might stop people from using it without permission
Final Wordings on this Topic
Changing the copyright footer in WordPress is a simple yet effective way to customize your website and make it uniquely yours. This guide has provided straightforward methods to change the copyright footer text so you can follow easily, you can use WordPress Built-In theme feature, using a plugin, or even using PHP code.
I hope this guide has been helpful, if you still have some concerns, you can comment down below, I am always here to assist you.