Are you finding it difficult to download the WordPress media library Entirely in one go?
It can be time-consuming to download each media file individually, especially if your WordPress website is big and has many images, videos, and other media files.
But don’t worry! This guide will show you different methods and approaches to download wordpress media library entirely.
So if you need a backup of your media files or want it for wordpress website migration to your new WordPress hosting, this guide will give you the necessary information to manage and export your entire media library without the need for manual and time-consuming methods.
Why is it important to download the entire media library in WordPress?
As your website grows, so does your collection of media files. Keeping a backup of your media library is crucial because you want to avoid losing all your media files in unusual circumstances.
Whether you are migrating your WordPress website, performing a backup of your entire wordpress site, or want to organize your media files on your local computer, downloading the entire media library is necessary as you will have an extra layer of security that will protect you from data loss and gives you greater control over your media files, making it easier to share with others.
In this blog post, I will show you 5 different ways to download your WordPress media library entirely to your local computer. However, If you want to only download a single or just few images from media library then check out our step-by-step tutorial on download images from the WordPress Media Library.
So let’s get started!
Method 1. Download WordPress Media Library Using Plugin
I’ve explored various ways to export the entire WordPress media library, and through my experience, I’ve discovered the best method is using the “Export Media Library” plugin.
This method takes the top spot among others because it lets you get your entire WordPress media library with just a few simple clicks.
The plugin offers a convenient option to either export all media files into one folder or organize them into separate folders. This flexibility empowers you to manage and organize your media files effortlessly after downloading.
Here’s how you can do it:
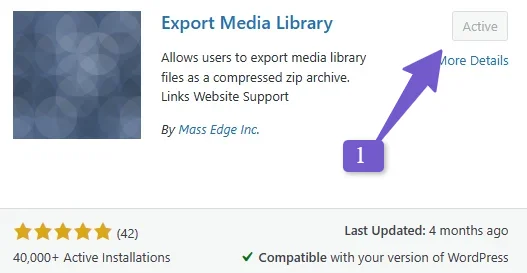
Step 1: Install and activate the “Export Media Library” plugin from your WordPress dashboard. You can find it by navigating to Plugins > Add New and searching for “Export Media Library.” Once found, install and activate it.
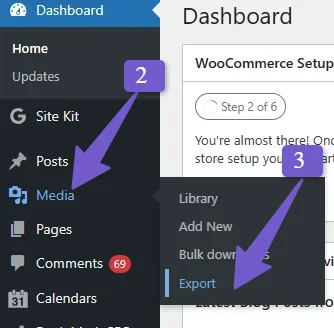
Step 2: Go to Media > Export in your WordPress dashboard, and you’ll find settings for downloading your media library.
Step 3: On the “Export Media Library” page, choose either the “Single folder with all files” or the “Nested folder” option from the dropdown menu. Click the “Download Zip” button, and your entire media library will be downloaded to your local storage.
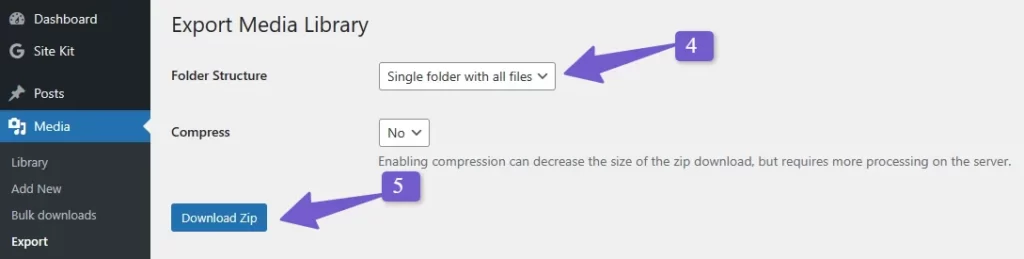
Tip: If you have a low-budget hosting plan, leaving the compressed setting to “NO” is recommended, as it requires fewer server resources.
Tip: The “Single folder” option is ideal when you want all media files in one folder, while the “Nested folder” option is best if you prefer to Obtain all images and media files from a WordPress website in their respective upload month folders, which works well for some users.
Simply unzip the downloaded zip file, and voilà! You have successfully completed the WordPress media library export, saving you time compared to manually downloading each media file.
If you want to download a single images from media library then cheak out our this
Now, you can enjoy the convenience of managing your media assets offline, ensuring a safer and more organized WordPress media library.
Also, if you want to export only your blog posts with images, you can check out our comprehensive guide on export WordPress posts with images.
The method we discussed earlier will work for many users and is pretty straightforward. But, you know what? We should always be prepared for different situations.
What if that method stops working for some reason, or you have a super large collection of media files that are sizing in GBs? or you might be searching for a way to download a WordPress media library without a plugin? Don’t worry; there’s another way to handle it!
Let’s explore an alternative method using Cpanel. It’s a tool that simplifies the management of servers and websites. With Cpanel, you can download your entire media library and have a backup ready. If the first method doesn’t quite fit your needs, the Cpanel method will surely come to the rescue.
Let’s dive into the details and make sure you’re all set to manage your media files like a pro!
Method 2. Download WordPress Media Library via Cpanel
If you’ve been using WordPress for some time, you might be familiar with cPanel. It’s a powerful tool that manages your website and server, offering various functions to help you run your website smoothly.
In cPanel, there’s a useful feature called the “File Manager,” which organizes all your WordPress website files. We’ll use this File Manager to download all the media files from your WordPress website. Don’t worry if your hosting provider uses a different file manager; the process will be similar.
Let’s get started!
Step 1: Log in to your cPanel. For instance, I’m using Hostinger, and their cPanel is called “H-Panel,” but don’t worry, the steps will be the same for you.
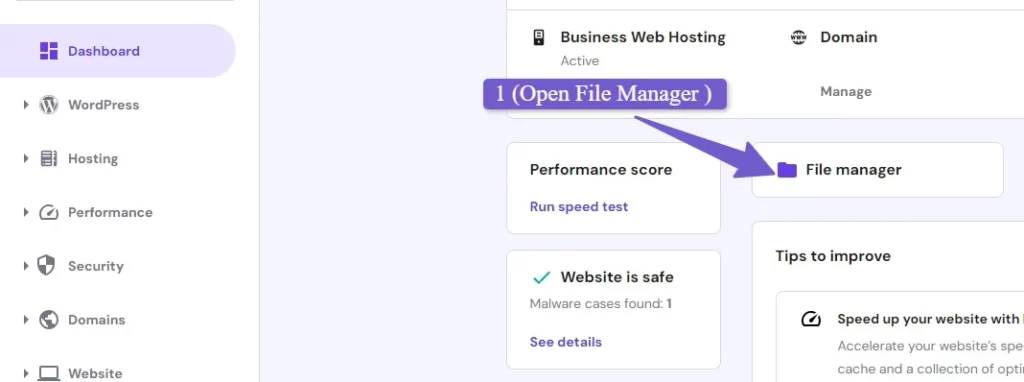
Step 2: Open the “File Manager” in your cPanel.
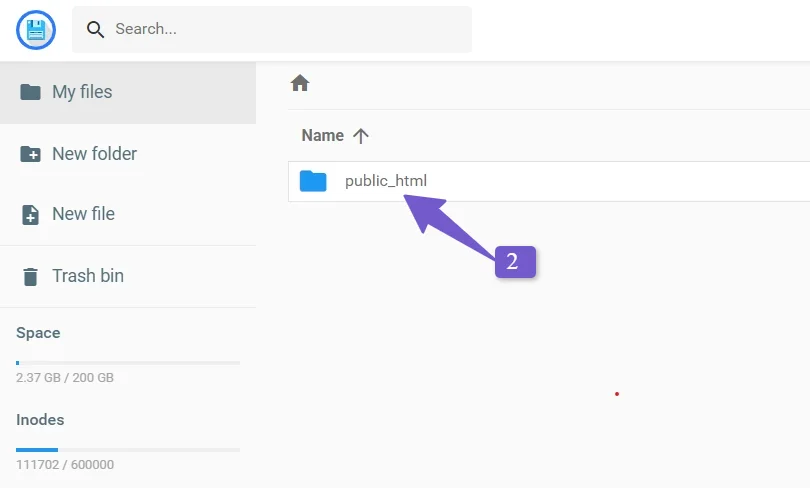
Step 3: Once the File Manager opens, you’ll be in the “public_html” folder. Open it and navigate to “wp-content.”
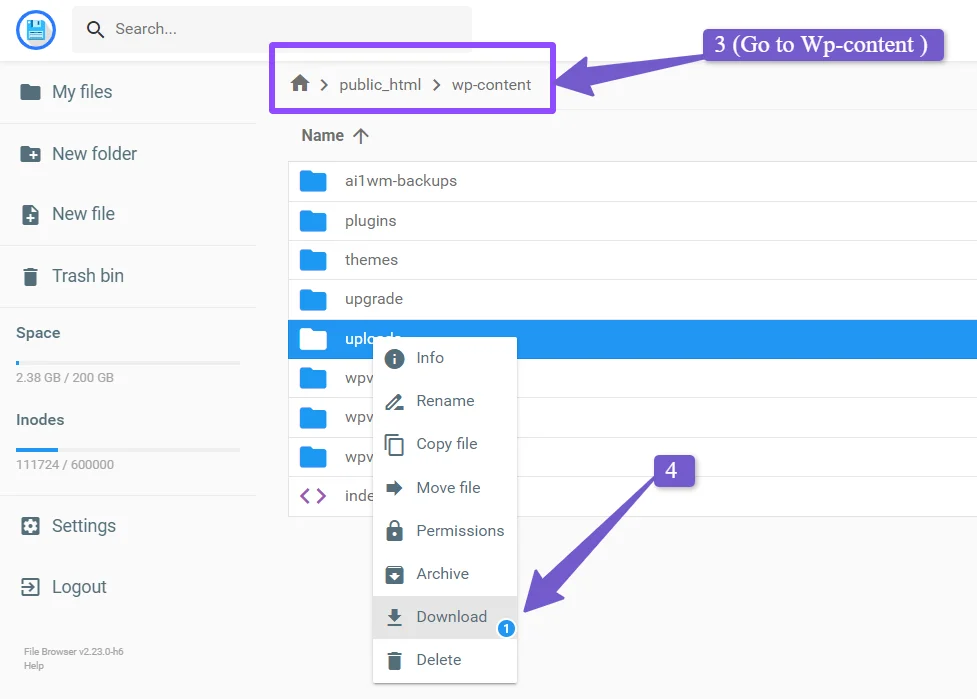
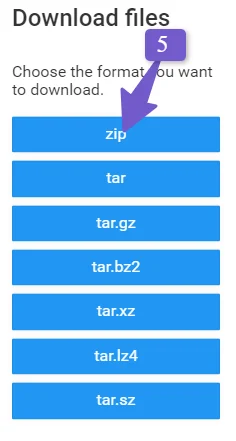
Step 4: Inside “wp-content,” find the “Uploads” folder, right-click on it, and then click “Download.” A pop-up will appear, offering different download formats. Choose “ZIP” from the options.
Step 5: The download will begin. Once it’s complete, you can unzip the downloaded file, and voilà! You’ll have your entire WordPress media library on your local computer.
This method makes it easy to keep a backup of your media files or migrate your website to a new hosting provider without any hassle. Now you have full control over your media assets!
Method 3. Download WordPress Media Library via FTP
If you’re looking for a more advanced way to download your entire WordPress media library, using the FTP method might be the thing! Don’t worry; it may sound technical, but I’ll break it down for you.
FTP (File Transfer Protocol) lets you transfer files faster and more efficiently than the CPanel method. Unlike CPanel, which works through your web browser, FTP works independently and is perfect for larger file downloads. Plus, it’s widely supported by many hosting providers so that you can use it no matter your platform!
But remember, this method might be trickier, so if you’re new to this, consider trying the other methods first.
As I have Hostinger hosting, the interface for you in your hosting will be different, but the process will be the same.
To start:
Go to your hosting provider and find your FTP credentials.
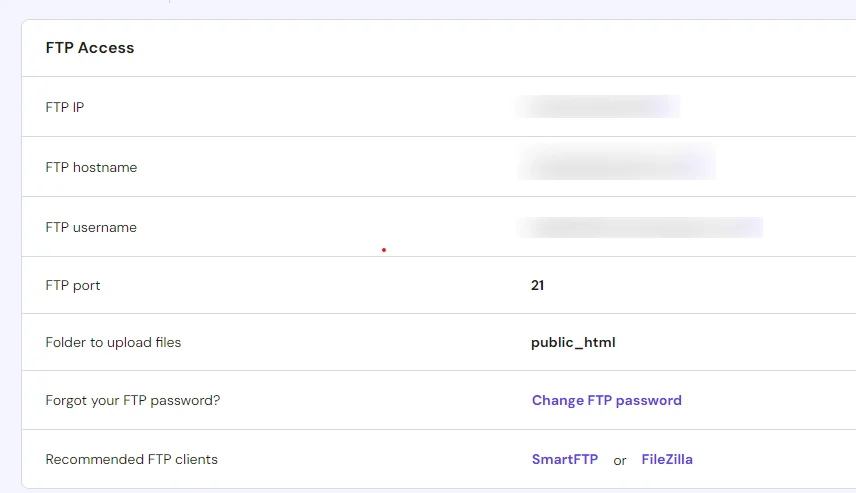
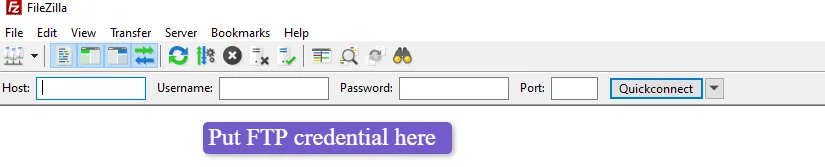
Download a program called FileZilla; it’s free and recommended by WordPress.Once installed, connect FileZilla using your FTP credentials.
Now, you’ll see your local site on the left and the remote site (your hosting) on the right. Head to the “public_html” folder, then find “wp-content.” and there, find the Upload folder and drag it to the local site.
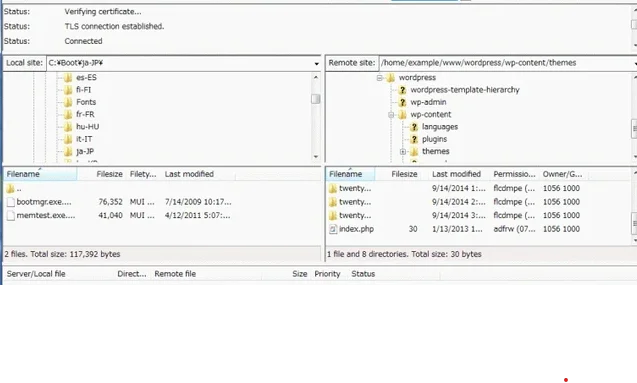
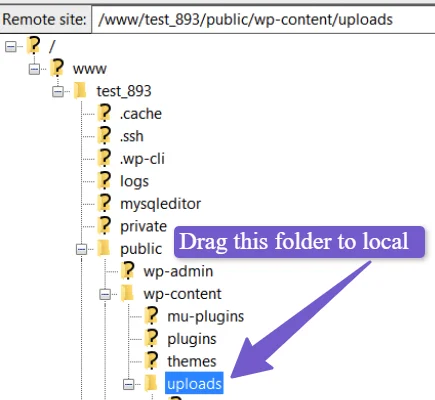
That’s it your wordPress media library will start downloading.
Method 4. Export WordPress Media Library Using WordPress Export
Although, I didn’t recommend downloading the media files using this method as it downloads your images as XML files, which means you will not be able to see what the images look like as it will be the links only.
But this method is in the WordPress settings, so I shared it with your guys. Also, this method works if you have a very small website you have just started and want to move it to some other hosting, then this method will work for you.
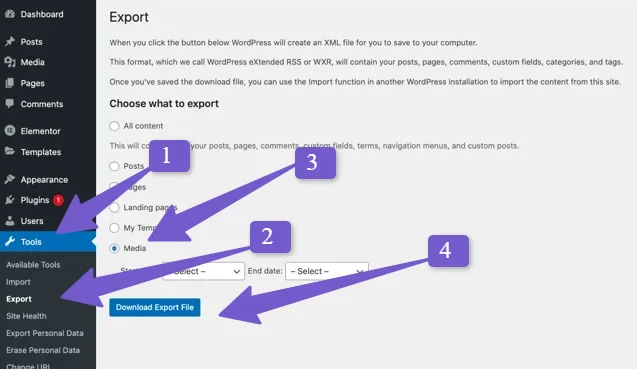
To begin, head over to your WordPress dashboard and go to Tools > Export. Make sure to select the “media” option, as we’re dealing with media files, and then click on “Download Export File.”
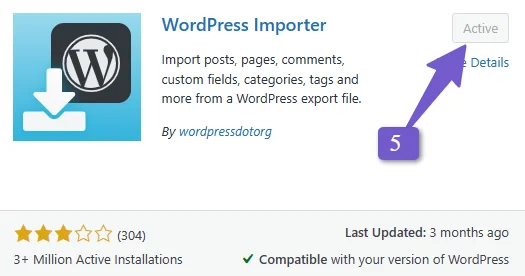
The downloaded file will be in XML format. Now, go to the new website where you want to import the media files. To make this work, you’ll need to install and activate the “WordPress Importer” plugin. You can find this plugin by going to “Plugin” > “Add New” and searching for WordPress Importer
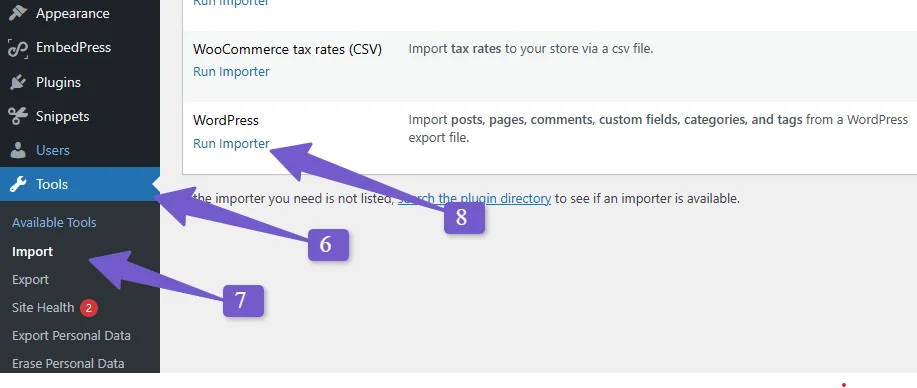
After installing the plugin, go to Tools > Import and click on “Run importer.” In the WordPress Importer settings, click on “Choose File,” and upload the XML file you downloaded earlier. Then, click on “Upload File and Import.“
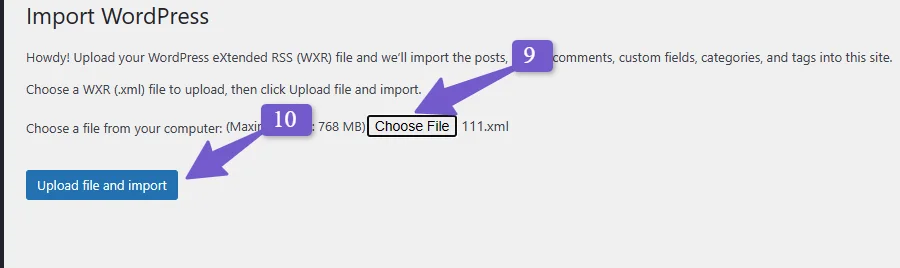
By doing this, all your media files from your old WordPress website will be imported to the new website using the XML file format.
Keep in mind that this method is best suited for smaller websites. For larger websites or if you want to see the images directly, there are alternative methods that might work better for you.
Method 5. Download WordPress BackUp, including the Media Library
If you’re looking to secure your entire WordPress website, including the valuable media library files, Method 5 is the way to go! With this approach, you can create a comprehensive backup that not only safeguards your website but also allows you to extract and manage your media files separately.
Here’s a step-by-step guide to using the WPvivid Plugin for hassle-free backup and restoration:
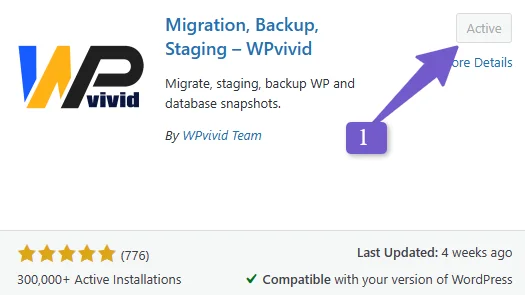
Step 1: Install and Activate the WPvivid Plugin
Head to “Plugins” in your WordPress dashboard, click “Add New,” and search for “WPvivid.” Once you find it, click “Install” and then “Activate” the plugin.
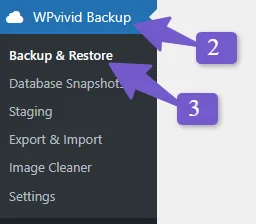
Step 2: Access WPvivid Plugin Settings
After activation, you’ll notice the WPvivid plugin settings on your dashboard’s sidebar. Navigate to “Backup & Restore” to get started.
Step 3: Select Backup Options
In the “Backup & Restore” section, you can choose whether you want a complete website backup (including the database) or just the WordPress files. For this method, we’ll leave it on the default setting to ensure a full backup. Click the “Backup” button to initiate the process.

Step 4: Wait for Completion
The backup time will vary based on the size of your WordPress website; when complete, you will have a download button below. Click on it, and the backup will be downloaded.

Step 5: Extract the Backup
After downloading the backup, extract the files. Inside the extracted backup, locate the “wp-content” folder. There, you’ll find the “uploads” folder containing all your precious media library files.
Tip: This backup can migrate your WordPress website to another hosting provider. Perform a fresh WordPress installation on the new hosting, install the WPvivid plugin, and then upload the backup file.
By following these simple steps, you’ll not only have a reliable backup in case of any unforeseen mishaps but also retain full control over your WordPress media library files for seamless management and organization.
FAQ(Export Media Library WordPress)
How do I download the media library in WordPress?
To download the entire WordPress media library in one go, use the “Export Media Library” plugin. Install and activate the plugin, then go to Media > Export. Choose the “Single folder” or “Nested folder” option and click “Download Zip.” Unzip the file, and you’ll have all your media files saved locally.
Where is the WordPress media library stored?
The WordPress media library is stored within your WordPress installation’s “wp-content/uploads” folder. All images, videos, and other media files uploaded to your website through the dashboard are saved in this location, making managing and accessing your media assets easy.
Is a plugin the only way to download the entire WordPress media library?
While using a plugin like “Export Media Library” is one of the simplest methods, there are other approaches, like using Cpanel or FTP for more advanced users.
How long does the “Export Media Library” plugin take to download the entire media library?
The download time depends on the size of your media library and your website. Smaller media libraries will download more quickly than larger ones.
What if I have a large media library with GBs of files? Will the plugin still work efficiently?
Using FTP or Cpanel methods might be more efficient for large media libraries than relying on the “Export Media Library” plugin.
Conclusion
In the end, downloading your entire WordPress media library becomes so easy with the methods we’ve explored in this guide. No more worries about losing your media files! Whether you choose the easy “Export Media Library” plugin, the handy cPanel or FTP methods, or the comprehensive WPvivid Plugin, every method has advantages, making the export of media library from WordPress seamless.
Backing up your media library is super important! It keeps your files safe and makes website migration smoother. So please don’t waste time doing it manually. Embrace these user-friendly methods and enjoy a well-organized and secure WordPress media library.
Still have any questions, you can ask via comment, and I will be happy to assist you. Thank you