Google has been pushing for a more secure and user-friendly web since 2014 when it announced that HTTPS was a ranking signal. Since then, HTTPS adoption has increased significantly, especially among the top websites.
According to Google Transparency Report, as of November 2023, 95% of the top 100 non-Google sites on the web use HTTPS by default.These 100 sites account for approximately 25% of all website traffic worldwide.
Google Transparency Report
According to W3Techs, 84.5% of all websites use HTTPS by default as of November 2023.
W3Techs
But what are HTTP and HTTPS, and why should you switch to HTTPS for your WordPress website?
In this article, I will answer these questions and show you how to redirect HTTP to HTTPS in WordPress using a plugin or manually, and what to do after the redirection.
What is HTTP and HTTPS?
HTTP
HTTP stands for Hypertext Transfer Protocol. It is a set of rules that defines how data is exchanged between a web browser (Chrome, Safari) and a web server(Web Host where website files are stored).
When you type a web address in your browser, you send a request to the webserver to get the web page you want. The web server responds by sending back the web page data to your browser. This process is done using HTTP.
But Because of the security risk involved with HTTP For example:
- HTTP data is not encrypted and anyone on the same network can see or change it.
- HTTP does not verify the identity of the website you are visiting and you may end up on a fake or malicious site.
- HTTP does not protect the data from being altered or corrupted by attackers.
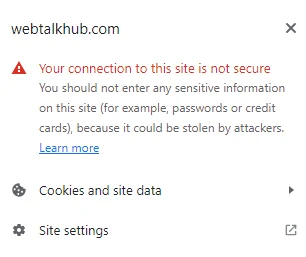
- HTTP websites may be blocked or marked as “Not Secure” by browsers, as shown in the image below.
A new secure Hypertext Transfer Protocol Secure development i-e HTTPS is needed to add an extra layer of protection and trust for web users and owners.
HTTPS
HTTPS stands for Hypertext Transfer Protocol Secure. It is an extension of HTTP that adds an extra layer of security. HTTPS encrypts the data that is sent and received between the web browser and the web server.
This means that no one can intercept or modify the data, even if they have access to the network. HTTPS also verifies the identity of the web server, so you can be sure that you are visiting a legitimate website and not a fake one.
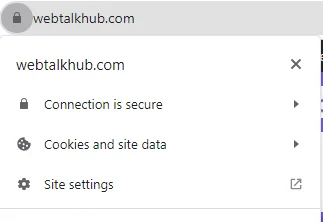
To use HTTPS, websites need to have a special type of certificate that enables encryption and authentication. This certificate is called an SSL/TLS certificate and once installed and configured correctly your site when visited will show a padlock icon next to the web address, as shown in the image below:
How SSL/TLS Certificate Work
SSL/TLS certificates work by using two keys: a public key and a private key. The public key is used to encrypt the data that is sent from the browser to the website, and the private key is used to decrypt the data that is received by the website. This way, only the website can read the data and no one else can access it.
Also, SSL/TLS certificates verify the identity of the website, so you can be sure that you are visiting a real site and not a fake one. This prevents hackers from creating fake websites that look like the ones you trust and tricking you into giving them your information.
The SSL/TLS certificates also ensure that the data is not changed or corrupted during the transfer. This prevents hackers from altering the data or injecting malicious code into the website.
These features of SSL/TLS certificates make HTTPS more secure and reliable than HTTP and protect your data and activity on the web.
Difference Between HTTP and HTTPS
The difference between HTTP and HTTPS is mainly related to security, integrity of data and information, and how they affect the site SEO, here are some of the main differences
| HTTPS | HTTP |
|---|---|
| HTTPS stands for Hypertext Transfer Protocol Secure | HTTP stands for Hypertext Transfer Protocol |
| HTTPS requires an SSL certificate to be installed on the web server, which is issued by a trusted authority and has a unique identity | HTTP does not use any encryption or verification method, and sends the data as plain text |
| Protects the website and the users from man-in-the-middle attacks, where a hacker can intercept, modify, or steal the data | Vulnerable to man-in-the-middle attacks, and any sensitive information such as passwords, credit card numbers, or personal details can be exposed |
| Requires an SSL certificate to be installed on the web server, which is issued by a trusted authority and has a unique identity | HTTP does not require any certificate or identity verification |
| HTTPS displays a padlock icon and the word Secure in the web browser’s address bar, indicating that the connection is safe | HTTP displays a warning icon and the words Not Secure in the web browser’s address bar, indicating that the connection is unsafe |
| HTTPS improves the website’s SEO ranking, as Google and other search engines prefer secure sites and reward them with higher positions in the search results | HTTP lowers the website’s SEO ranking, as Google and other search engines penalize insecure sites and demote them in the search results |
To understand the difference between HTTP and HTTPS in more simpler way let me explain this for you with real-life examples to clear any confusion you have, let’s say you are sending a letter to your friend. If you use HTTP, you write the letter in plain text and put it in an envelope with the address. Anyone who has access to the envelope can open it and read or change the letter.
If you use HTTPS, you write the letter in a secret code and put it in a sealed envelope with the address and a stamp. Only your friend knows the secret code and can open the envelope and read the letter. No one else can tamper with the envelope or the letter.
Why Should You Change to HTTPS?
Google announced that HTTPS is a ranking signal, so this alone should motivate you to switch from HTTP to HTTPS. But this is not the only reason; there is more to it.
HTTPS not only improves your website’s legitimacy in Google’s eyes but also enhances the security of your site and the user data on it. This will increase the user trust in your website, which also covers the E-E-A-T factor: Expertise, Authoritativeness, and Trustworthiness.
Also, many search engines and browsers do not show sites having HTTP so it means if you have HTTPS, you will have peace of mind that your site is displayed on every browser without any issue.
Also Before redirecting from HTTP to HTTPS make sure you have installed the SSL certificate on your hosting for your website nowadays every popular hosting provider gives free SSL certification with their hosting plans which is enabled automatically but you can enable the SSL manually from the hosting.
For a more in-depth guide on WordPress redirects, including various scenarios and tips, you can check our comprehensive guide on %WordPress Redirects.
So, let’s get started with 301 redirect HTTP to HTTPS in WordPress.
Redirecting HTTP to HTTPS in WordPress Using Plugin
One of the easiest ways to redirect HTTP to HTTPS in WordPress is using the Really Simple SSL plugin which I personally recommend. The plugin has 5+ million downloads and the 5-star positive reviews speak for the plugin’s effectiveness in redirecting the HTTP version of your wordpress website to the HTTPS version.
Step 1: Install and Activate Really Simple SSL PLugin
First Install and activate the plugin by going to Plugins > Add New and search for Really Simple SSL. The plugin’s featured image is shown below:

After activating the plugin, you will be automatically taken to the plugin’s settings and a popup will appear as shown below:
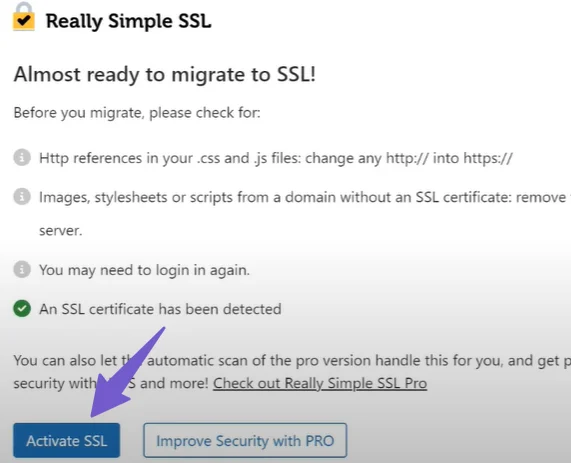
Step 2: Activate the SSL Option
Click on the Activate SSL button on the popup. This will redirect all the HTTP URLs on your site, including images, CSS files, JS files, and other media, to HTTPS and will force HTTPS in wordpress.
After clicking on Activate SSL, the plugin will also redirect the login page to HTTPS and log you out of your WordPress dashboard. You will need to log in again with your credentials.
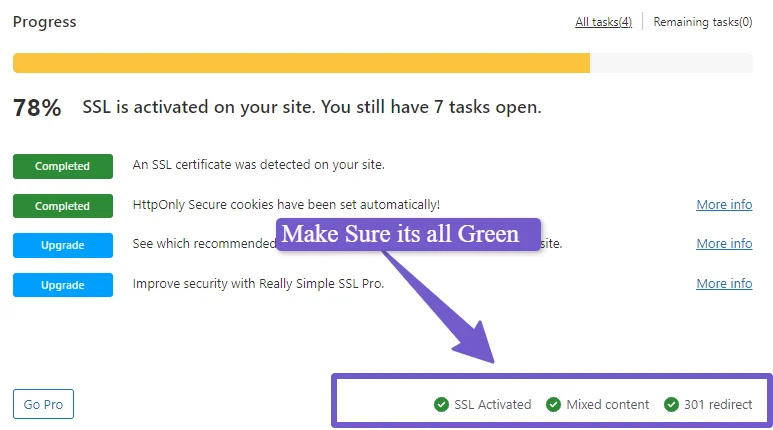
After that Go to Settings > SSL and make sure that all the checkmarks are green. This means that everything is working fine like there are no mixed content issues and warnings.
Step 3: Manually Test HTTP to HTTPS redirection
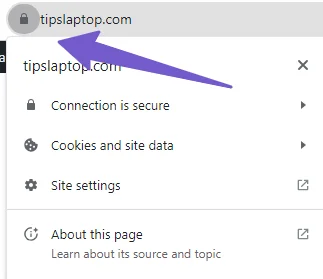
Now also manually verify the redirection by typing the HTTP version of your domain (e.g., http://yourdomain.com) in the address bar. If it is redirected to the HTTPS version and shows you https://yourdomain.com with a lock.
That’s it you have successfully redirected HTTP to HTTPS in wordpress.
Redirecting HTTP to HTTPS in WordPress Manually
If for some reason you don’t want to use a plugin for the redirection of HTTP to HTTPS then you can Try the manual methods in wordpress by modifying files like. htaccess or by using the PHP coding for more advanced users.
Redirect HTTP to HTTPS with .htaccess
For redirecting all HTTP requests to HTTPS using .htaccess Follow the steps below:
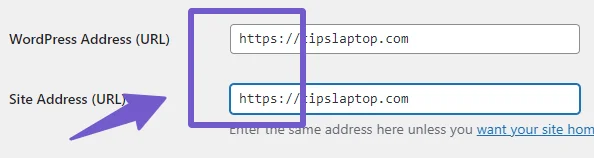
First Go to Settings > General settings in your WordPress dashboard and change the site URL and WordPress address to start with HTTPS, as shown in the image below:
Go to your WordPress files using cPanel or FTP, whichever you prefer. I am using Hostinger as my hosting provider, but the process is the same for any host. In the root folder (public_html) of your WordPress files, you will see a file named .htaccess. If you don’t see it, enable the show hidden file option.
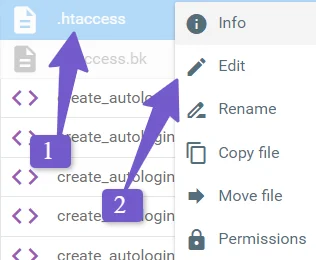
Now Edit the .htaccess file and paste this code at the end:
<IfModule mod_rewrite.c>
RewriteEngine On
RewriteCond %{HTTPS} off
RewriteRule ^(.*)$ https://%{HTTP_HOST}%{REQUEST_URI}
[L,R=301]
</IfModule>
Save the file and refresh your site. You should see a padlock icon next to the address bar, indicating that your site is now using HTTPS.
But what does the code do?
The code you pasted in the .htaccess file tells the webserver to redirect users from HTTP to HTTPS. Here is what each line means:
- The first line turns on a feature that can change the website address.
- The second line checks if the user is visiting the website with a secure or an insecure connection.
- The third line changes the insecure connection to a secure one and tells the user to go to the new address.
By using this code in .htaccess, you can make sure your WordPress site will always load with HTTPS.
Redirect HTTP to HTTPS Using PHP Code
I would not recommend this method for redirecting your HTTP to HTTPS, and I would suggest using the plugin or sitewide .htaccess method instead. However, if you have some specific need, you can use PHP coding to achieve this.
The only drawback of this method is that the code should be present on every page you want to redirect, which for large websites will be very difficult to implement and also increase the chances of error. That’s why it is a good practice to first backup your WordPress site before making any changes to files, so in case anything goes wrong, you have a backup to recover your site.
The code to be pasted on the page is given below:
< ?php function redirectTohttps()
{
  if($_SERVER['HTTPS']!=”on”)
  { $redirect= “https://”.$_SERVER['HTTP_HOST'].$_SERVER['REQUEST_URI'];header(“Location:$redirect”); }
} ?>
For this to work, the SSL should be installed and activated on the server.
And that’s it, you are done adding the HTTP to HTTPS redirect using the PHP code. This is only for coding folks, beginner WordPress users should use the plugin or .htaccess method, but preferably the plugin.
What to do after HTTP to HTTPS Redirection
After redirecting your site from HTTP to HTTPS, there are some important steps that you need to take to ensure that everything is working properly and that you are not missing out on any SEO benefits.
Many users make the mistake of not adding the new HTTPS version of their URL in Google Search Console and Google Analytics, and not submitting the new sitemap with the HTTPS URLs. Let’s go over these major changes that you need to make after redirecting your entire site from HTTP to HTTPS.
Add the HTTPS version of your site to the Google Search Console
If you have verified your website in Google Search Console by using the domain method, then you don’t need to do anything as it automatically tracks all the traffic from both HTTP and HTTPS. But if you have verified your website using the HTTP prefix method in Google Search Console, then you have to add a new property for the HTTPS version, which is simple to do.
Go to your Google Search Console and click on your domain in the upper left corner and it will open a dropdown as shown below:
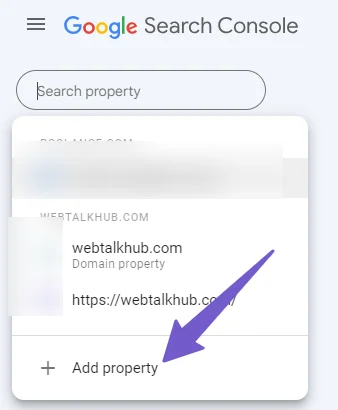
Now click on the add property and there add your full website URL with HTTPS and verify it. If you don’t know how to verify it, you can follow our guide on adding Google Search Console in WordPress.
Once you are done, the HTTPS version traffic will now be tracked in Google Search Console.
Add the HTTPS version of your site in Google Analytics (GA4)
After changing your site to HTTPS, you will also need to change this in Google Analytics (GA4) so that your website traffic for the HTTPS version is tracked. If it is not set up, then you will miss the analytics data and it is very easy to do.
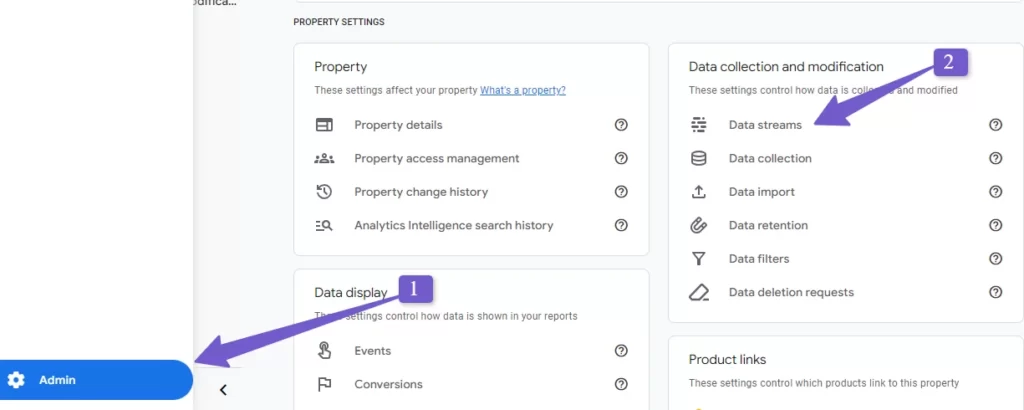
Go to your Google Analytics account and then in the lower left corner click on admin. It will open the settings menu. There click on data streams.
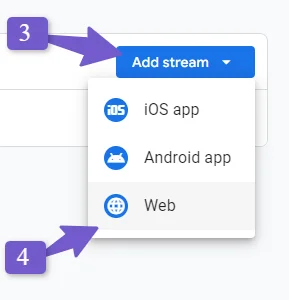
Then click on the add stream button. It will open a dropdown. Select the web option from it and now paste your website URL without any protocol. From the website URL option, select the HTTPS version as shown in the image below:
So now you have successfully done the integration of your new HTTPS version of your website in Google Analytics and all the HTTPS users will be tracked in your analytics now.
Resubmit Sitemap in Google Search Console
This is also one of the major mistakes that many people make of not submitting their new sitemap in Google Search Console after redirecting their site from HTTP to HTTPS.
Because of this Google will still crawl the old sitemap with HTTP links so it’s not a good practice for SEO and it’s better to give Google the new fresh Sitemap with HTTPS links.
So that’s why it is an important step after redirecting HTTP to HTTPS to submit the newly updated sitemap in Google Search Console.
If you are using an SEO plugin like Yoast or Rank Math, then generating the new sitemap is easy after redirecting to HTTPS. Just go to the plugin sitemap settings and click save changes. It will automatically generate the new sitemap. Then after that, paste the new sitemap into Google Search Console as shown below:

Once the new sitemap is added, remove the old sitemap.
Update Disavow File in Google Search Console
If your site was a victim of a negative SEO spammy link attack and you have submitted the disavow link.txt file in your search console, after redirecting to the HTTPS version you will have to re-submit the file again for the HTTPS version of your site.
For this, go to Google Disavow Link Tool select the HTTPS version of your website, and upload the disavow link file for the HTTPS version and you are done.
Note : If you didn’t disavow backlinks in your previous HTTP version, you can skip this step.
FAQ (HTTP to HTTPS Redirection)
Below are some most common faqs related to HTTP to HTTPS Conversion.
Do I need to update all internal and external links on my site to use HTTPS after the migration?
It’s a good practice to update all internal links within your website to use HTTPS to ensure a consistent and secure browsing experience which a really simple SSL plugin automatically does in wordpress. However, for external links to other websites, you don’t have control over their protocols. Most modern websites will automatically redirect to their HTTPS versions if available, so there’s usually no need to manually update external links.
Are there any potential issues or side effects when switching from HTTP to HTTPS on a WordPress site?
Yes, there can be a few issues that may arise during the transition. One common problem is mixed content, where some elements on your site (like images or scripts) are still loaded over HTTP. This can lead to browsers displaying warnings to users but it can fixed using the really simple SSL plugin or by modifying your .htaccess file in wordpress.
Conclusion
As we have discovered, approximately 85% of websites, according to W3Techs, have adopted HTTPS. Google now penalizes sites without HTTPS and SSL certificates. If your site lacks an SSL certificate, follow this guide to install a Let’s Encrypt’ SSL certificate and make the switch from HTTP to HTTPS. and improve your site’s credibility and trust from the user’s perspective and for the Google algorithm.
In this guide, we have learned all about HTTP and HTTPS their redirection process, and how important this is for your site SEO and Security.
But Still, if you have issues doing the redirection from the HTTP version to HTTPS then you can ask me via comment and I will assist you further.