Have you ever encountered a situation where you want to change the URL of a page or post on your WordPress site, but you don’t want to lose the traffic or SEO ranking of the old URL? Or maybe you want to redirect your visitors to a different page or site after you have relocated content from the old URL? If so, you need to learn how to use WordPress redirects.
In this guide, I will explain what WordPress redirects are, there types, how they work, and how to use them effectively. By the end of this guide, you will know everything about redirection in WordPress.
What is a Redirect in WordPress
WordPress redirects are a way of telling your browser or server to send your visitors to a different URL than the one they requested.
For instance, suppose you want to update the URL of a blog post from https://domain.com/old-post/ to https://domain.com/new-post/. You can use a redirect to make sure that anyone who visits the old URL will be automatically taken to the new one.
This way, you can preserve the traffic and SEO ranking of the old URL, and prevent your visitors from encountering a 404 error page when they follow the old link.
Types of Redirects
Here are the primary types of redirects you can implement in WordPress:
301 redirect:
301 is a permanent redirect that tells the browser or server that the requested URL has moved to a new location permanently. This type of redirect is useful when you want to change the domain name of your site, or update the URL structure of your content.
A 301 redirect also passes most of the SEO value of the old URL to the new one, which helps you maintain your ranking and authority.
302 redirect:
302 is a temporary redirect that tells the browser or server that the requested URL has moved to a new location temporarily. This type of redirect is useful when you want to test a new page or site, or when you want to redirect your visitors to a different page for a short period of time, such as during maintenance or a promotion.
A 302 redirect does not pass any SEO value of the old URL to the new one, which means that the old URL will still be indexed by search engines and shown in the search results.
For better Comparison you can checkout this table on 301 vs 32 redirects
307 redirect:
307 is also temporary redirect that tells the browser or server that the requested URL has moved to a new location temporarily, but the method and body of the request should not be changed.
This type of redirect is useful when you want to redirect your visitors to a different page without losing any data or information that they have submitted, such as in a form or a login. A 307 redirect does not pass any SEO value of the old URL to the new one, just like a 302 redirect.
303 and 308 Redirects:
303 and 308 redirects are less common in most WordPress scenarios and are typically used in specific situations. For most WordPress users, the choice is usually between 301 and 302 redirects.
Meta refresh:
This is a type of redirect that is executed by the HTML code of the page, rather than by the browser or server. Meta refresh is useful when you want to redirect your visitors to a different page after a certain amount of time, such as a few seconds or minutes.
A meta refresh can also display a message to your visitors before redirecting them, such as “You are being redirected to a new page. Please wait.” It does not pass any SEO value of the old URL to the new one, and it can also affect your site performance and user experience.
Here is the example code for redirecting visitor another URL after 3 seconds:
<meta http-equiv="refresh" content="5; url=https://domain.com/">
HTTP to HTTPS:
This is a type of redirect that forces browsers to display the HTTPS version of a page. HTTPS is a secure protocol that encrypts the data between your website and your visitors, while HTTP is an insecure protocol that can be intercepted or modified by hackers.
To use HTTPS, you need to have a valid SSL certificate installed on your web server. For more information, you can check out our guide on How to Properly Move WordPress from HTTP to HTTPS.
Server-Side vs Client-side Redirect:
You should also understand that these redirects can be done from Server-side or Client-side.
Server-side redirects are executed by the web server before the page is loaded, and they are faster and more SEO-friendly. Server-side redirects include 301, 302, 303, 307, and 308 redirects.
On the other hand Client-side redirects are executed by the browser after the page is loaded, and they are slower and less SEO-friendly. Client-side redirects include meta refresh and JavaScript redirects, etc.
When to Use redirects in WordPress
Before you start using redirects in WordPress, you should be familiar with the scenarios where they are appropriate and beneficial. Redirects are not meant to be used for everything, as they can have some drawbacks and limitations, like they slow down your site performance, confuse your visitors, and cause SEO issues if not done correctly.
Common Error Scenarios to use Redirects:
- 404 Error: This error means the page is not found. You can redirect the visitors to a related page that exists on your site. You can also create a custom 404 page that helps the visitors find what they are looking for.
- 403 Error: This error means the access is forbidden. You can redirect the visitors to a login page or a contact page where they can get authorized. You can also create a custom 403 page that explains the reason for the error and provides some options to the visitors.
- 500 Error: This error means the server has an internal problem. You can redirect the visitors to a maintenance page or a home page where they can see something else. You can also create a custom 500 page that apologizes for the inconvenience and asks the visitors to try again later.
Other Example Scenarios:
- Domain Migration: When the site is moved to a new domain, visitors from the old domain are redirected to the new one, without losing any traffic or SEO benefits.
- Marketing Purpose: Creating short or custom URLs for marketing or branding purposes.
- HTTP to HTTPS: When you move a website from HTTP to HTTPS.
- Security Purpose: Protecting your site from spam or malicious attacks.
- Improving Conversions: You want to enhance your user experience and conversion rate, such as by redirecting the visitors to a landing page that matches their location, language, or device, or by redirecting them to a thank you page after they complete a form or a purchase.
3 Ways to Create Redirects in WordPress
Now that you are well aware of the types of redirects and the scenarios where to use the right redirect, let me show you how to create redirects in WordPress.
Since there are different methods that you can use to set up redirects in WordPress, depending on your needs and preferences, so lets look at each in detail starting from the simplest one to the more advanced one.
1) Using Plugin To Create Redirect
One of the easiest ways to create redirects in WordPress is by using a plugin. A plugin lets you create and manage redirects from your WordPress dashboard, without any technical skills or server access.
You can also monitor and track the redirects, choose the type of redirect, and create conditional redirects based on various criteria. There are many plugins that can help you create and manage redirects in WordPress, such as Redirection, Yoast SEO, Rank Math, All in One SEO.
I will use the Redirection plugin, which is most popular and has a similar working process to other plugins, so follow these steps to apply redirect:
Steps to follow for Redirection Plugin:
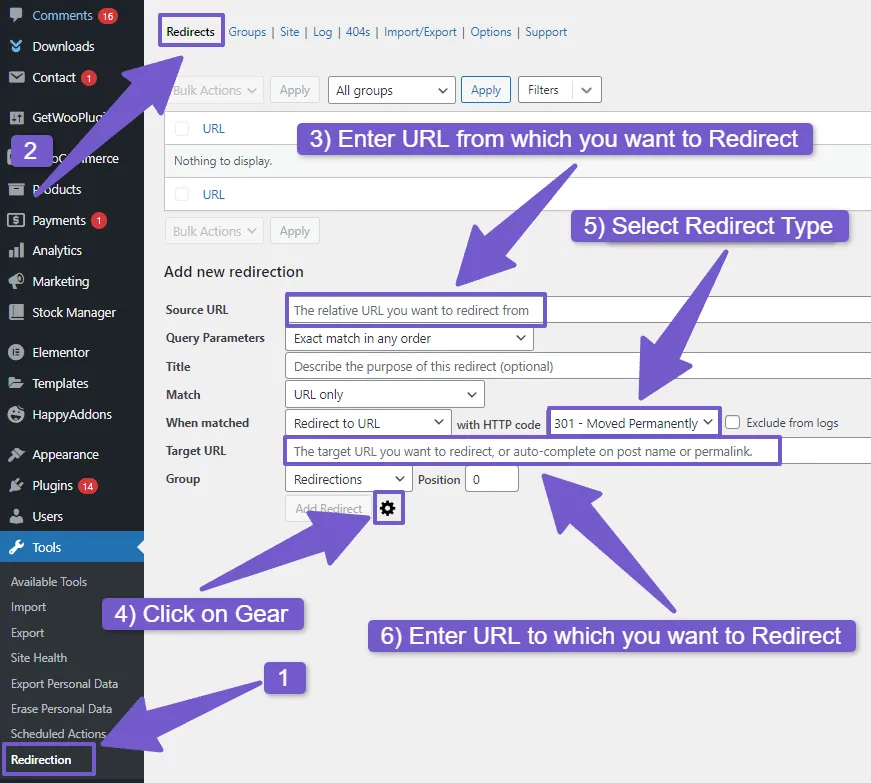
- Go to your WordPress dashboard and navigate to Plugins > Add New. Search for Redirection and then install and activate it.
- Then Go to your Dashboard > Tools > Redirections > Redirects. On this page you will see two input fields:
- Source URL: Enter the URL of the original page that you want to redirect.
- Target URL: Enter the URL of the new page that you want to redirect to.
- Click on the gear icon below the target URL, next to close button. This will open more options for the redirection.
- In the When Matched field, select Redirect to URL from the first dropdown and the redirect code from the second dropdown. You can choose from 301, 302, 307, or 308 redirects, depending on your needs and preferences.
- Click on Save Redirect and that’s it, you have now successfully created a redirect in WordPress using the Redirection plugin.
Well, I as mentioned earlier that there are many plugins that can help you with redirects in WordPress, but I can’t show you all of them in this guide. That would make it too long. But don’t worry, I have them discussed here in separate guide on best redirection plugins you can use in WordPress.
2) Using .htaccess File To Create Redirect in WordPress
Another way to create redirects in WordPress is by using the .htaccess file. This is a more advanced method that requires you to edit the .htaccess file, which is a configuration file that controls the behavior of your web server.
Editing the .htaccess file can be risky, as a small mistake can cause your site to stop working. Therefore, you should always backup your .htaccess file or entire site before making any changes.
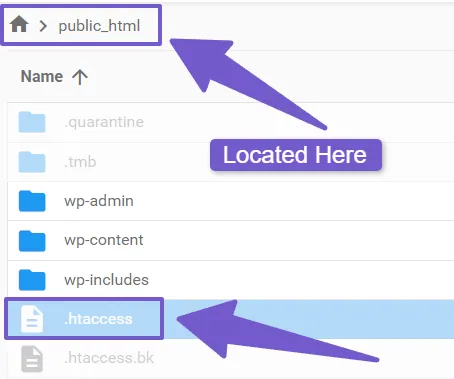
To create a redirect using the .htaccess file, you need to first access it from your WordPress installation( Login to your hosting > File Manager or C-panel then File Manager > Public_html > here locate .htaccess file ) and add a line of code either at the beginning or end of the file.
The general syntax for creating a redirect in .htaccess file is:
Redirect [redirect-code] [source-url] [target-url]
Now let me give you the code for all types of Redirects:
Code for 301 Redirect:
If you want to redirect a page in WordPress through 301 redirect from http://example.com/old-page to http://example.com/new-page, you need to add this line of code to your .htaccess file:
Redirect 301 /old-page /new-page
Note: You only need to specify the relative paths of the URLs, not the full URL.
RedirectMatch 301 ^(.*)$ http://example.net$1
Or If you want to redirect all pages that contain the word blog to a new page, you can do it with this code:
RedirectMatch 301 /blog(.*) /new-page-url
Code for 302 Redirect
To create a 302 redirect, you need to use the 302 code:
Redirect 302 /old-page /new-page
HTTP to HTTPS Redirect
To create an HTTP to HTTPS redirect, you need to use the RewriteEngine directive to enable the rewriting module followed by the RewriteCond directive to check if the request is using HTTP, and then the RewriteRule directive to rewrite the request to HTTPS.
For example, if you want to redirect all pages from http://domain.com to https://domain.com, you need to add these lines of code to your .htaccess file:
RewriteEngine On RewriteCond %{HTTPS} off RewriteRule ^(.*)$ https://%{HTTP_HOST}%{REQUEST_URI} [L,R=301]
Old Domain to New Domain Redirect
To create an old domain to new domain redirect, you need to use the RedirectMatch directive with the 301 code, followed by a regular expression that matches any request from the old domain and then the new domain with the captured request.
For example, if you want to redirect all pages from http://domain.com to http://domain.net, you need to add this line of code to your .htaccess file:
RedirectMatch 301 ^(.*)$ http://domain.net$1
Or If you want to redirect all pages that contain the word blog to a new page, you can do it with this code:
RedirectMatch 301 /blog(.*) /new-page-url
Code for WWW to Non-WWW Redirect:
A WWW to Non-WWW redirect is a redirect that changes the subdomain of your site from www to non-www, or vice versa. This is useful when you want to have a consistent URL for your site and avoid duplicate content issues.
For example, if you want to redirect all pages from http://www.domain.com to http://domain.com, you need to use this code:
RewriteEngine On RewriteCond %{HTTP_HOST} ^www\.old-domain\.com$ [NC] RewriteRule ^(.*)$ http://old-domain.com/$1 [L,R=301]
3) Using PHP code to redirect visitors:
This is a complex method and you should avoid using it if you are a beginner and should use the plugin method instead. However, this method is very useful if you want to apply conditions to redirect visitors based on various criteria, such as user role, query string, post type, or date.
This method requires you to edit the functions.php file of your theme. Editing the functions.php file can also be risky, as a small mistake can cause your site to stop working so backup your site.
Now to create a redirect using PHP code, you need to use the wp_redirect() function, which is a function that redirects the user to a specified URL.
You can use different redirect codes here, just change from 301 to any other type:
function custom_redirects() {
$request_uri = $_SERVER['REQUEST_URI'];
// Example: Redirect from "/old-page" to "/new-page" and change status code too accordingly
if ($request_uri === '/old-page') {
    wp_redirect('/new-page', 301);
    exit();
}
// Add more redirect rules as needed
}
add_action('template_redirect', 'custom_redirects');
However you can also add various conditions such as if you want to redirect all subscribers to a special page, you can use this code in the above function we created:
if ( is_user_logged_in() && current_user_can( 'subscriber' ) ) {
 wp_redirect( 'http://domain.com/special-page', 301 ); }
Best Practices to Use Redirects in WordPress
Redirects can help you improve your site performance, user experience, and SEO ranking, but they can also cause problems if not used correctly, so here are some best practices to use redirects in WordPress effectively and safely.
Use 301 redirects for permanent changes and 302 redirects for temporary changes
The type of redirect you use depends on the nature of the change you want to make. If you want to permanently move a page or a site to a new URL, you should use a 301 redirect. This will tell the browser or server that the old URL is no longer valid and that the new URL is the correct one.
On the other hand, if you want to temporarily move a page or a site to a new URL, you should use a 302 redirect which this will tell the browser or server that the old URL is still valid and that the new URL is only a temporary alternative.
Check detailed comparison between 302 vs 302 here in this section
You should avoid using other types of redirects, such as 303, 307 or 308, unless you have a specific reason to do so. These redirects are less common and more technical, and they can cause confusion or errors if not implemented properly.
Use redirects sparingly and only when necessary
Use redirects sparingly and only when necessary. Too many redirects can slow down your site and confuse your visitors and search engines.
Test your redirects before and after implementing them
Redirects are not always straightforward and predictable. Sometimes, they can cause unexpected errors or loops that can harm your site functionality and SEO ranking. Therefore, you should test your redirects before and after implementation, to make sure they work properly and do not cause any issues.
Monitor your redirects regularly and update them as needed
You should monitor your redirects regularly and update them as needed to ensure that they are still relevant and effective. Check for any issues or warnings related to your redirects using tools like Google Search Console or Bing Webmaster Tools.
Use relative URLs instead of absolute URLs when possible
A relative URL is a URL that does not include the domain name, such as /new-post/. An absolute URL is a URL that includes the domain name, such as https://domain.com/new-post/. Using relative URLs can make your redirects more flexible and easier to manage, especially if you change your domain name or move your site to a different server.
For example, if you use a relative URL to redirect /old-post/ to /new-post/, you do not need to change anything if you have changed your domain name from domain.com to domain.net. The redirect will still work, as it is based on the path of the URL, not the domain name.
However, if you use an absolute URL, you will need to change the redirect when you changed domain name of your site. Therefore, you should use relative URLs instead of absolute URLs when possible, to make your redirects more adaptable and maintainable.
FAQ( Guide on WordPress Redirections )
To help you understand and use WordPress redirections better, I have answered some of the most common questions on this topic asked on various platforms and forums:
Why are redirects necessary in WordPress?
Redirects are essential for various reasons, such as fixing broken links, preserving SEO rankings when changing permalinks, managing site migrations, and ensuring a seamless user experience by directing visitors to the right page and right content.
What is a wildcard redirect, and when should I use it?
A wildcard redirect is a redirect that matches and redirects any URL matching a specified pattern. It is useful when you want to redirect multiple pages or URLs that follow a similar structure. For instance, redirecting all old blog post URLs to their new counterparts.
Can I set up redirects without using plugins?
Yes, you can set up redirects manually without using plugins and one common method is by editing the .htaccess file in your WordPress installation( File Manager ). However, this requires technical knowledge, and a safer alternative for beginners is to use a plugin for a more user-friendly experience.
Can I redirect individual pages or entire websites?
Yes, you can redirect individual pages, multiple pages, or even entire websites and the method varies depending on your needs. Plugins often allow easy management of individual redirects, while server-level configurations are more suitable for broader redirections like domain redirects etc.
How do I check if my redirects are working correctly?
After setting up redirects, test them by visiting the old URLs and ensuring they lead to the intended destination which you have given. Else you can also use online tools or browser extensions to check for HTTP status codes and ensure that redirects are implemented correctly.
Is there a way to track the performance of my redirects?
Many redirect plugins provide the feature to track the performance of your redirects. They often include options for monitoring click-through rates, tracking the number of times a redirect is used( Hits ), and providing insights into user behavior.
Do redirects affect SEO?
Redirects can impact SEO, especially if not implemented correctly. For example: Using 301 redirects for permanent changes is generally SEO-friendly, as search engines will transfer the SEO value from the old URL to the new one.
However for a permanent change, you used a 302 redirect, it will affect SEO since 302 is only for temporary redirect purpose. So incorrect implementation and also the excessive redirects can have negative effects, so it’s crucial to handle them carefully.
Do redirects slow down my website?
Properly configured redirects generally have a negligible impact on website speed. However, excessive redirects or misconfigurations can contribute to slower load times, so It’s essential to keep your redirects organized and remove unnecessary ones.
Conclusion
I hope this guide has helped you learn how to use redirects in WordPress effectively. Redirects are essential for maintaining your SEO rankings, delivering a smooth user experience, and keeping your website fresh. By selecting the appropriate redirect type and using plugins or manual code edits, you can manage your WordPress website redirects with ease.
Make sure to use redirects wisely and test them carefully to avoid any problems. If you have any questions or feedback, please let me know in the comments section and I will reply you as soon as possible.